DNS Source | Edit on
LAB: F5 DNS Cloud Service & F5 DNS Load Balancer Cloud Service
Table of Contents
- LAB: F5 DNS Cloud Service & F5 DNS Load Balancer Cloud Service
- Introduction
- Pre-Requisites
- Lab Environment Overview
- Lab Environment Setup / Validation
- F5 DNS Cloud Service - UI
- F5 DNS Cloud Service - API
- F5 DNS Load Balancer Cloud Service - UI
- 1. Create F5 DNS Load Balancer Cloud Service
- 2. Add Single Endpoint, Health Monitor, Pool and Default Geoproximity Rule
- 3. Add Multiple Ednpoints to Load Balanced Pool & Test
- 4. Add Europe Region & EU Endpoint with Corresponding Geoproximity Record
- 5. Duplicate Load Balanced Record using JSON through the UI
- 6. Delete DNS Load Balancer Service
- F5 DNS Load Balancer Cloud Service - API
- Clean Up
Introduction
Welcome to the F5 Cloud Services lab that covers DNS and DNS Load Balancer services. This lab will take you through the setting up, configuration, updates, and removal of the F5 Cloud Services that provide DNS capabilities. You will be using both browser-based UI of the F5 Cloud Services platform, as well as the declarative API, which is available to do all of the things the UI does, and more!
In the process of this lab you will learn how to:
- Set up a DDoS-protected secondary DNS service
- Retrieve and review the zone file retrieved from the primary DNS (we will provide you with a primary DNS and a zone just for you!)
- Set up Anycast network-backed load balanced DNS record
- Add and update application endpoints and a load-balancer pool
- Configure, update, and test geoproximity rules, and
- Have fun working with UI and APIs!
Pre-Requisites
- Any modern browser: for working with the UI (and this document)
- Postman: for working with the API of the F5 Cloud Services
- Opera browser: for simulating geo-location specific traffic
- Any text editor: for duplicating Load Balanced Record
IMPORTANT NOTE: If you originally signed up for F5 Cloud Services through a Limited User invitation (such as an email invite from another lab or from a different account owner), then it is possible that you haven’t yet completed a full registration.
You can quickly tell if you have a full account by looking at your account(s) in the F5 Cloud Services Portal. If you do now see any “Accounts you own:” and only see “Accounts you’ve been granted access to” as a “Limited User”, then you will need to create a full account / update user info before you can proceed with this lab. You can do so in the step 4(c) below via the F5 Cloud Services API using the Postman request titled “Set User Info (optional)”, the details of which are outlined below after the Login.
Lab Environment Overview
1. APIs and Services
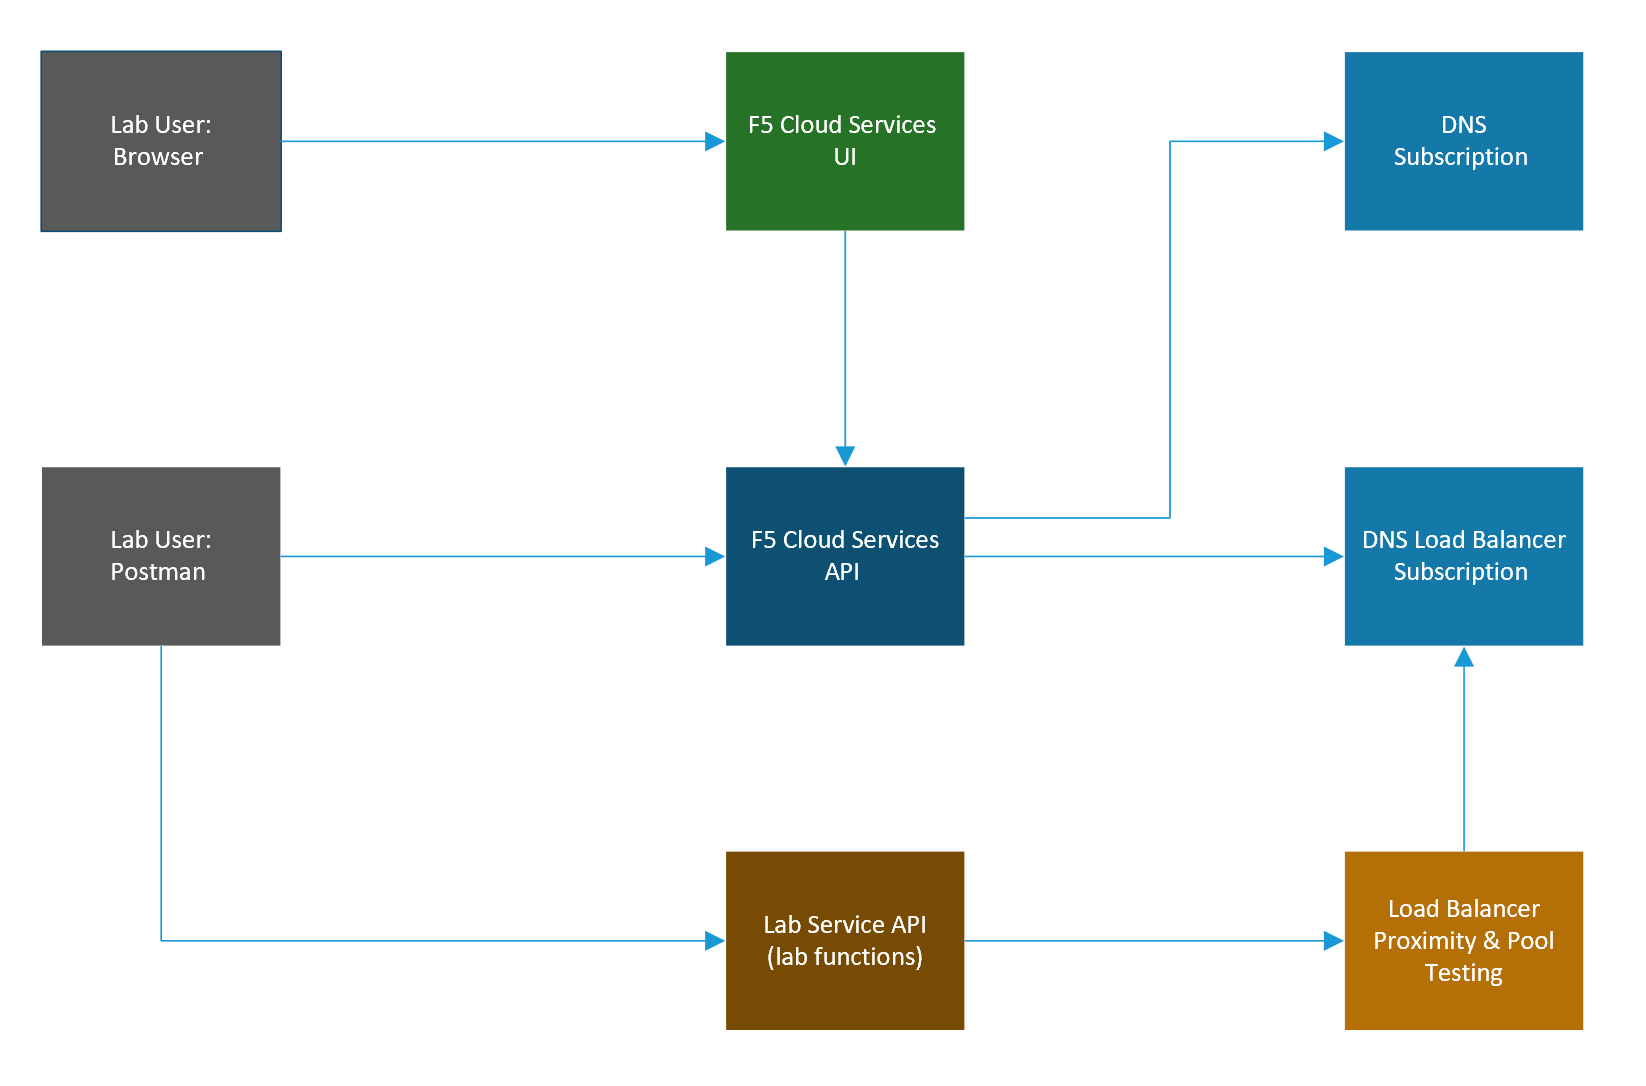
This Lab utilizes standard F5 Cloud Services API, as well as a Lab Service API, which was custom-built just for executing this lab:
- F5 Cloud Services API: create, use, and remove the services in the scope of this lab
- Lab service API: facilitates auxiliary functions for the lab only: creating DNS entries, sending targeted requests & traffic to the apps/services, etc.
The following diagram captures the core components of this Lab:
2. Application Scenario
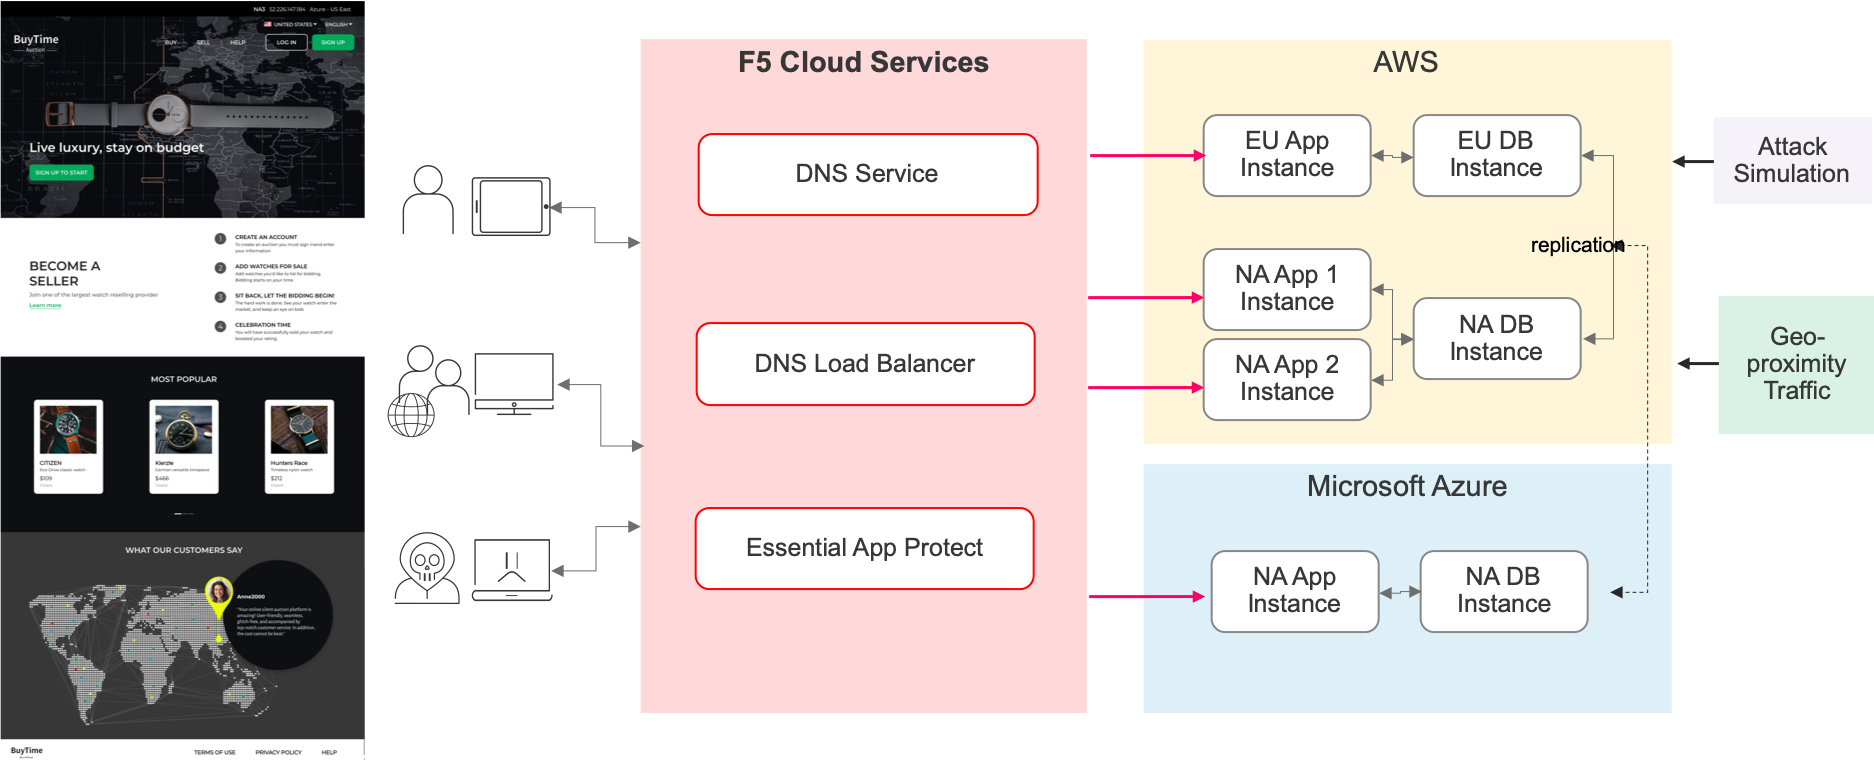
In order to fully explore the capabilities of F5 Cloud Services, you will be able to use an existing application with a set of live instances across different clouds and geographic locations. This app is “BuyTime Auction”, a fictitious multi-instance deployment that helps to simulate a globally deployed app topology. Unsurprisingly, performance, global availability, zero downtime, and security are critical for this application, while the app Developers & DevOps are used to consuming app infrastructure as-a-Service.
The following are the demo application instances, some of which will be utilized in the scope of this lab:
| Name | Geography | Cloud/Region | IP | URI |
|---|---|---|---|---|
| NA1 | North America | AWS - US East (N. Virginia) | 34.229.48.248 | http://na1-auction.cloudservicesdemo.net/ |
| NA2 | North America | AWS – US East (N. Virginia) | 318.232.64.254 | http://na2-auction.cloudservicesdemo.net/ |
| NA3 | North America | Azure – US East | 13.82.106.211 | http://na3-auction.cloudservicesdemo.net/ |
| EU | Europe | AWS – Europe (Frankfurt) | 3.122.191.227 | http://eu-auction.cloudservicesdemo.net/ |
The following diagram is a simplified architecture of the Auction application:
Lab Environment Setup / Validation
1. F5 Cloud Services Portal
a) Login
In order to use F5 Cloud Services, you need to be logged in with a valid user account. If you need to sign up, or if you already have one, proceed to the F5 Cloud Services portal.
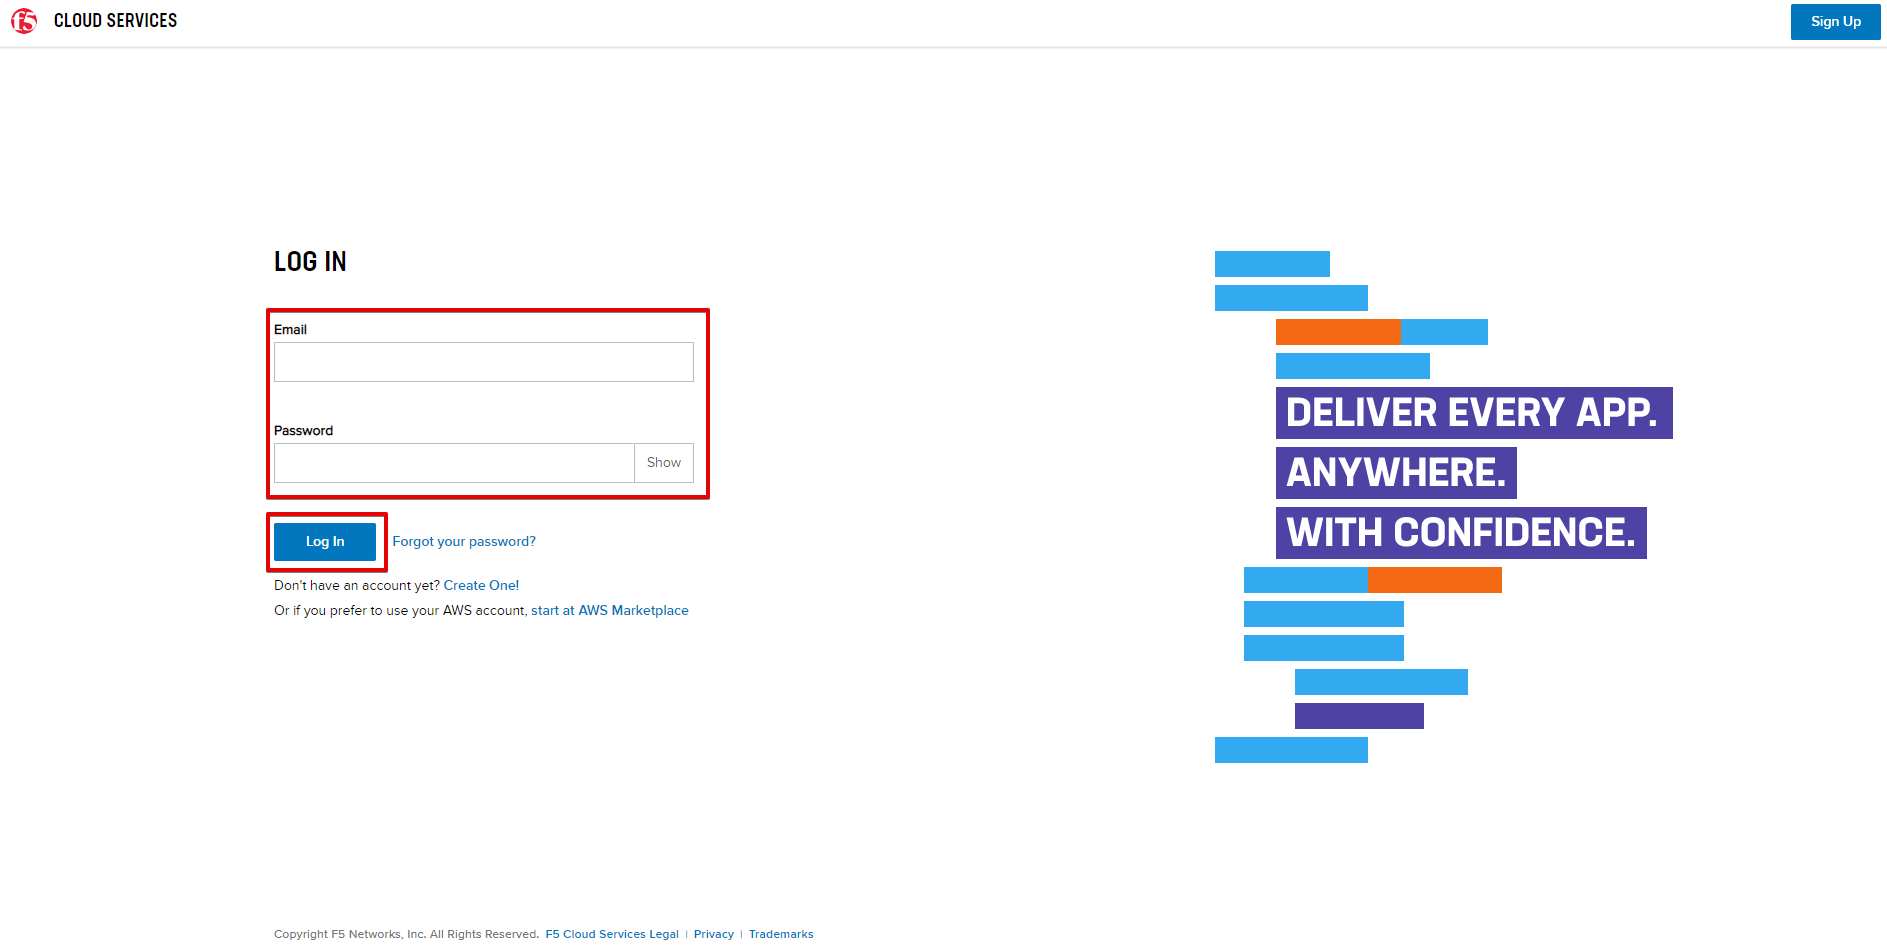
Once you’ve logged in with an account, you will be using the user name and password values in the lab to authenticate with the F5 Cloud Services and the API.
b) Subscribe to Catalogs
In order to access specific F5 Cloud Services, you need to subscribe to the corresponding service catalogs.
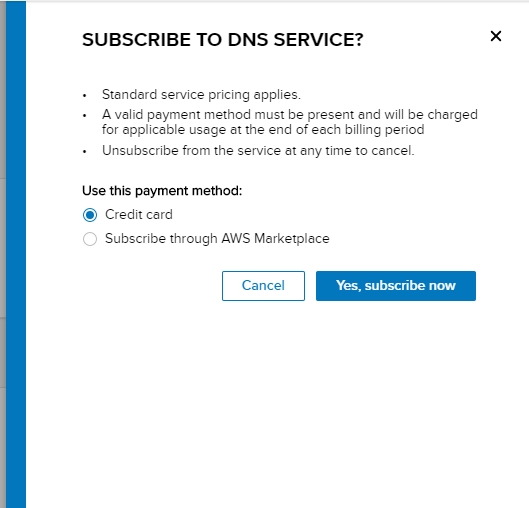
1. Click on the Your F5 Cloud tab in the left navigation panel and you will see the available service catalogs, as well as the services you have subscribed to, if any. For this lab you will need to click Subscribe to DNS and DNS Load Balancer services.

2. For the purposes of the lab you can utilize the Free Tier for both the DNS and DNS Load Balancer services. NOTE: you will be asked to add your payment card even for the free tier, however you will not be charged if you follow the Free Tier guidelines outlined here:
Should you decide to add additional zones or LBR records beyond the Free Tier, you will only pay for what you use.
You may also choose to not use a credit card, and instead subscribe through AWS Marketplace.
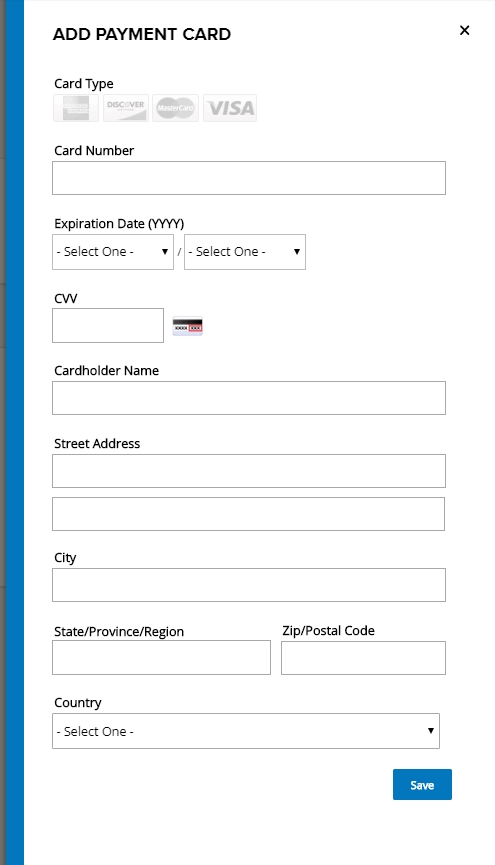
Add payment card to pay by credit card:
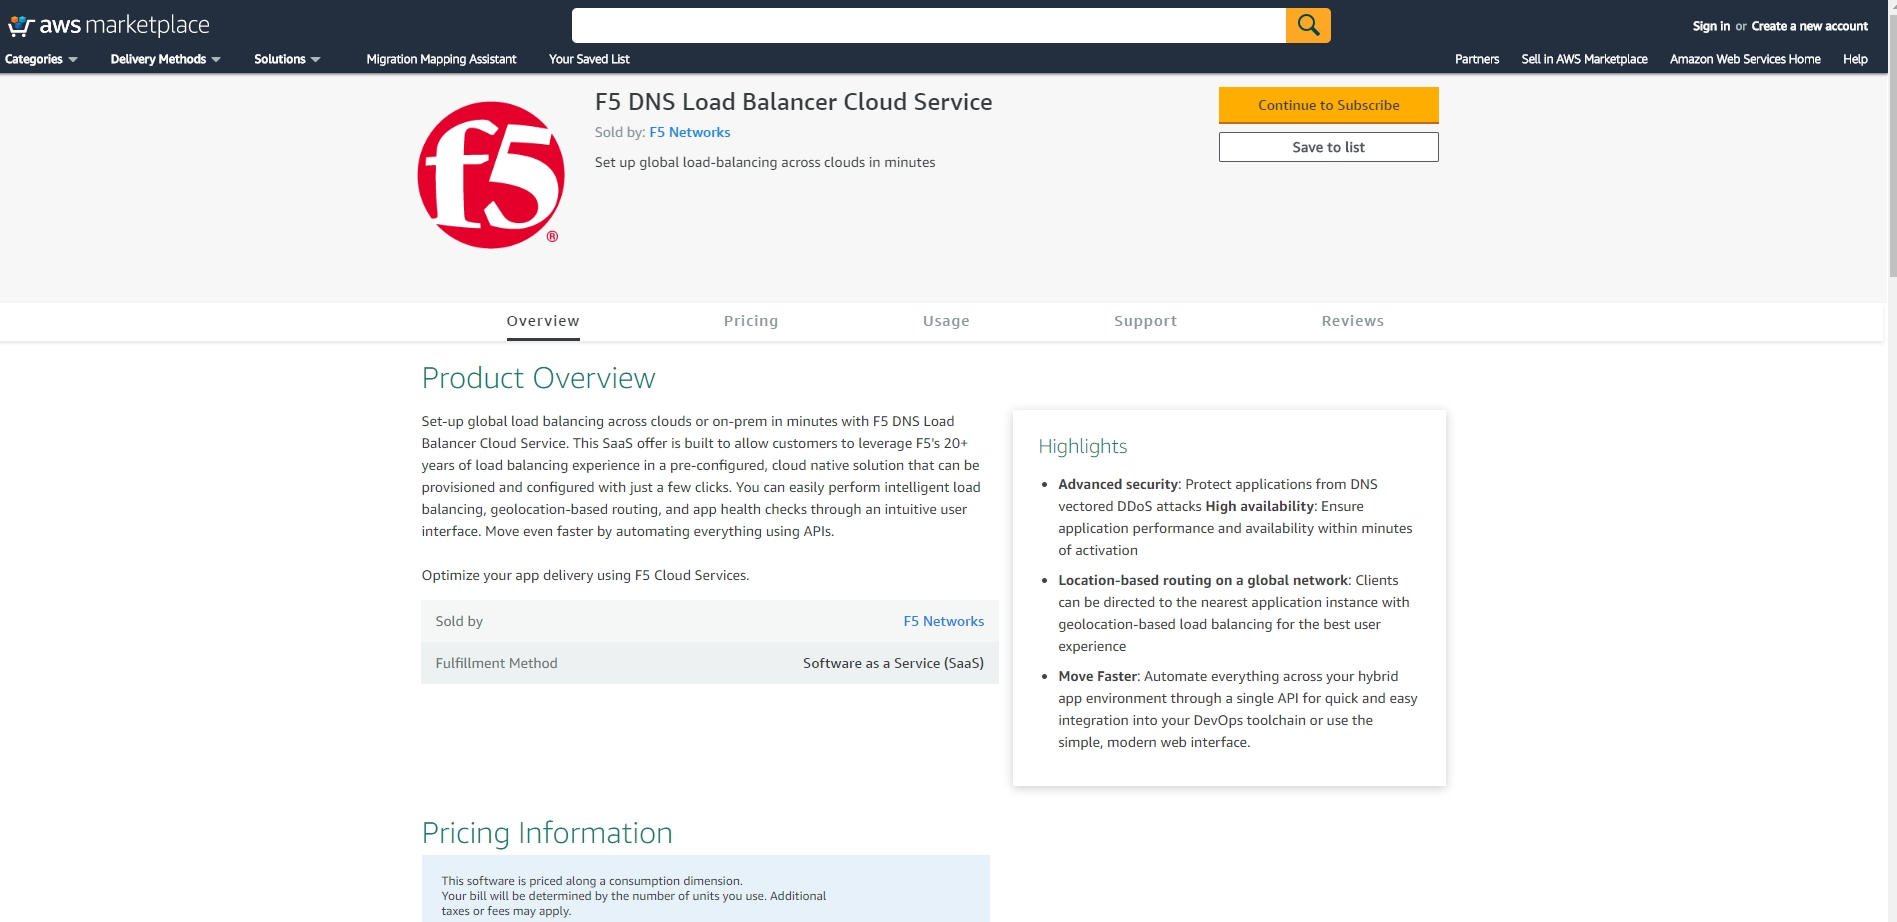
Or initiate the subscription from AWS Marketplace to subscribe through it:
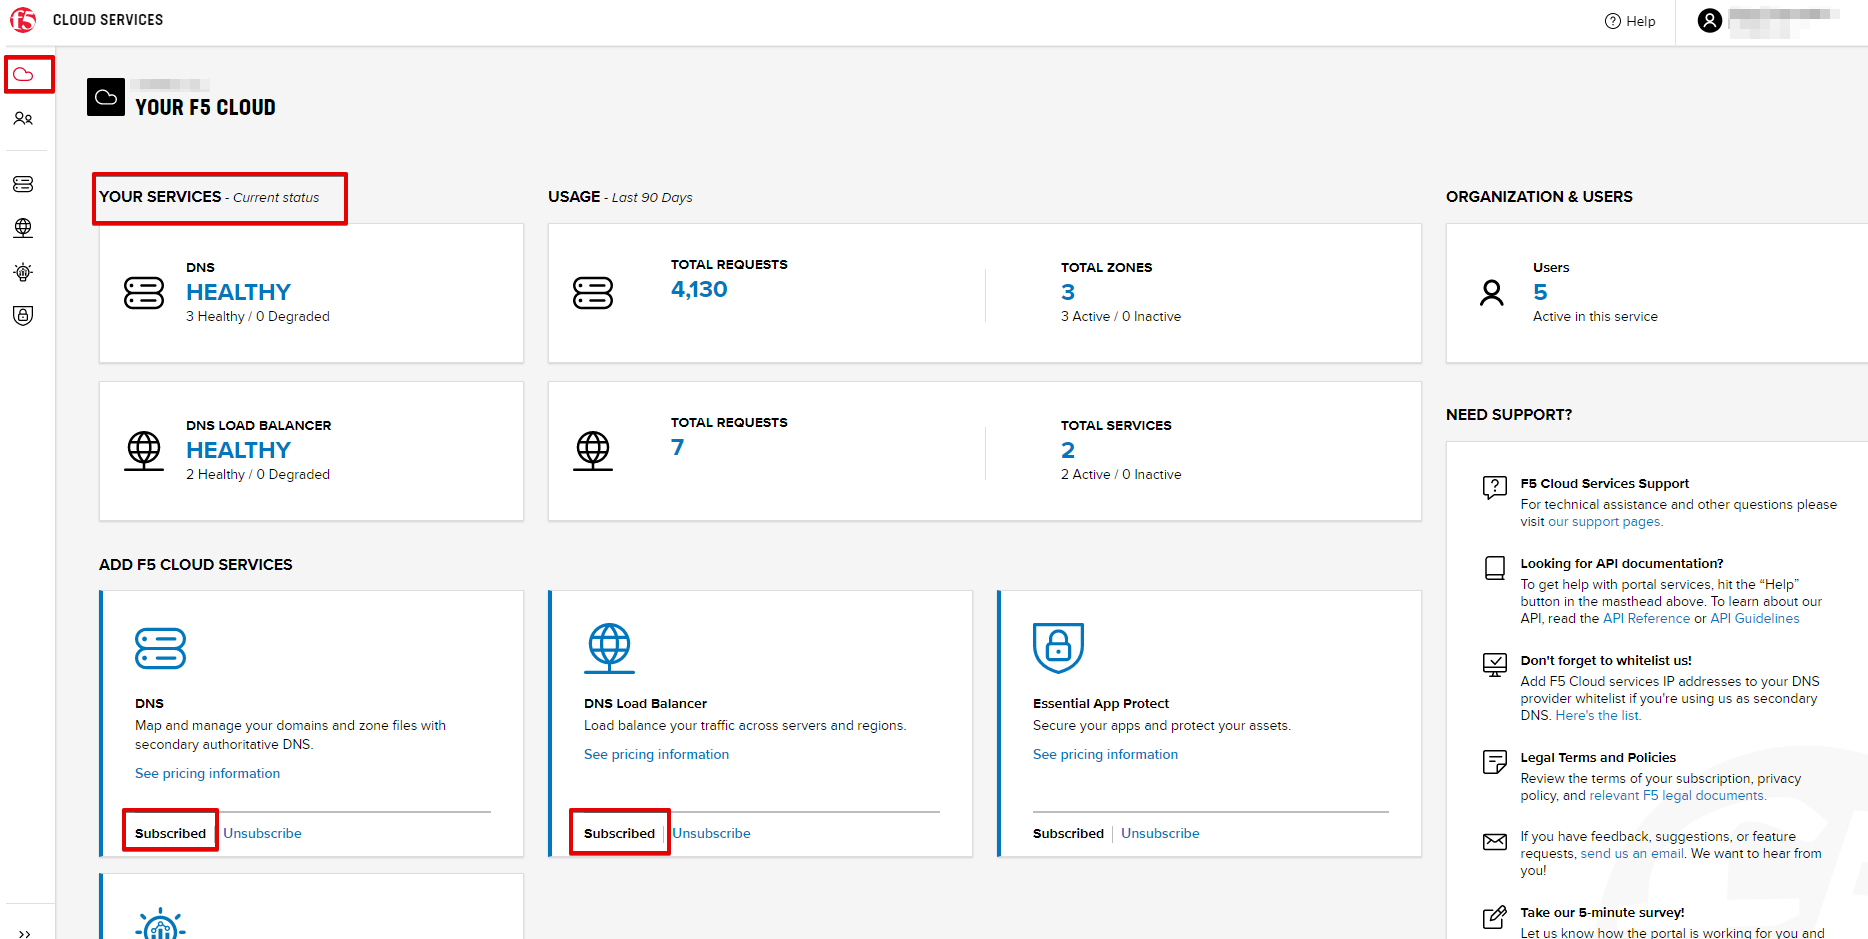
After successfully subscribing, your services will appear in the Your F5 Cloud tab. You will also see their current status.
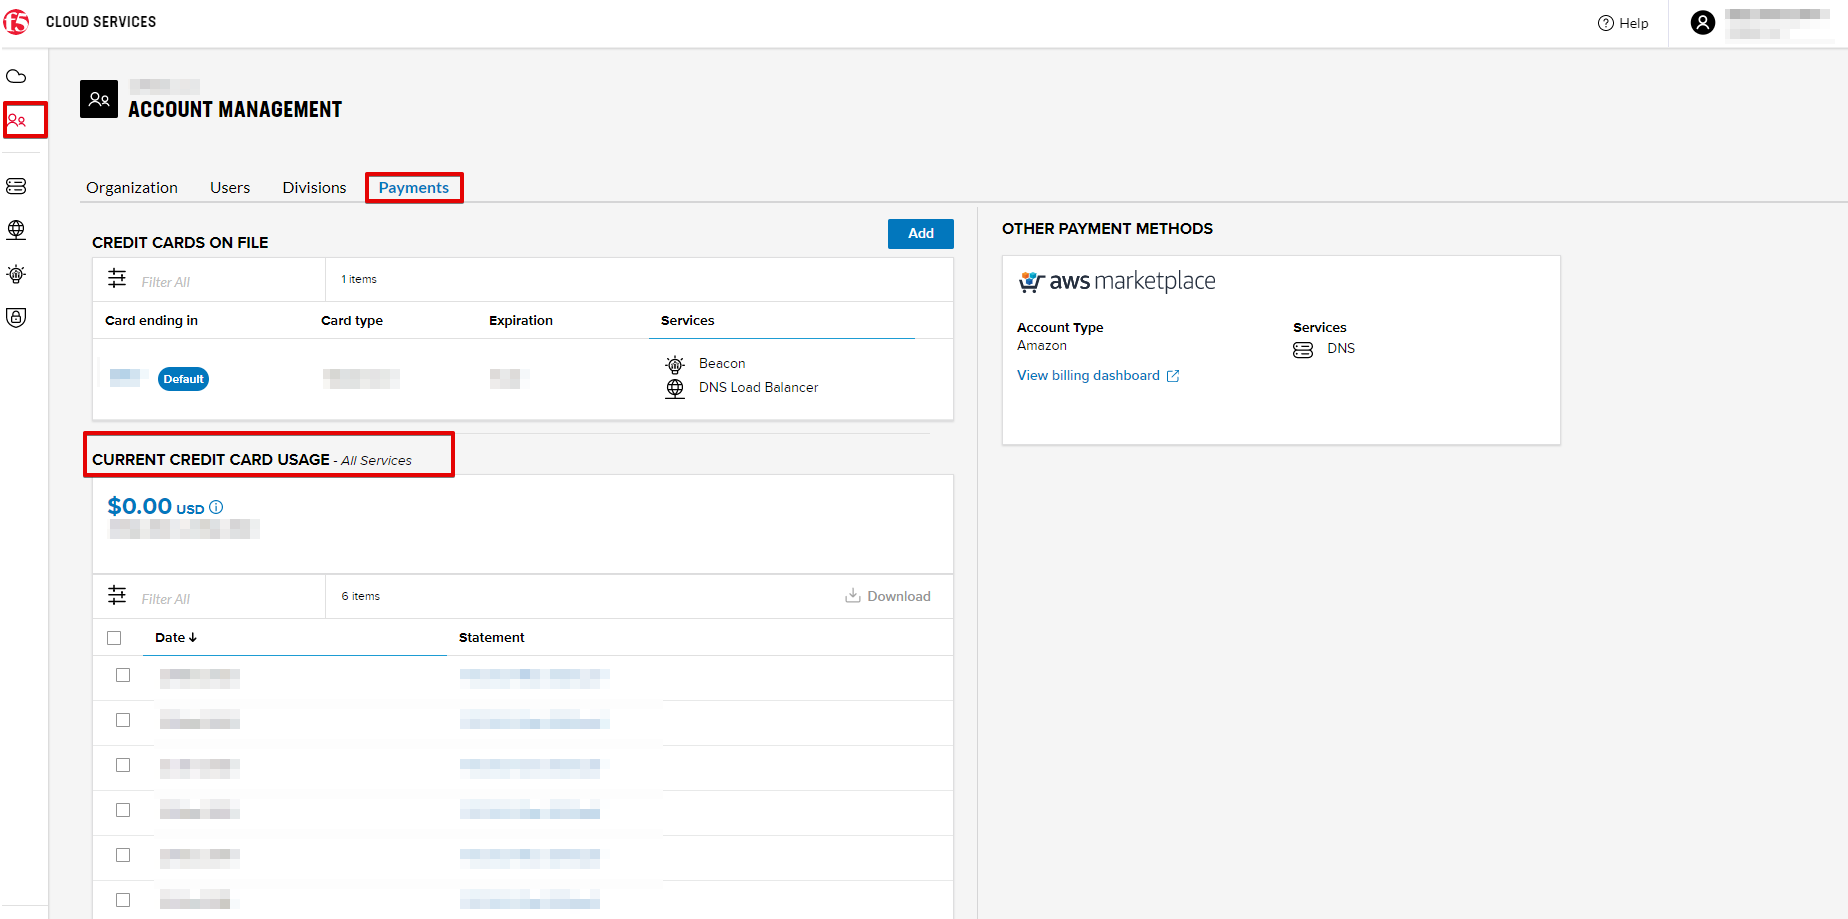
If you need to check your payment information, it is available in the Accounts tab, Payment section.
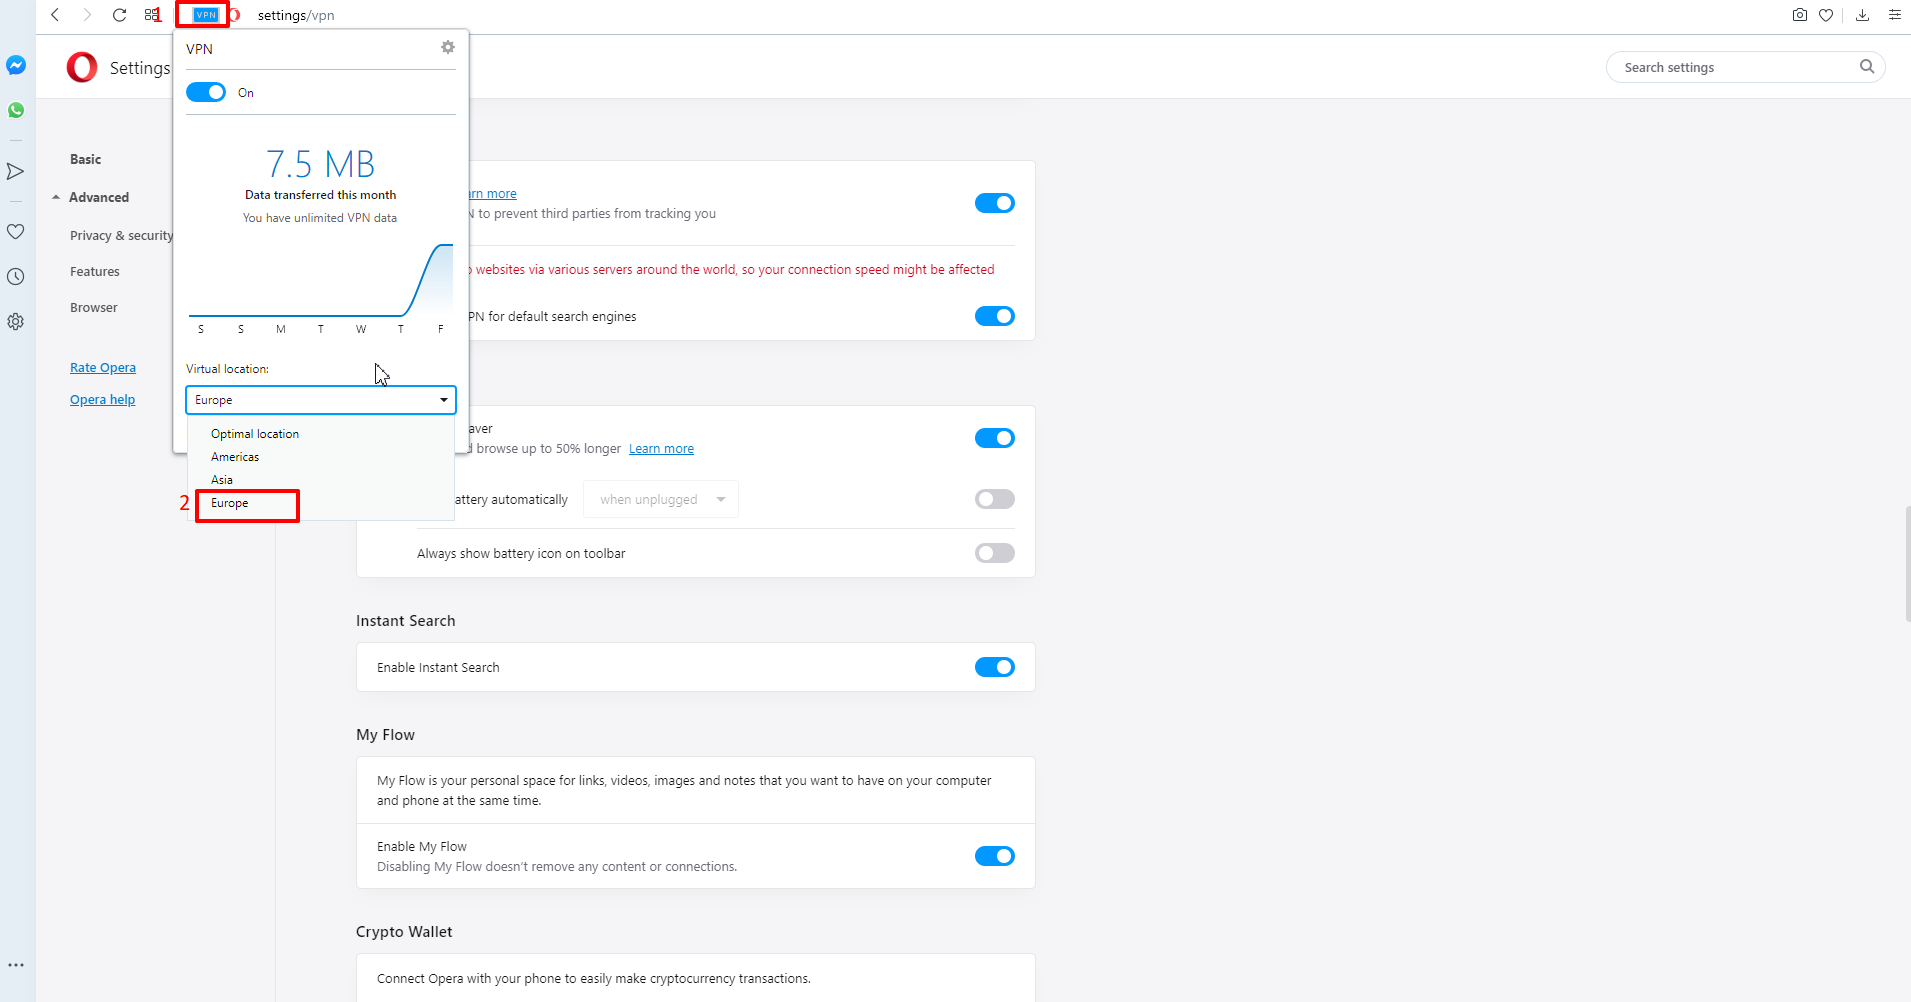
2. Opera with VPN to Test Geo Services
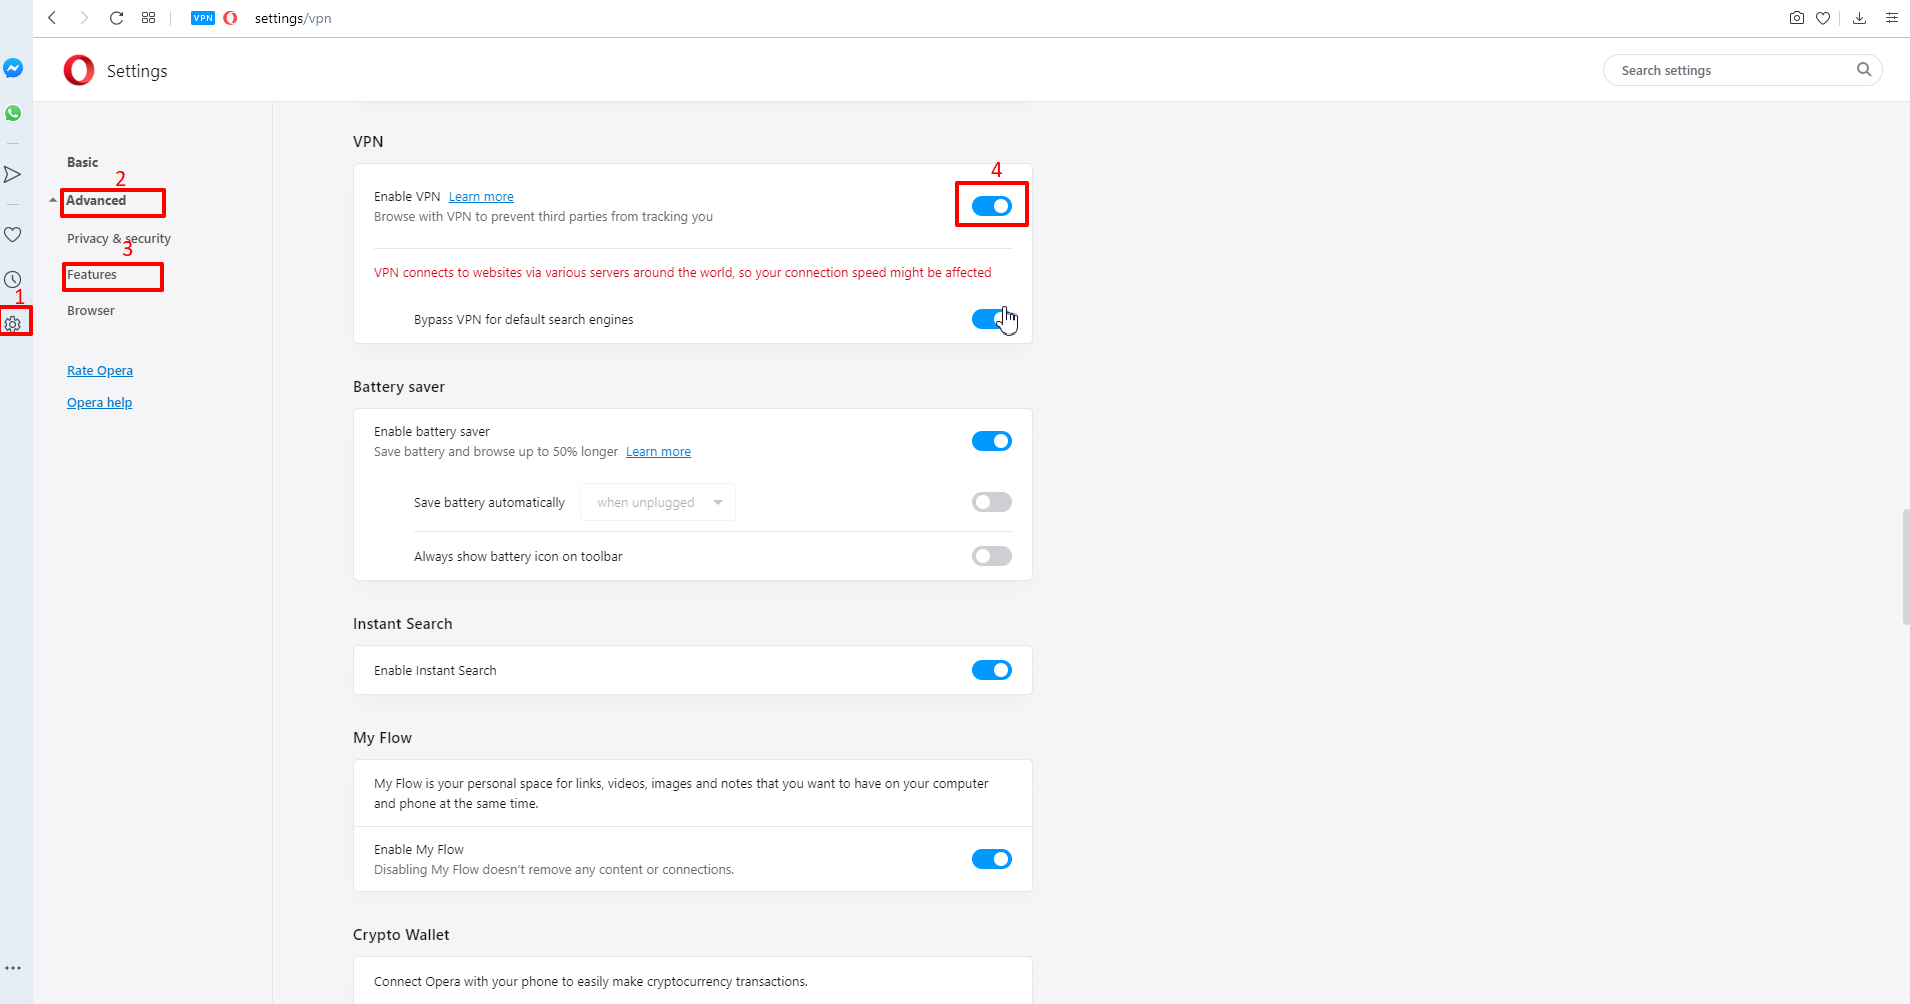
You will need the Opera browser to test proximity rules we will set later.
Open the Opera browser, click Settings, Advanced, Features and then Enable VPN.
3. Postman Configuration
a) Download Postman here, open it, create a Postman account if you don’t have one and choose to do so, and sign in.
b) Clone or download and extract the repository

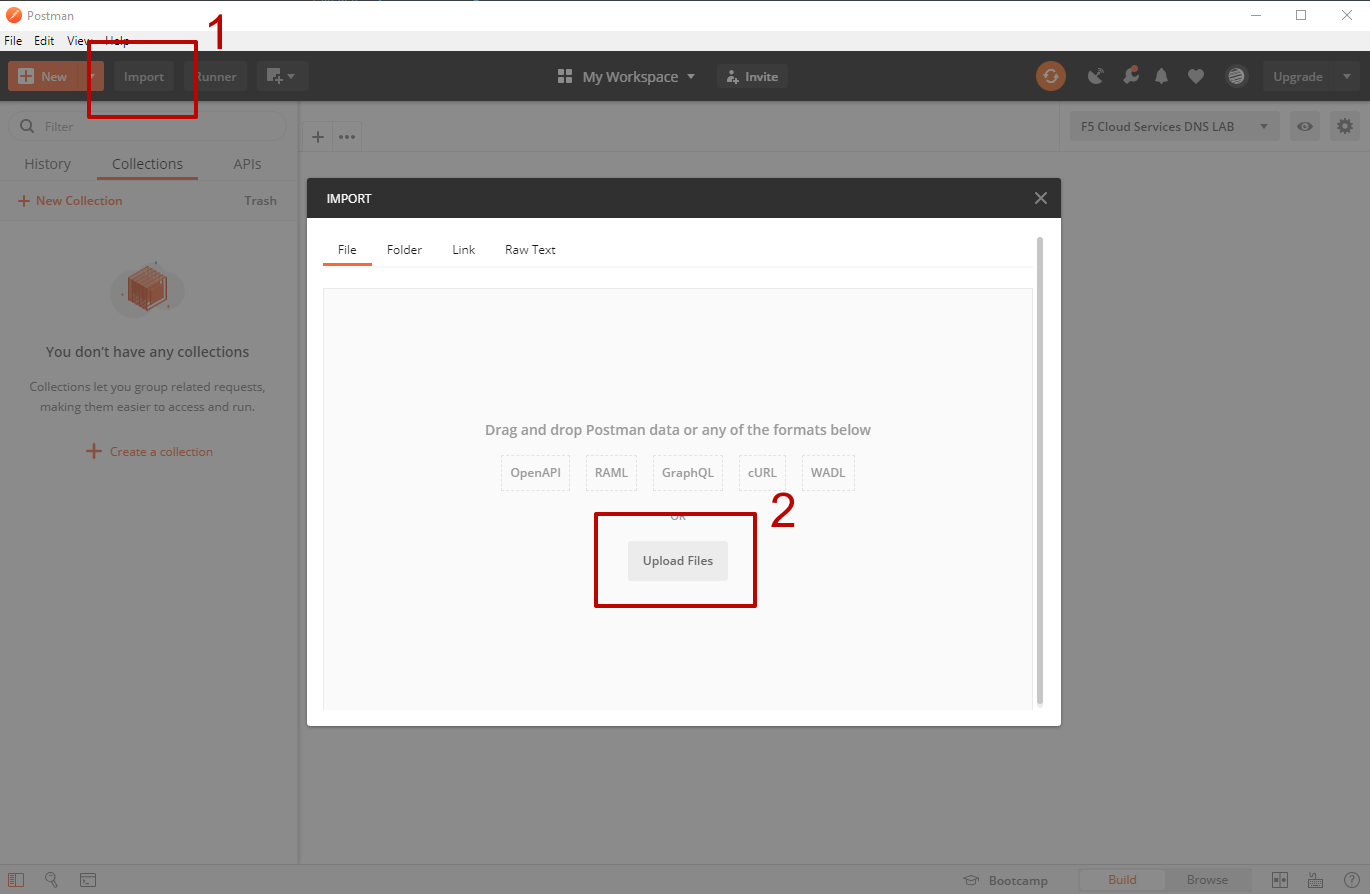
c) Import collection – /postman/F5 Cloud Services DNS LAB.postman_collection.json and environment – /postman/F5 Cloud Services DNS LAB.postman_environment.json.
You will now see the imported collection (left side) with the calls that you will be utilizing grouped into several categories, as well as the environment variables (top right) used to store and pass data between Postman and the API.
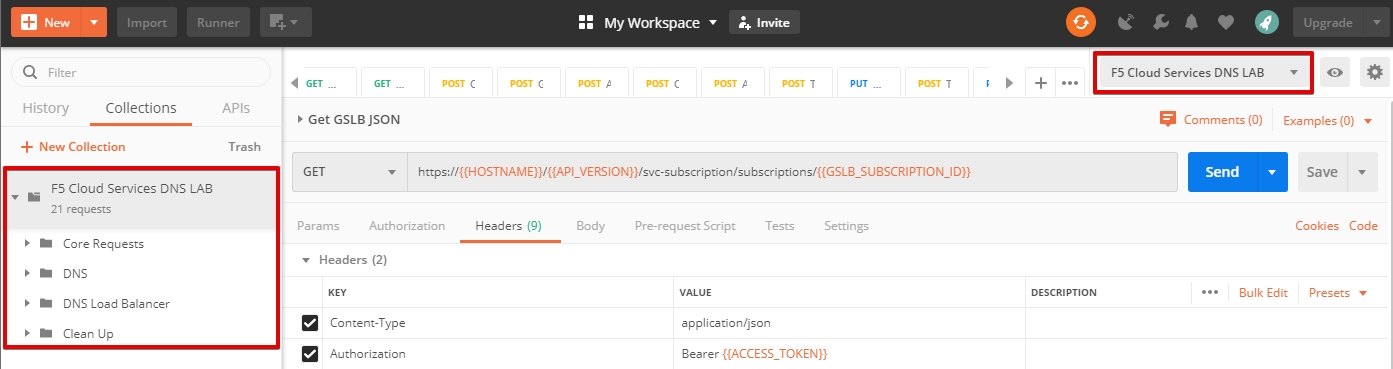
You are now ready to interface with the F5 Cloud Services using Postman.
4. Zone Name
In order to create secondary DNS zone in the F5 Cloud Services portal, you need to have a zone name. Use Postman and follow the steps below to get the Zone name from the Lab service API.
a) Open the “F5 Cloud Services DNS LAB” environment variables by clicking the “Environment Quick Look”, click into the field of the corresponding variable, and type the value of user email in the variable “USER_EMAIL” (click Enter after typing the values).
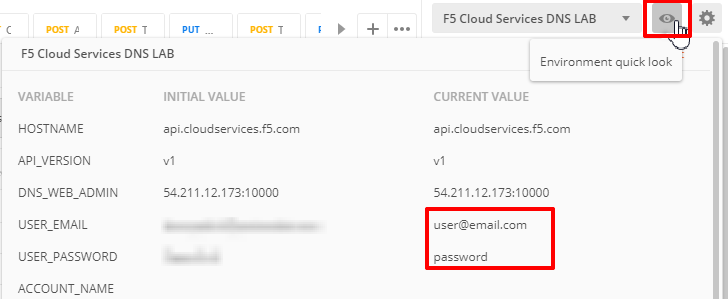
Repeat the same for the “USER_PASSWORD”.
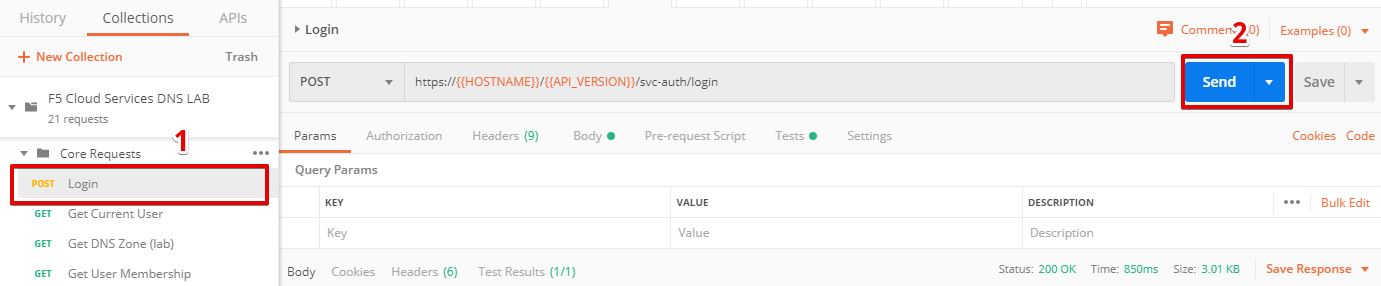
b) Select the Login request in the sidebar to login to your F5 Cloud Services profile and click Send to get the authorization token. More detailed information on this API request can be found here.
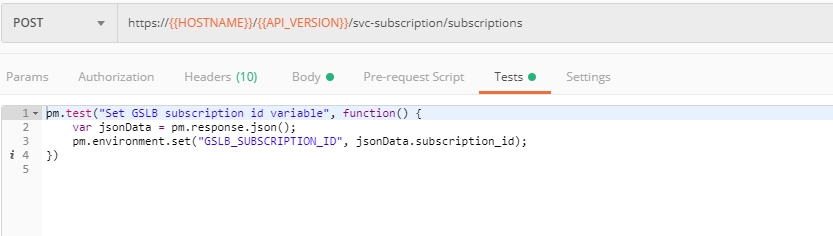
A successful login will result in Postman returning the tokens from the API, shown in the response body below:

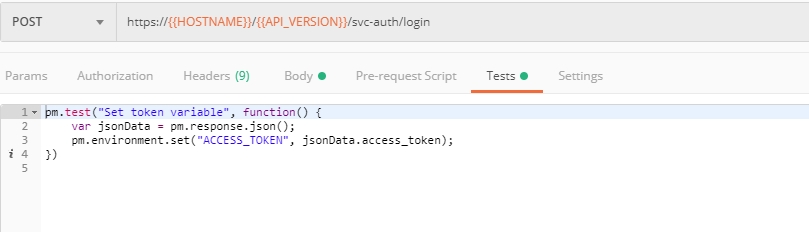
These tokens are then stored for subsequent calls using a function inside Postman to set environment variables. You can see the test function in the Tests tab:
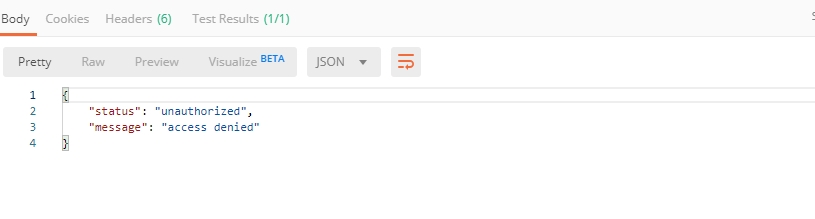
NOTE: If any of the subsequent Postman calls return a blank response or “status”: “unauthorized” response (see the screenshot below), it means your user token has expired and you will need to re-login. To do that you just need to re-send the Login request.
c) OPTIONAL: Set User ID & Account Info
IMPORTANT NOTE: If you originally signed up for F5 Cloud Services through a Limited User invitation (such as an email invite from another lab or from a different account owner), then it is possible that you haven’t yet completed a full registration. You can quickly tell if you have by looking at your account(s) in the F5 Cloud Services Portal If you do now see any “Accounts you own:” and only see “Accounts you’ve been granted access to” as a “Limited User”, then you need to create a full account & update user info before you can proceed with this lab.
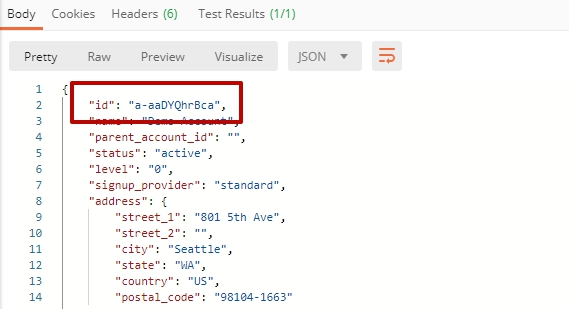
You can do this by running the following Set User Info API call, after you’ve updated the Body of the request with your own organization & address information:
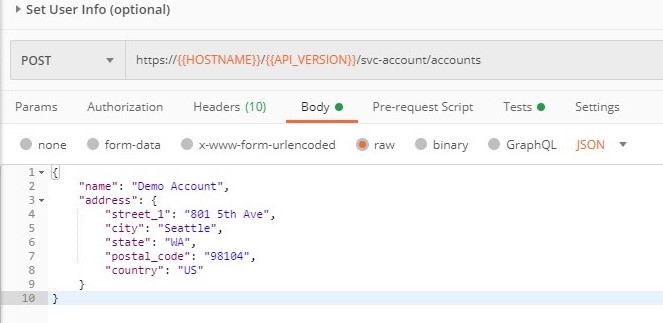
The response returns the following detail, including your own organization account ID (id):
More information on this API request can be found here.
At this point you should be a full user with an “Owned Account” and a primary organization account id, which can also be confirmed in the F5 Cloud Services Portal in the drop-down under your user name (top right), where you should see “Accounts you own:” and the Organization Account you created with “Owner” defined.
d) Retrieve User ID & Account ID
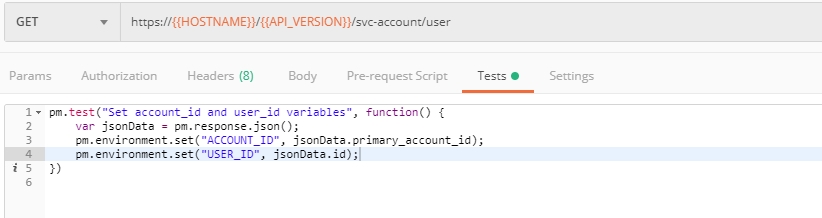
Select the Get Current User request and click Send to retrieve User ID and Account ID to be used in the further requests.
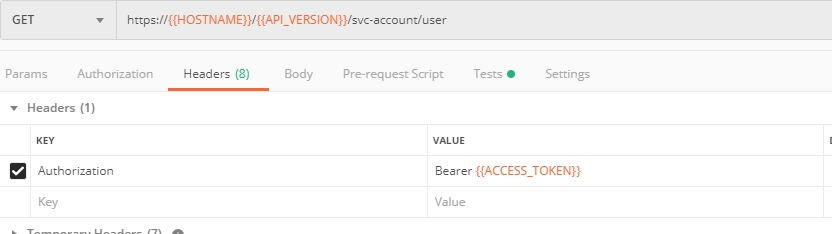
The response returns the following detail:
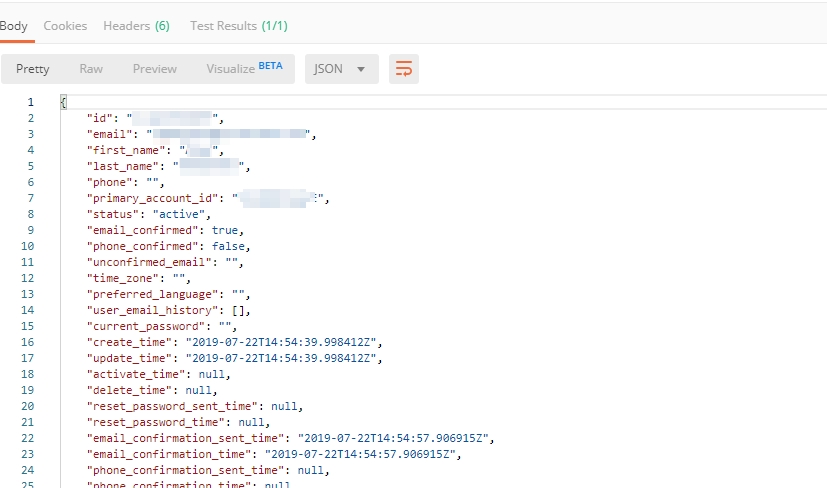
The retrieved User ID and Account ID are then stored for subsequent calls.
More detailed information on this API request can be found here.
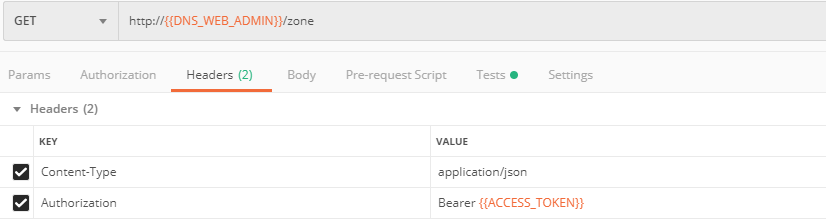
e) Let’s now retrieve DNS Zone Name with the Get DNS Zone (lab) API call. Click Send. This call will pass your “ACCESS_TOKEN” in the header of the request to the Labs API in order to validate existence of your F5 account & return back a Zone name unique to your lab.
Request:
The response will return your test DNS zone name and the status.
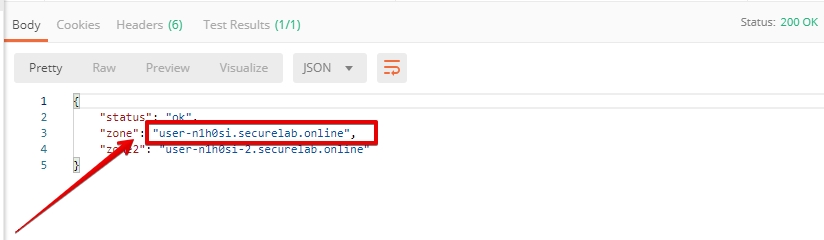
Sending this request will automatically capture of the Zone variables:
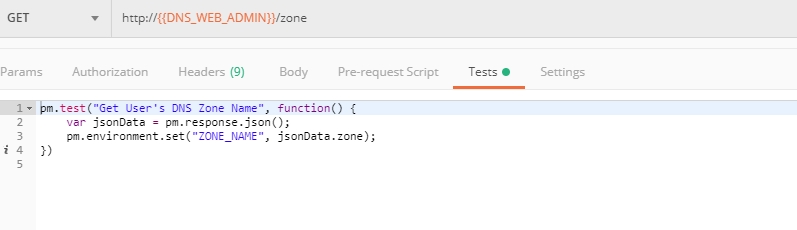
This Zone Name will be used for creating Secondary DNS Zone in the F5 Cloud Services portal, as well as throughout the lab as the domain name for your test applications.
F5 DNS Cloud Service - UI
1. Create Secondary DNS Zone
Let’s now return to the F5 Cloud Services portal and create Secondary DNS Zone using the UI. We will repeat the same flow through the API in the subsequent section.
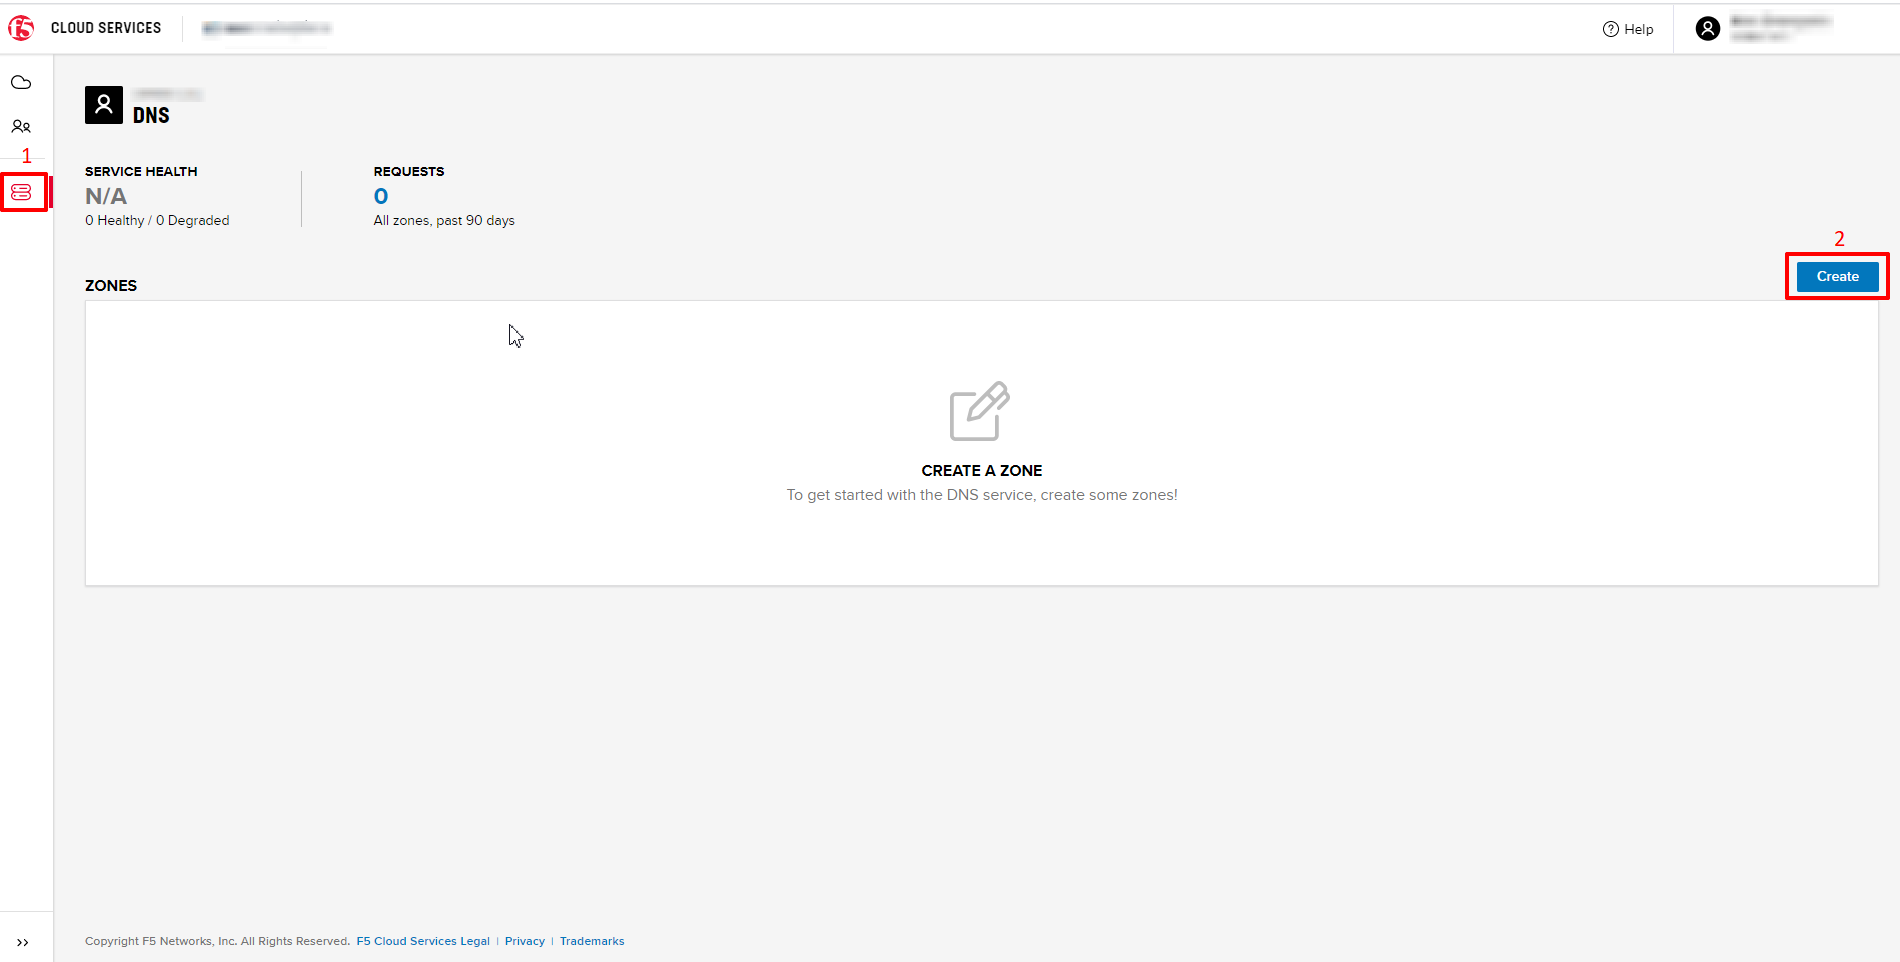
a) Go to the DNS tab and click Create.
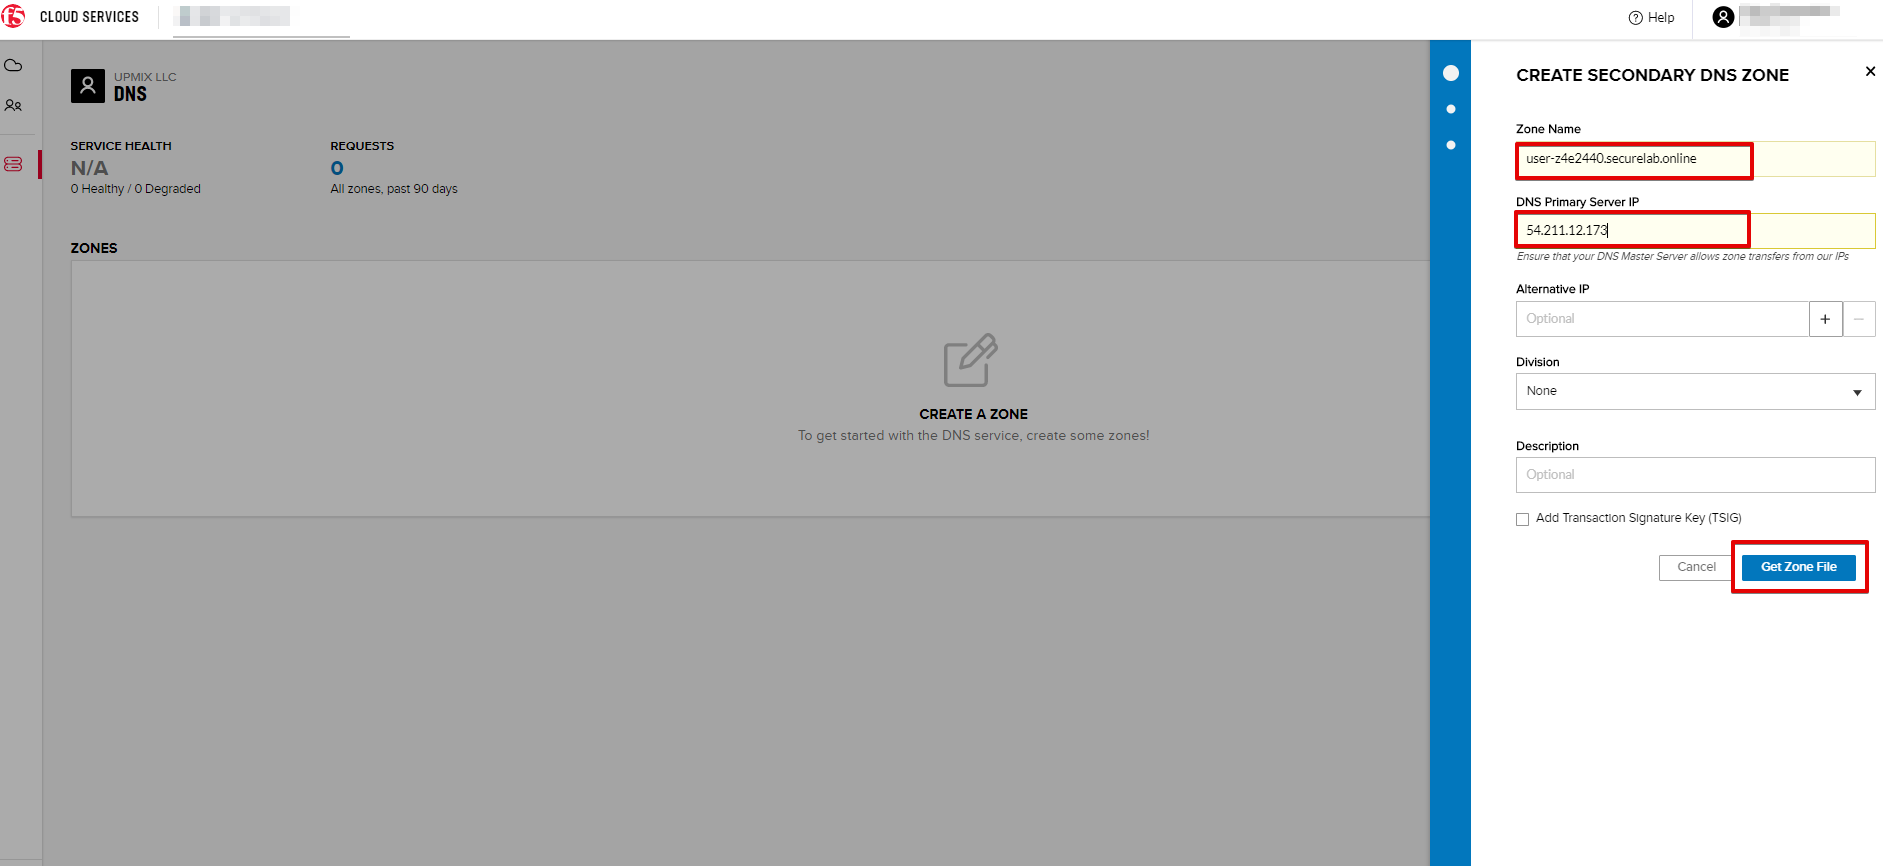
b) Paste Zone name retrieved in step 4.e) above and indicate the following DNS IP: 54.211.12.173 as the DNS Primary Server IP. Other values are optional. Then click Get Zone File.
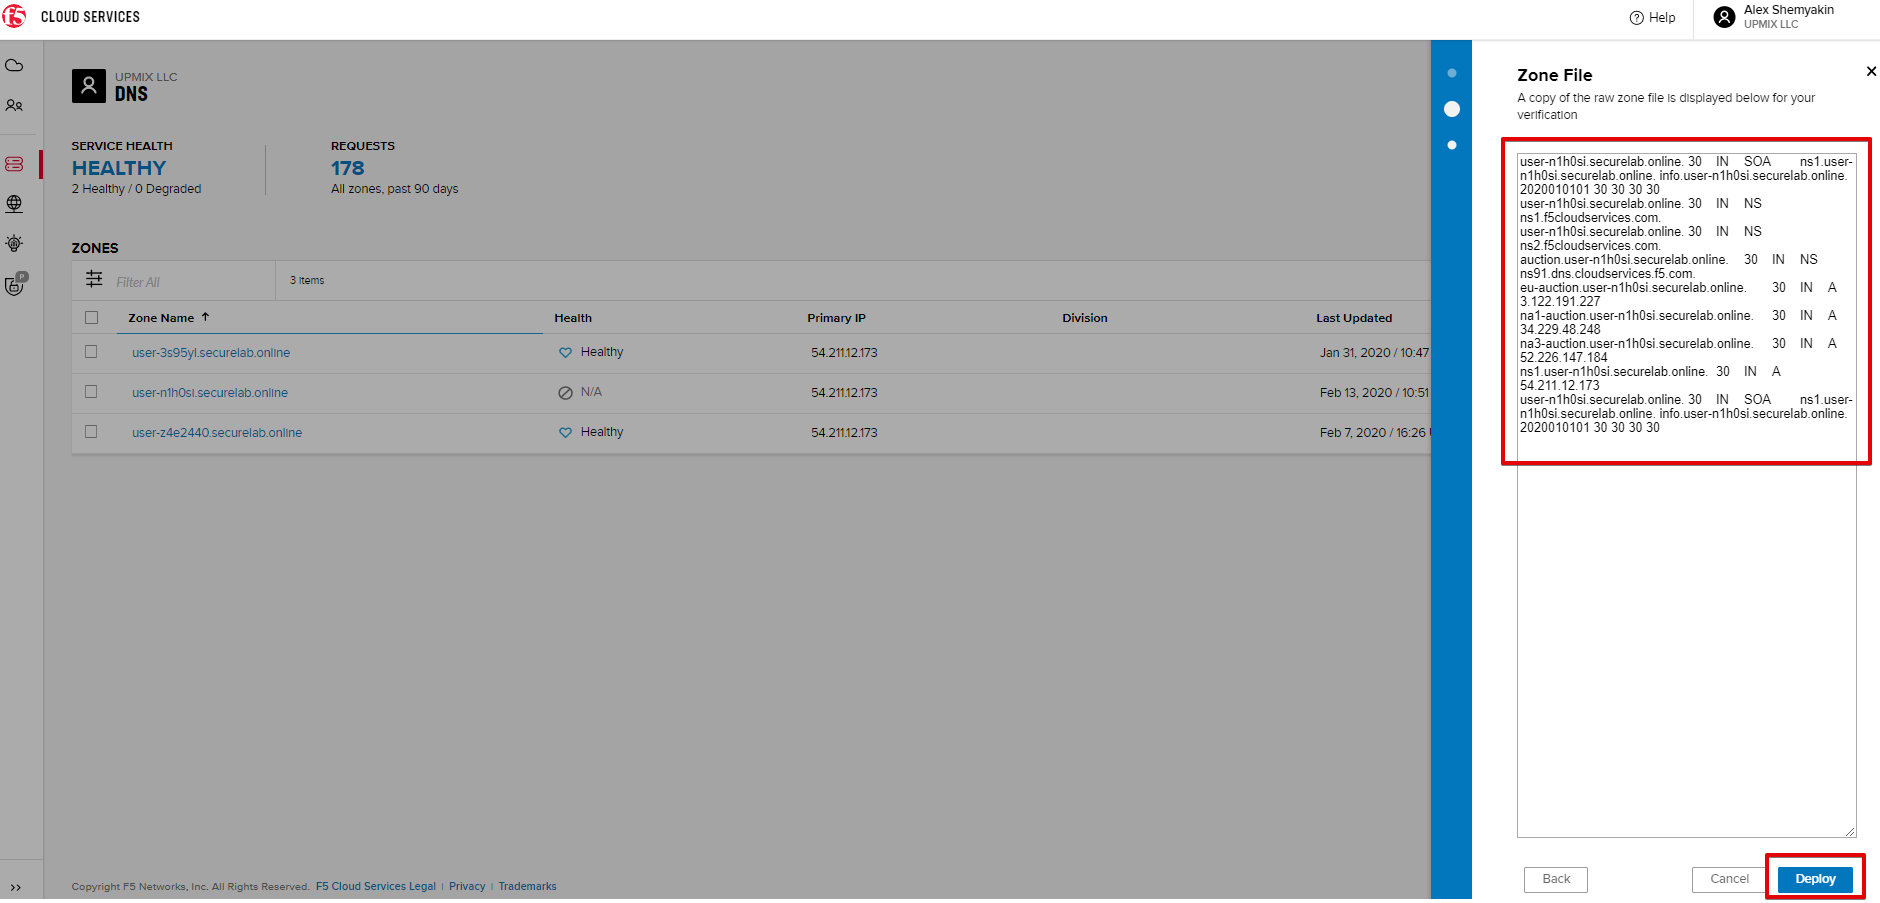
c) This will retrieve the zone file from your primary DNS server. Click Deploy and then Done. This will create Secondary DNS Zone.
2. Query via Browser
Let’s now see how the created Secondary DNS works.
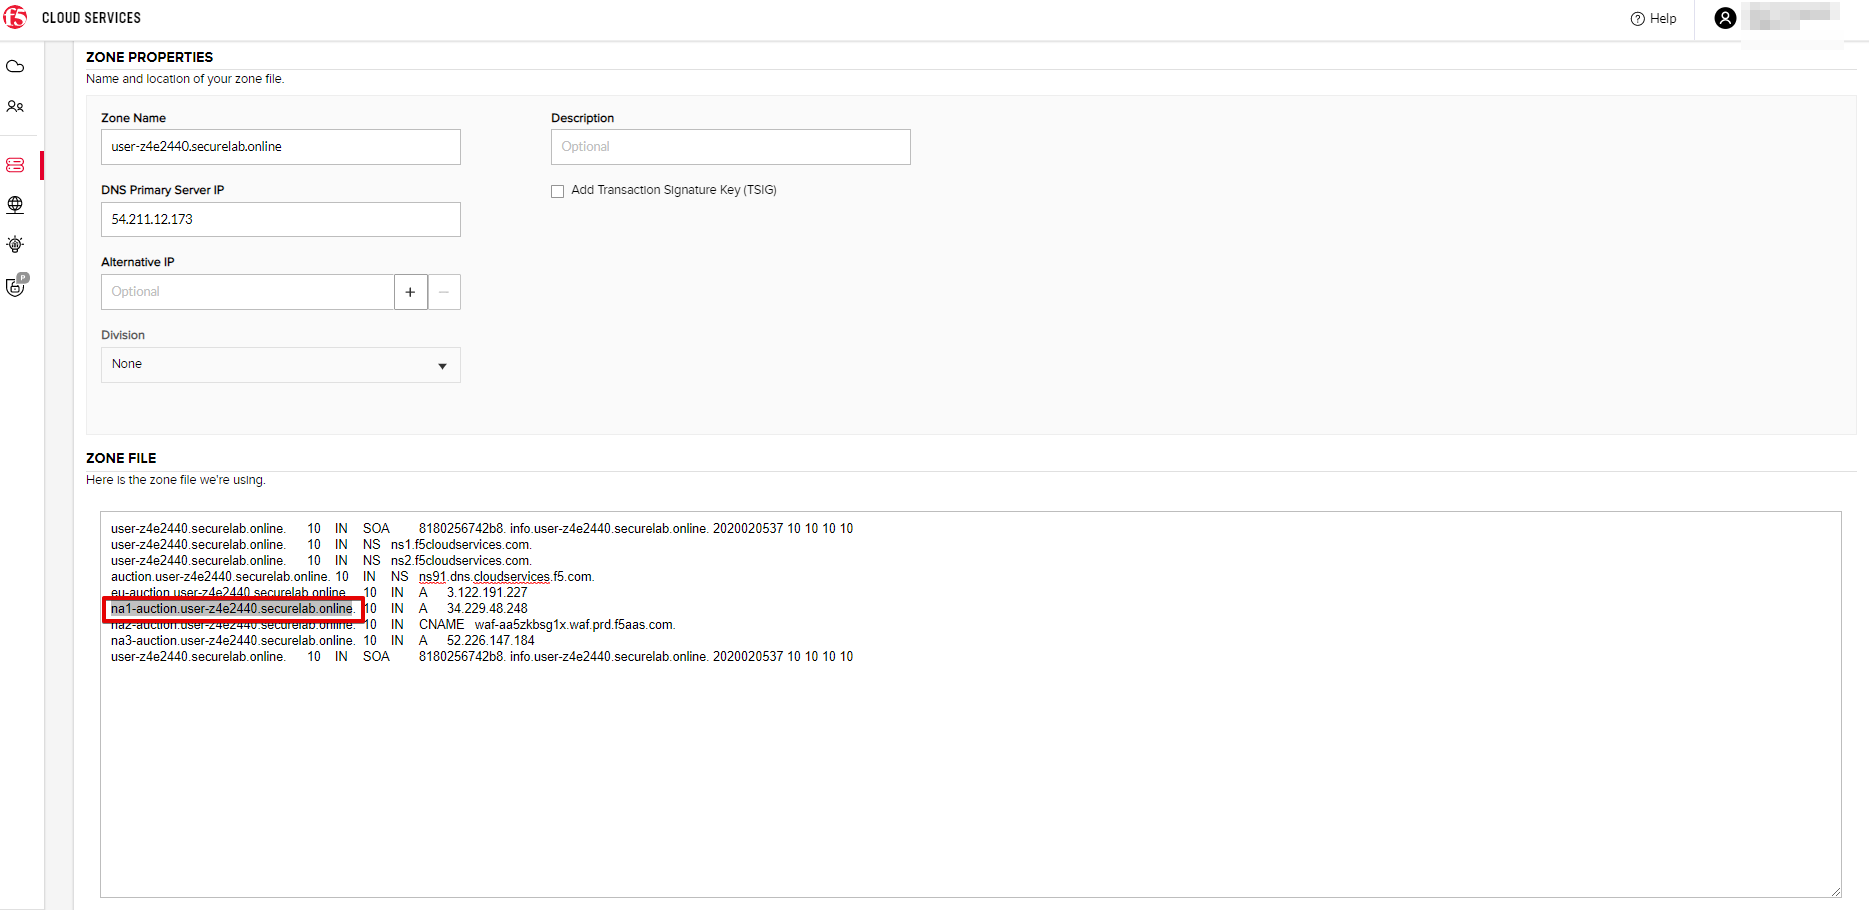
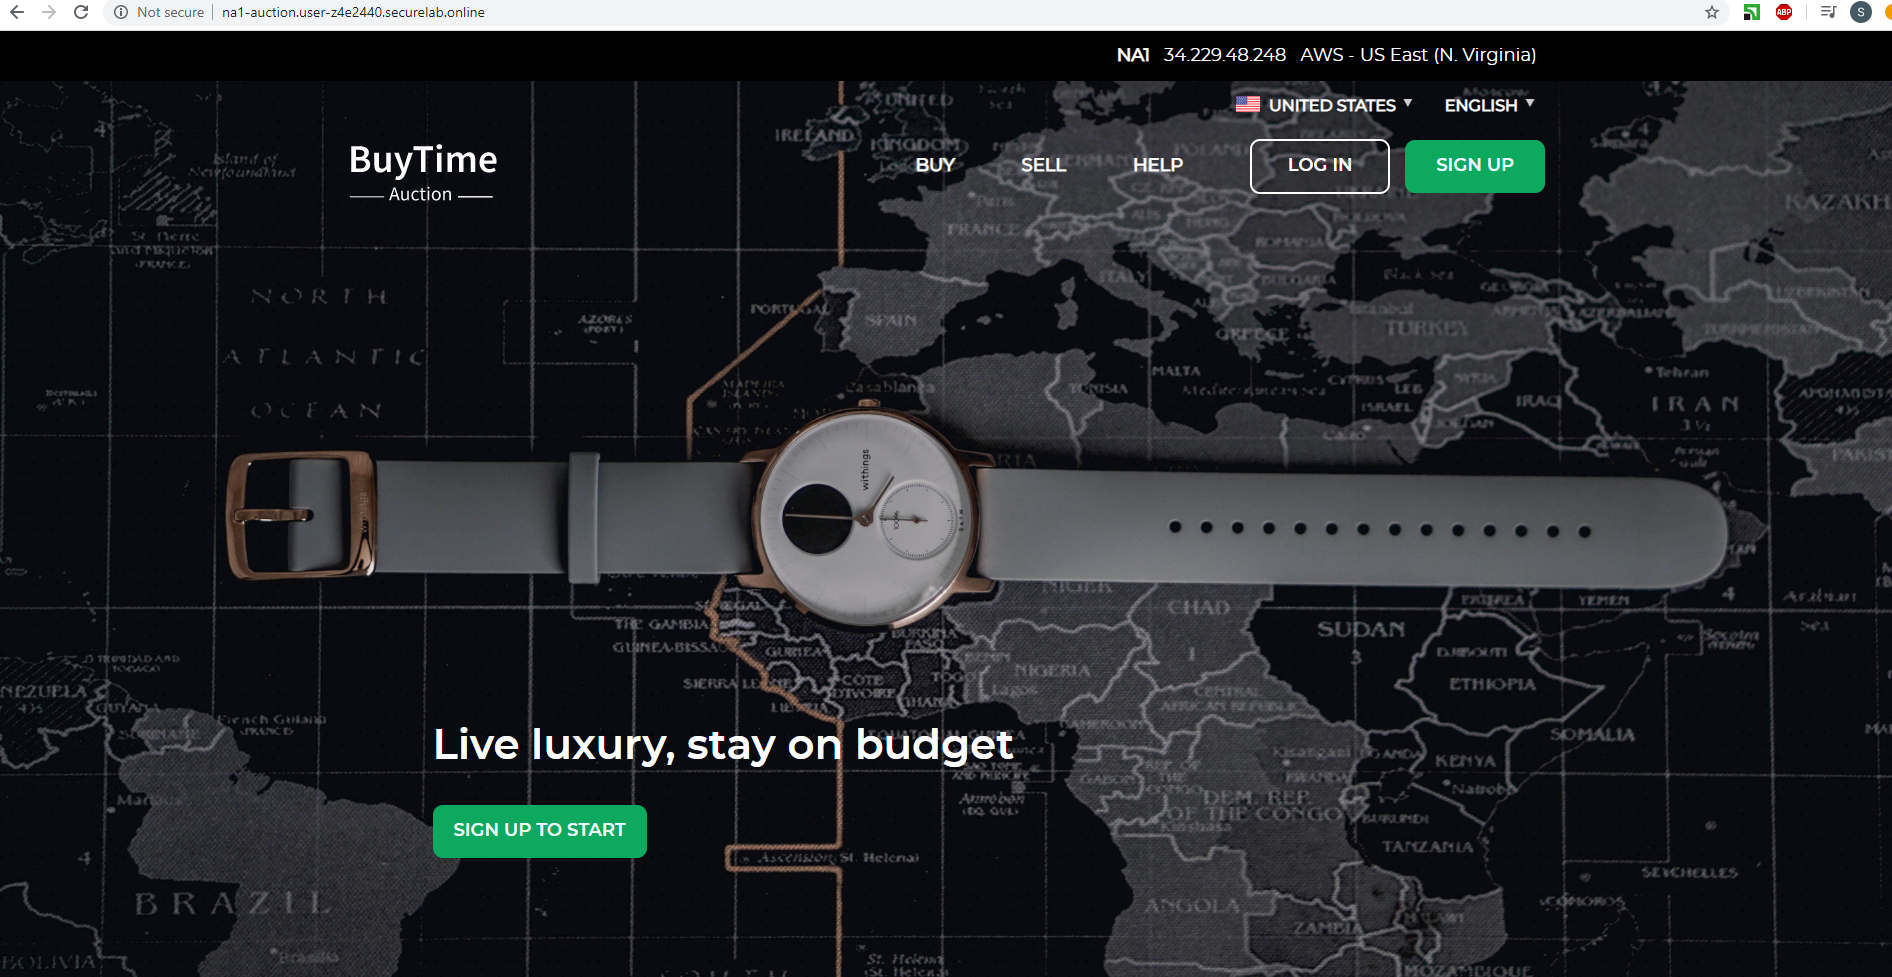
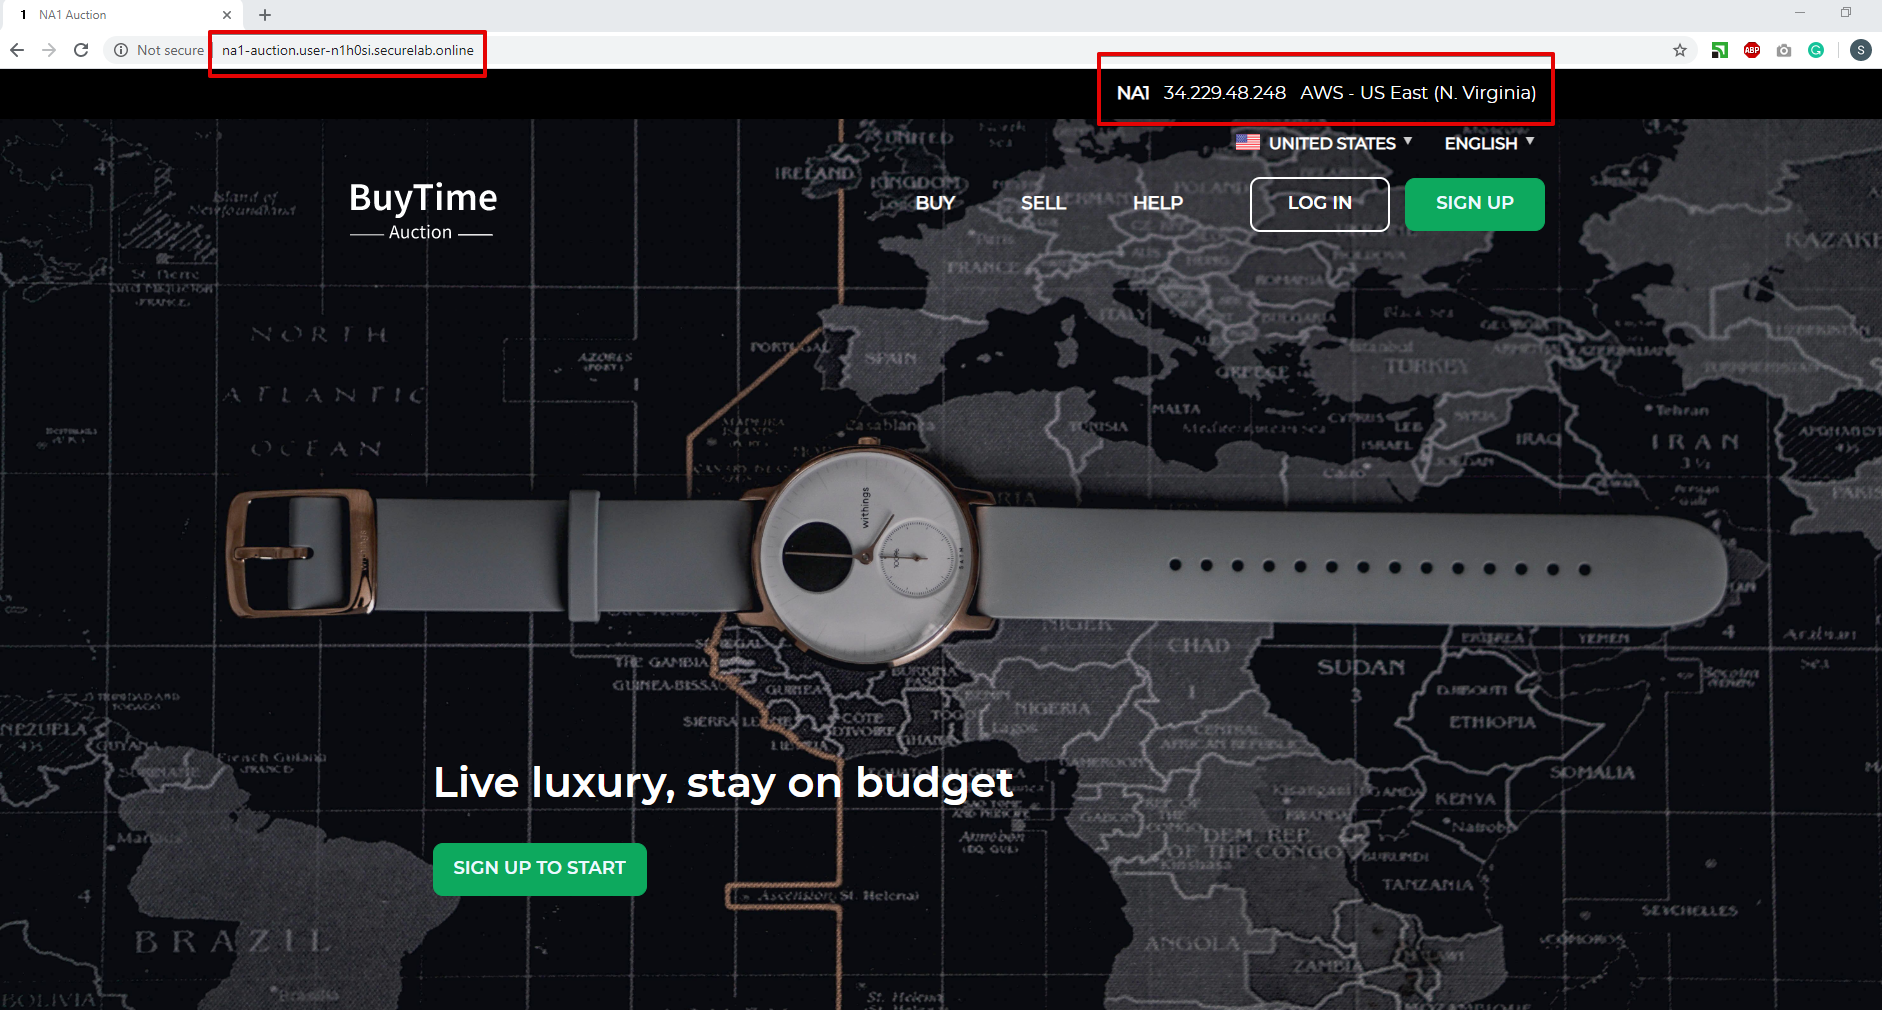
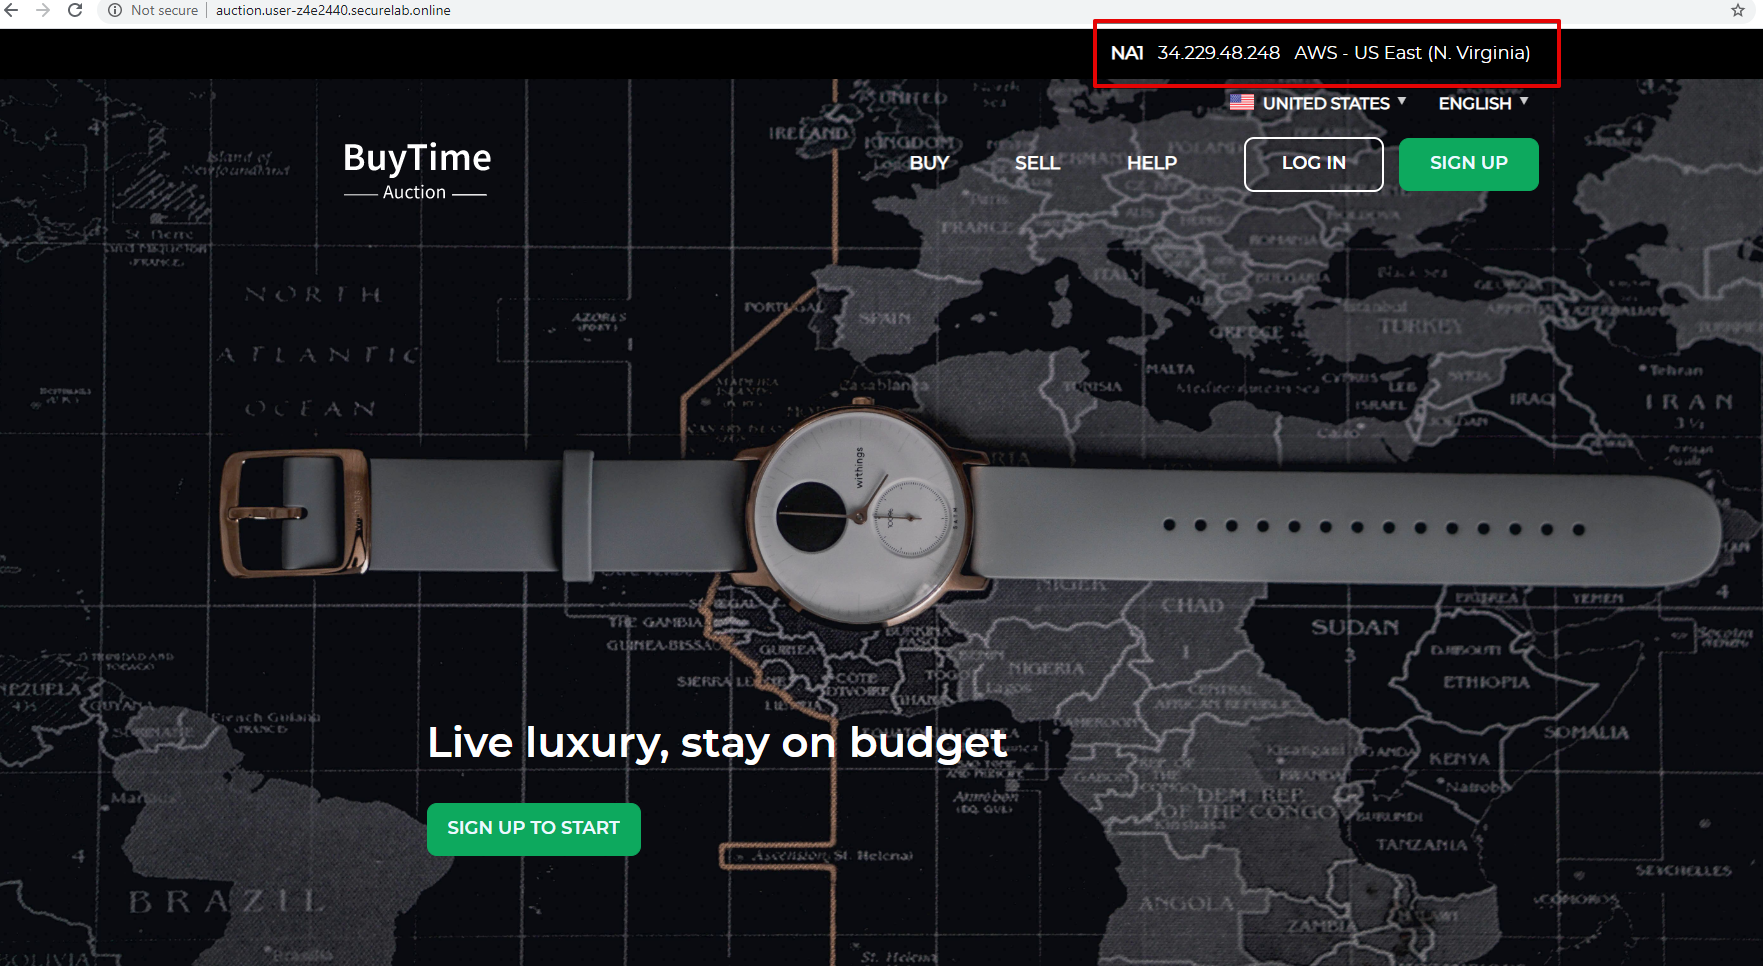
a) Click on your zone in the DNS tab and scroll down to see ZONE FILE, where you need to copy “na1-auction.user-your_zone_name”.
b) Paste the address into your browser and you’ll get to the website:
3. Delete Zone
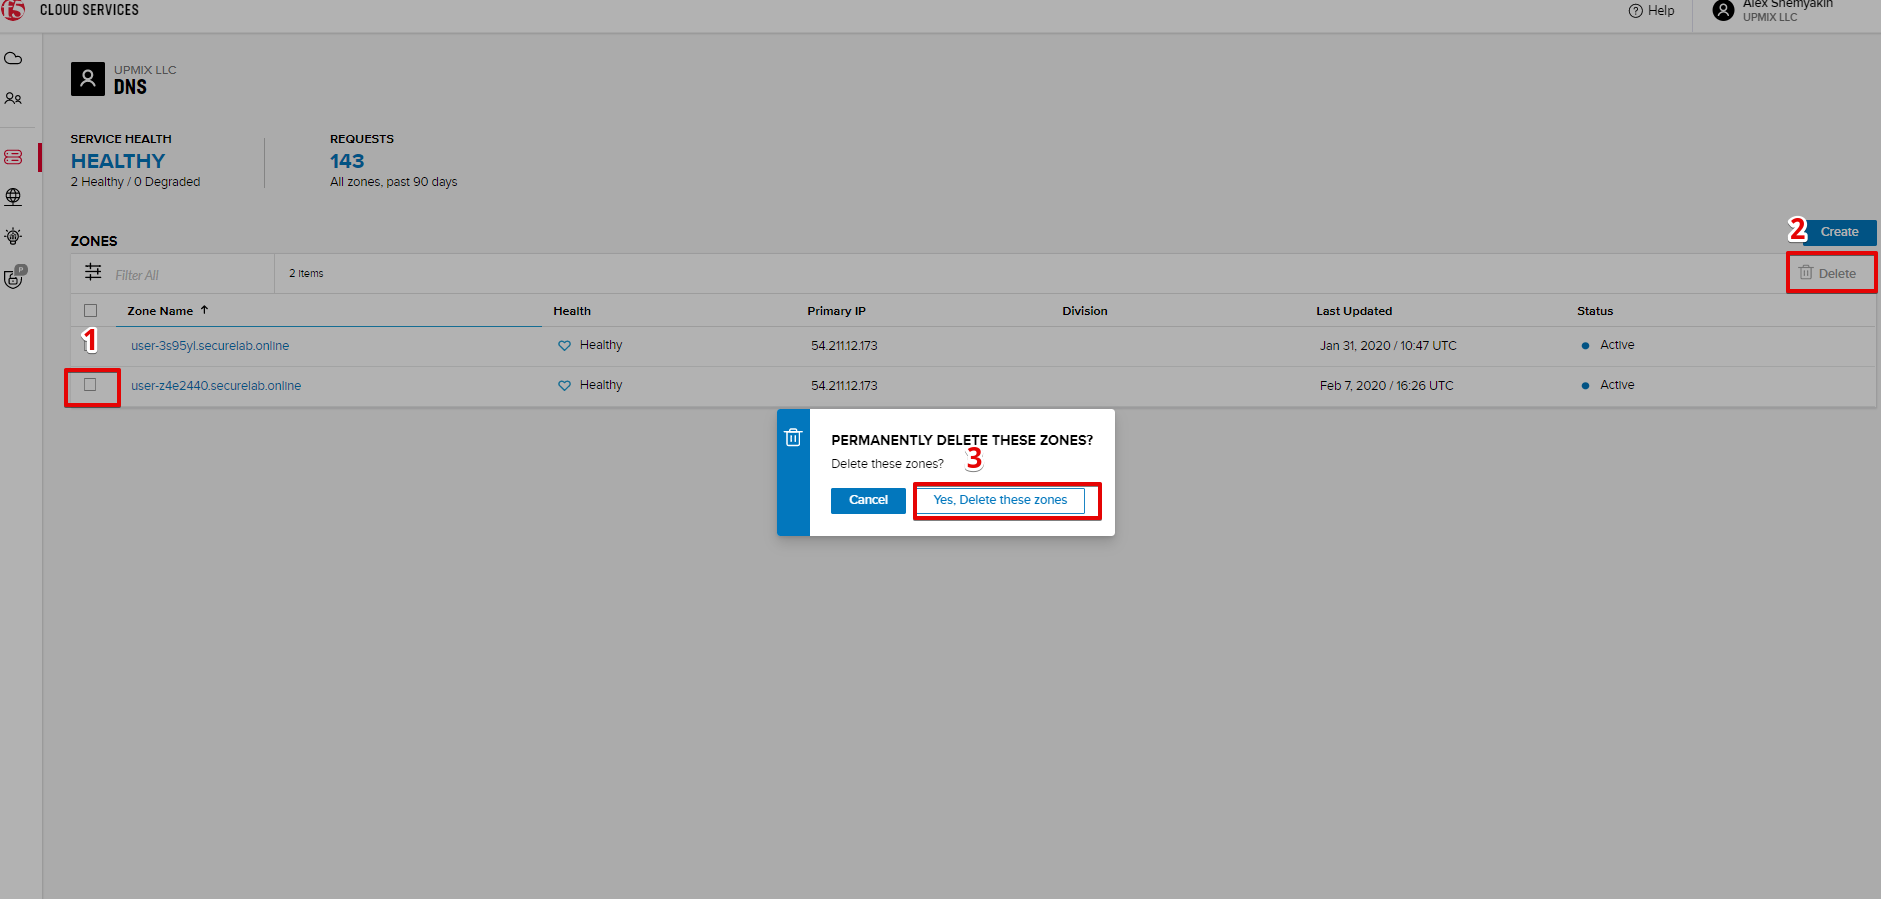
In case you need to delete the zone, tick your zone, click Delete and then confirm your choice.
F5 DNS Cloud Service - API
In this section we will repeat the flow of the preceding section by using the F5 Cloud Services APIs with the help of Postman.
1. Create Zone
In order to create your zone using API, you will first need to get your account details - membership and catalogs.
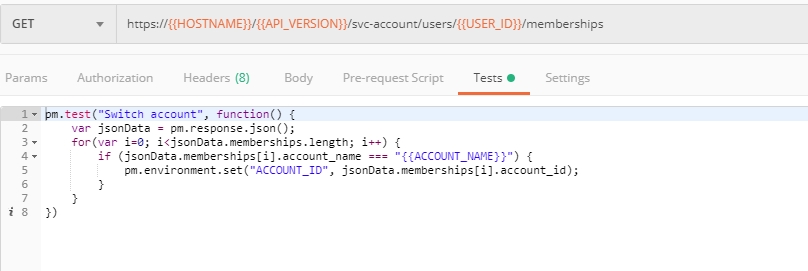
a) Get User Membership to F5 Cloud Services accounts
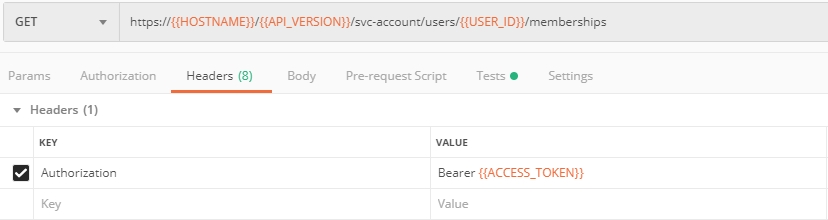
In Postman, send the Get User Membership request which returns info on your user’s access to Cloud Services accounts.
You will see account ids, names, roles and other information in the body of response.
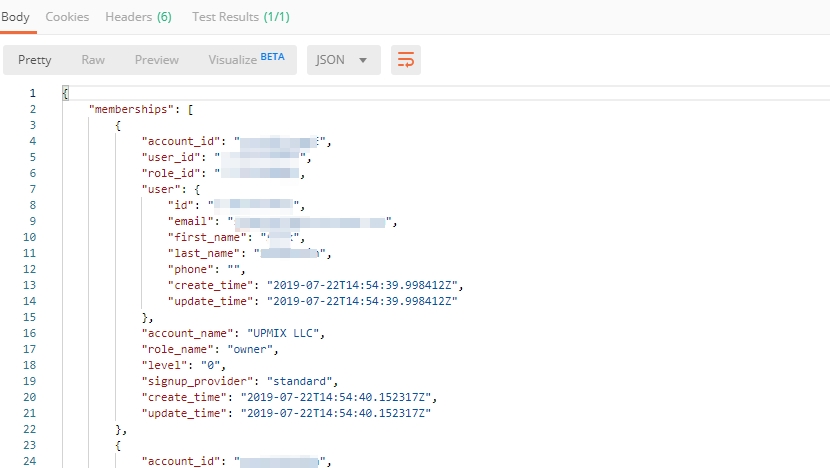
Your “account_id” will be retrieved using “account_name” and used for creating user’s instances.
More detailed information on this API request can be found here.
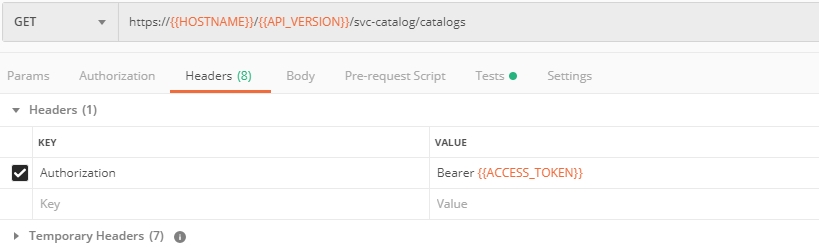
b) Retrieve information on available catalogs and their IDs
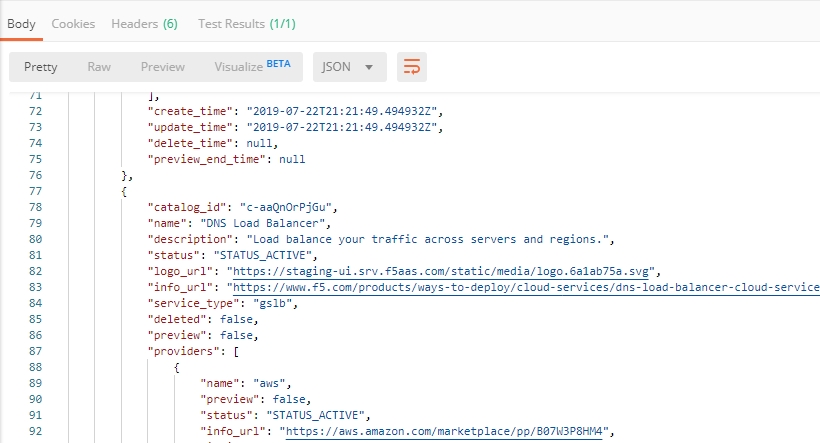
Select the Get Catalogs request and click Send to retrieve data about the available Catalogs and their IDs.
As you see there are a number of catalogs available:
The retrieved IDs are then stored for subsequent calls using a function inside Postman to set environment variables. You can see the test function in the Tests tab:
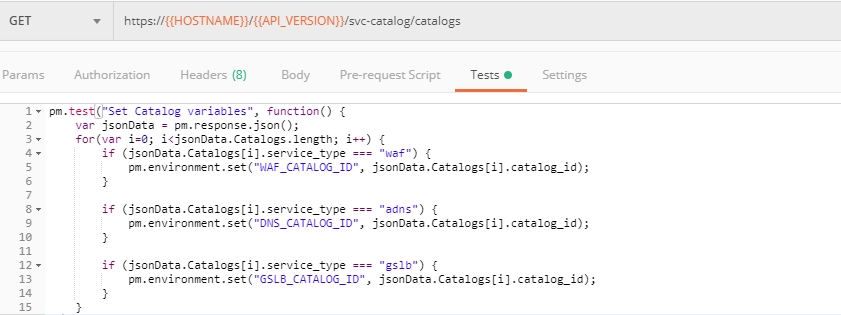
More detailed information on this API request can be found here.
c) Select the Create DNS Subscription request and click Send to create a new service instance of Secondary Authoritative DNS using “account_id” and “catalog_id” retrieved a few steps above.
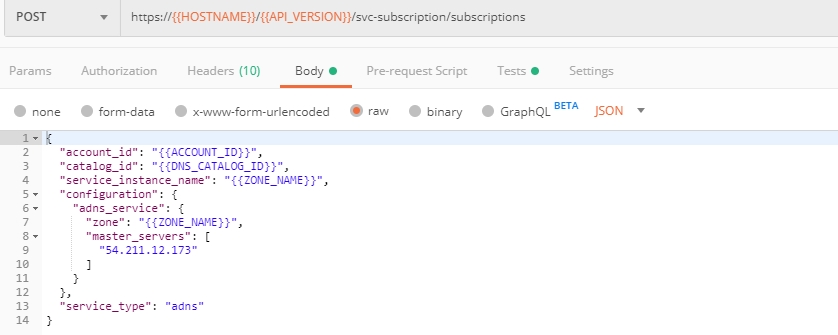
You will see “subscription_id” and created “service_instance_id” in the body.
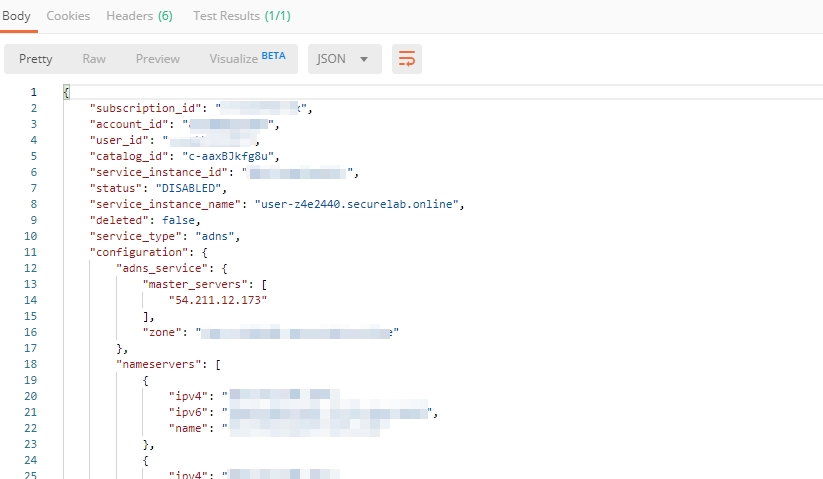
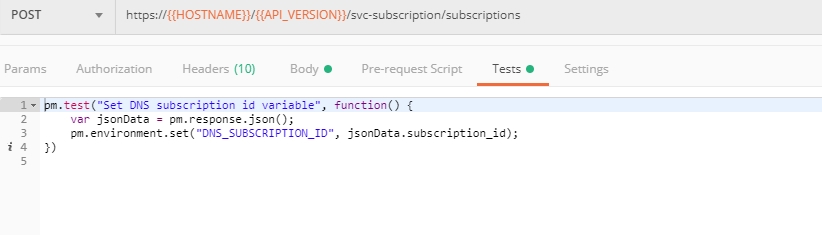
The retrieved “subscription_id” is then stored for subsequent calls.
You can change its status from “DISABLED” to “ACTIVE” sending the Activate DNS Subscription request below. More detailed information on this API request can be found here.
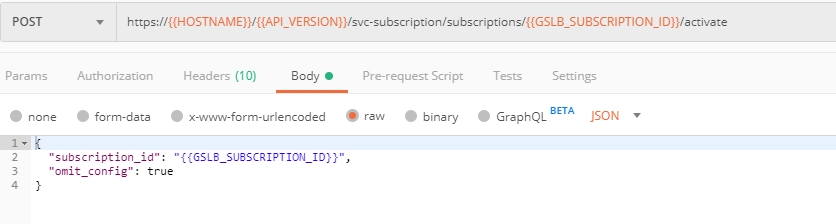
d) Select the Activate DNS Subscription request and click Send. This will deploy the secondary DNS using “subscription_id” captured in one of the steps above.
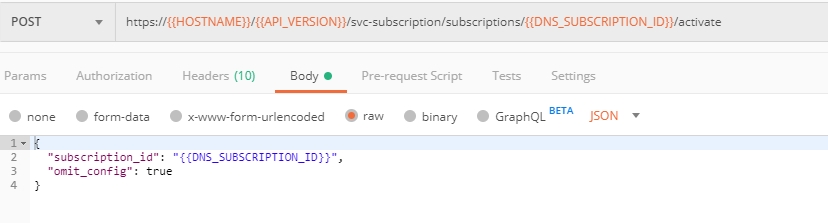
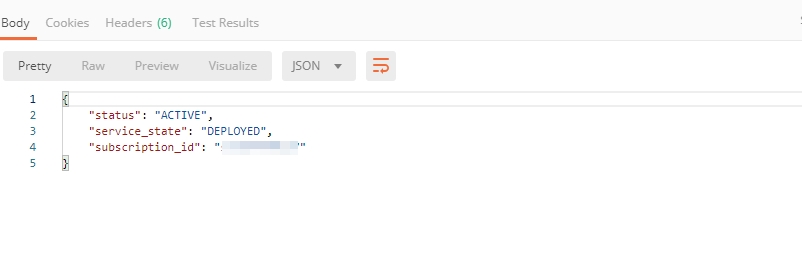
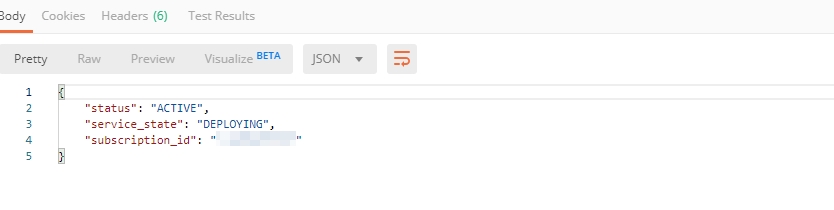
You will see “active” subscription status.
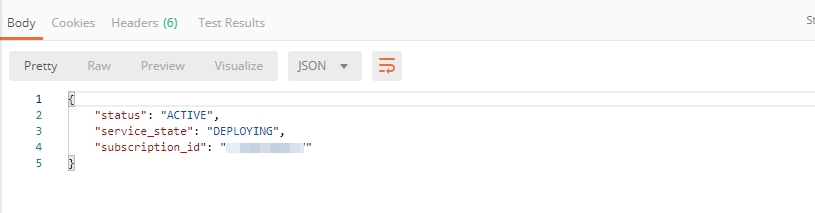
Note that it takes some time to deploy the service, so you can just re-send the same request after a few minutes to see “service_state”: “DEPLOYED”.
More detailed information on this API request can be found here.
2. Get Zone File
Send the Get DNS Subscription Zones request which uses DNS “subscription_id” created a few steps above. This will retrieve a zone file from your primary DNS server.
As a result, you will get the zone file describing your DNS zone and containing mappings between domain names and IP addresses.
3. Query via Browser
Let’s now check the created DNS service via browser.
a) Copy NA1 address from the Zone file retrieved in the step above:
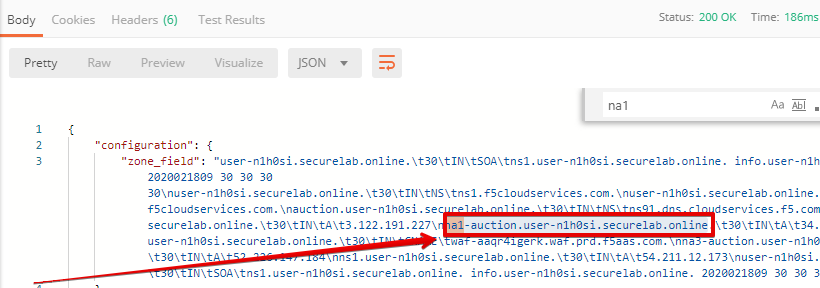
b) Paste the copied address into your browser and you will get to the created secondary DNS instance:
4. Review the JSON
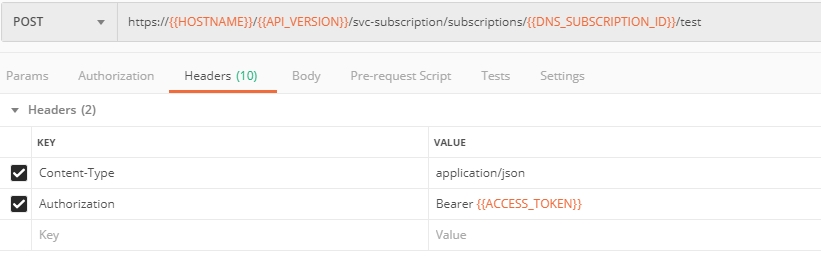
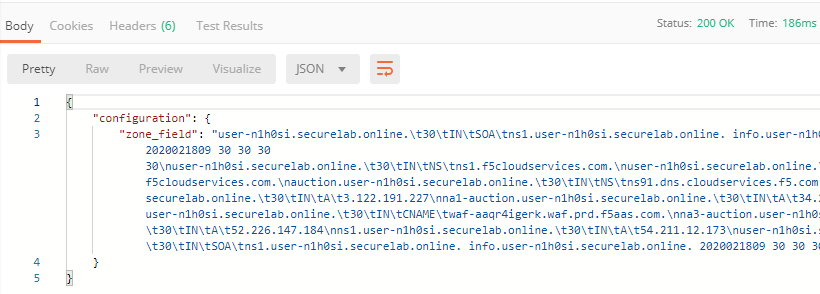
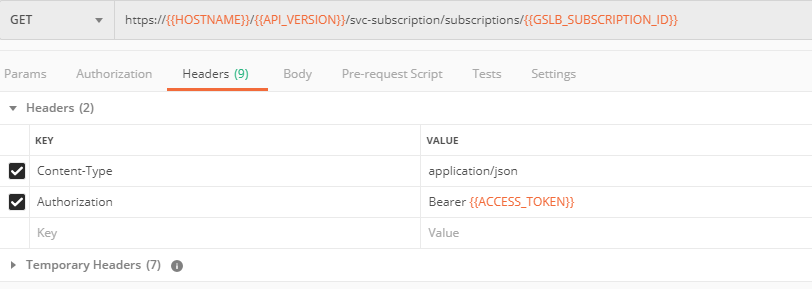
Let’s now see the structure of the JSON. In order to get the JSON, go back to Postman and send the Get DNS JSON request which uses your ACCESS_TOKEN to retrieve the JSON:

The response will retrieve the JSON containing all the DNS instance information:
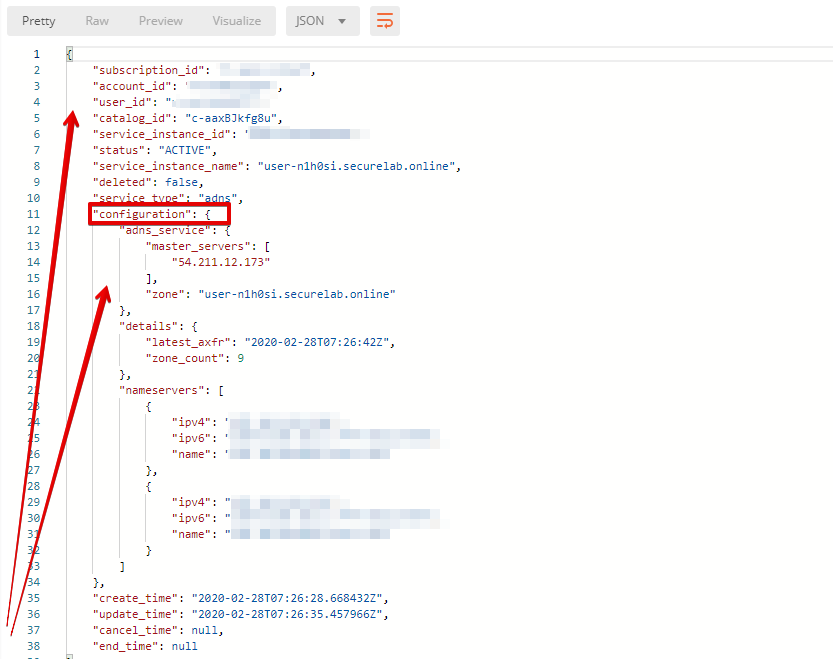
As you can see, the JSON provides some general information on subcription_id, user_id, and instance name, as well as all configuration details (service IP, zone name, etc).
5. Delete Zone
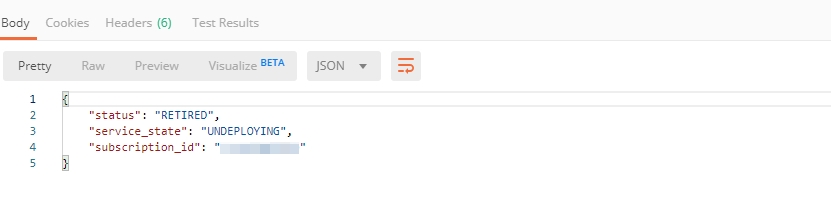
In order to delete your Zone using Postman, send the Retire DNS Subscription request which uses the relevant “subscription_id”.
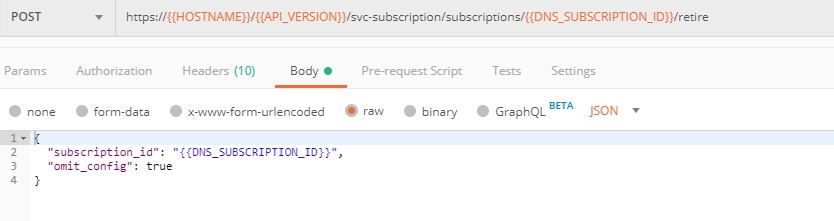
You will see “retired” status in the response body which means that it’s not available on the F5 Cloud Services portal anymore.
More detailed information on these API requests can be found here.
F5 DNS Load Balancer Cloud Service - UI
In this section we will use the F5 Cloud Services UI to set up the Load Balancer DNS record, add endpoints for our Auction app, add health checks, load balanced pools, and run through a few configuration options.
1. Create F5 DNS Load Balancer Cloud Service
Let’s now create DNS Load Balancer Service to be able to balance loads across multiple clouds (Azure & AWS) and provide global availability and performance with health-check and built-in DDoS protection.
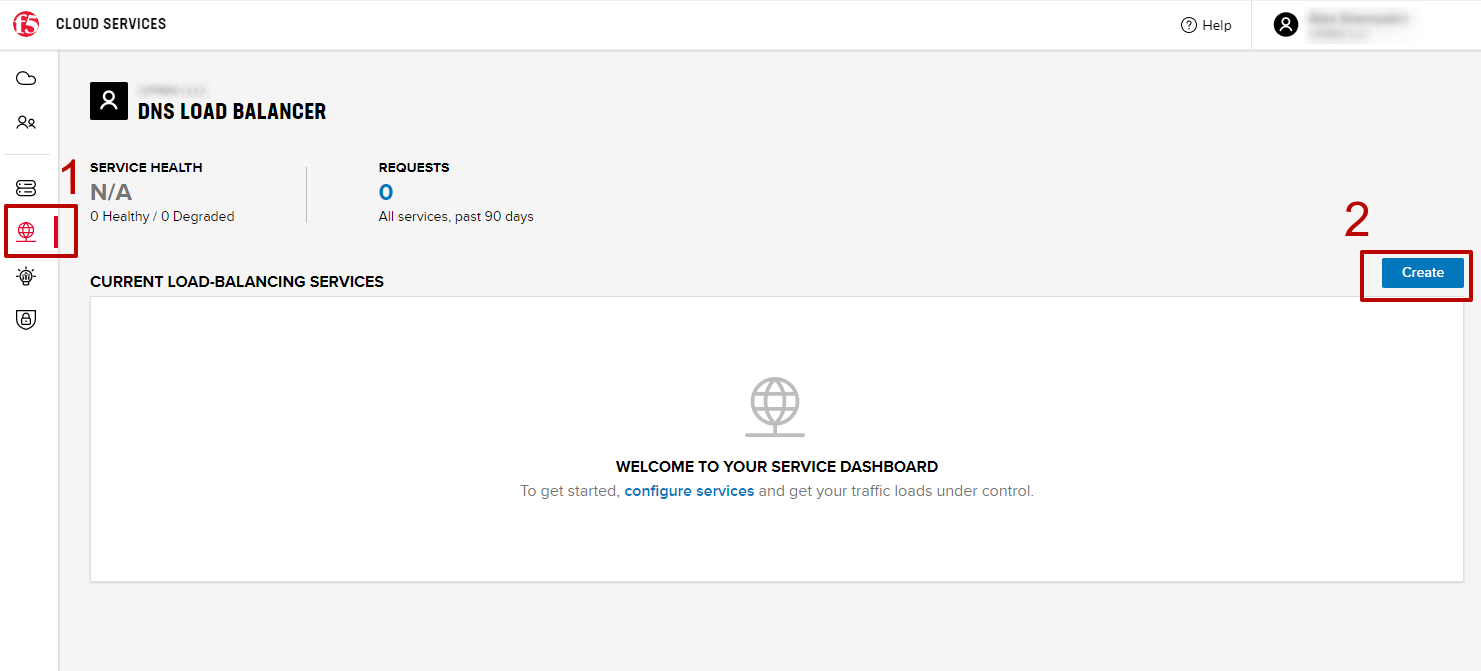
a) Go to the DNS Load Balancer tab and click Create.
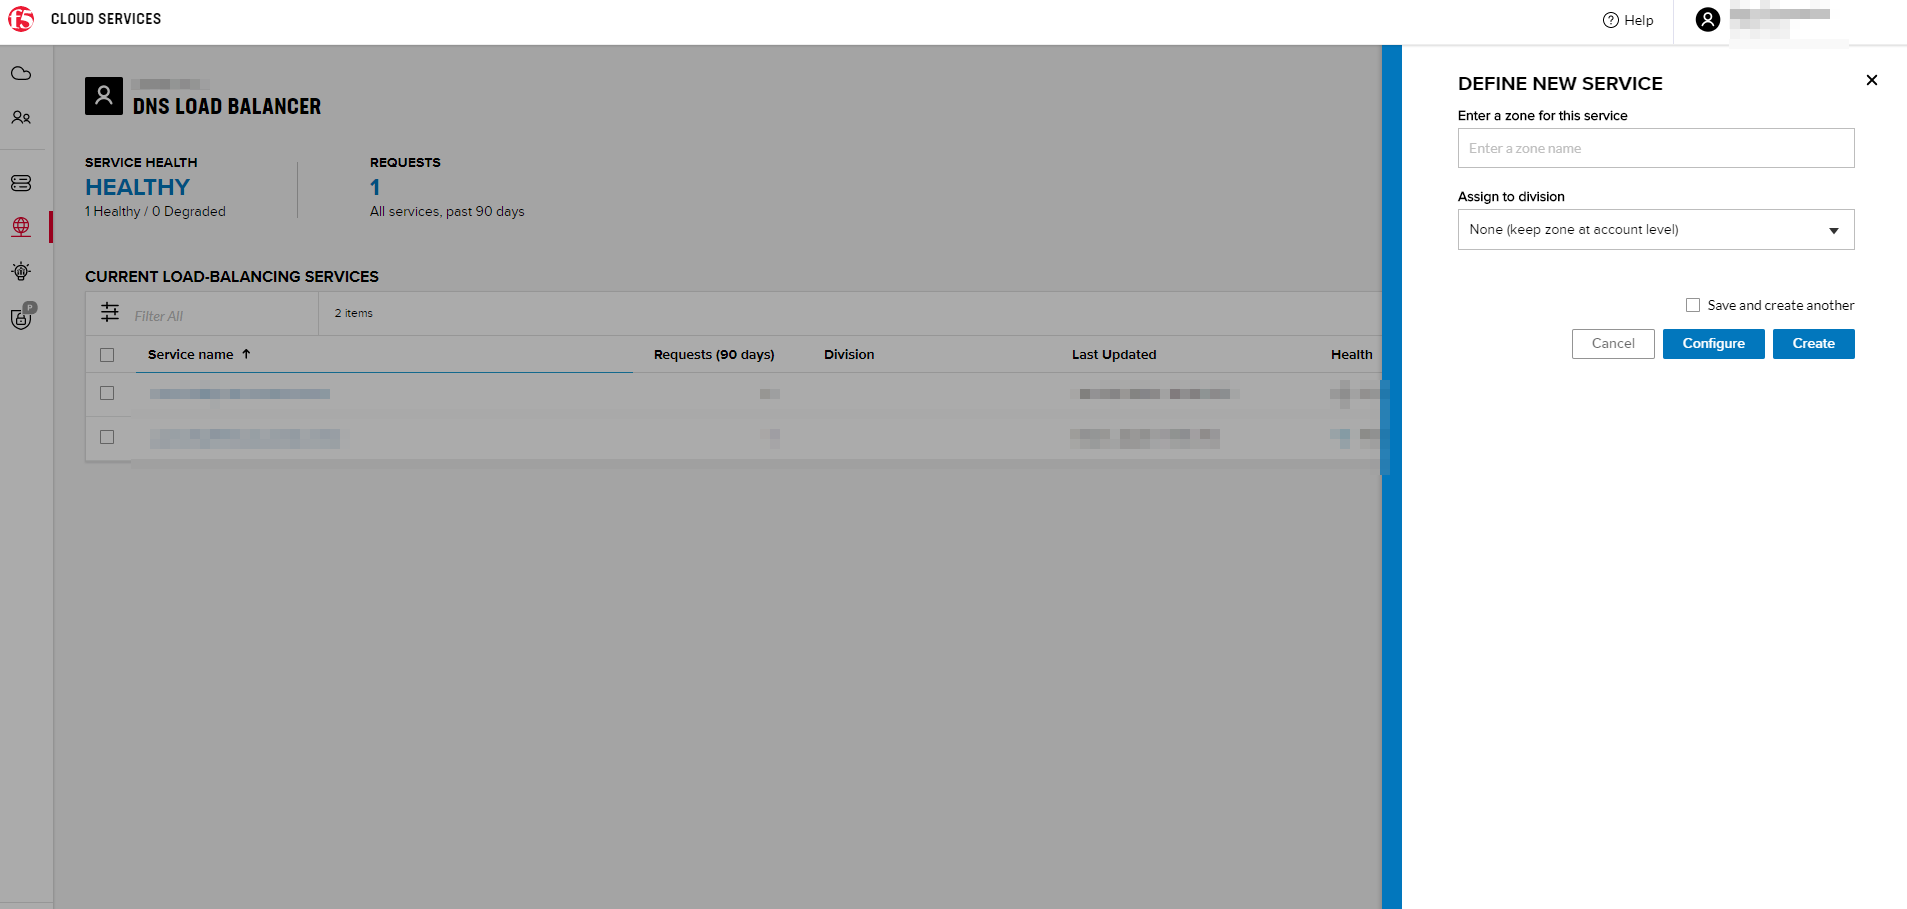
b) Enter name of the zone we created before and click Create.
Your DNS Load Balancer instance will appear on the list but in Inactive status. You can change the status after creating load balanced record and pool.
2. Add Single Endpoint, Health Monitor, Pool and Default Geoproximity Rule
a) Create a Region
Creating regions will allow grouping incoming requests by geographic areas and directing them to specific pools.
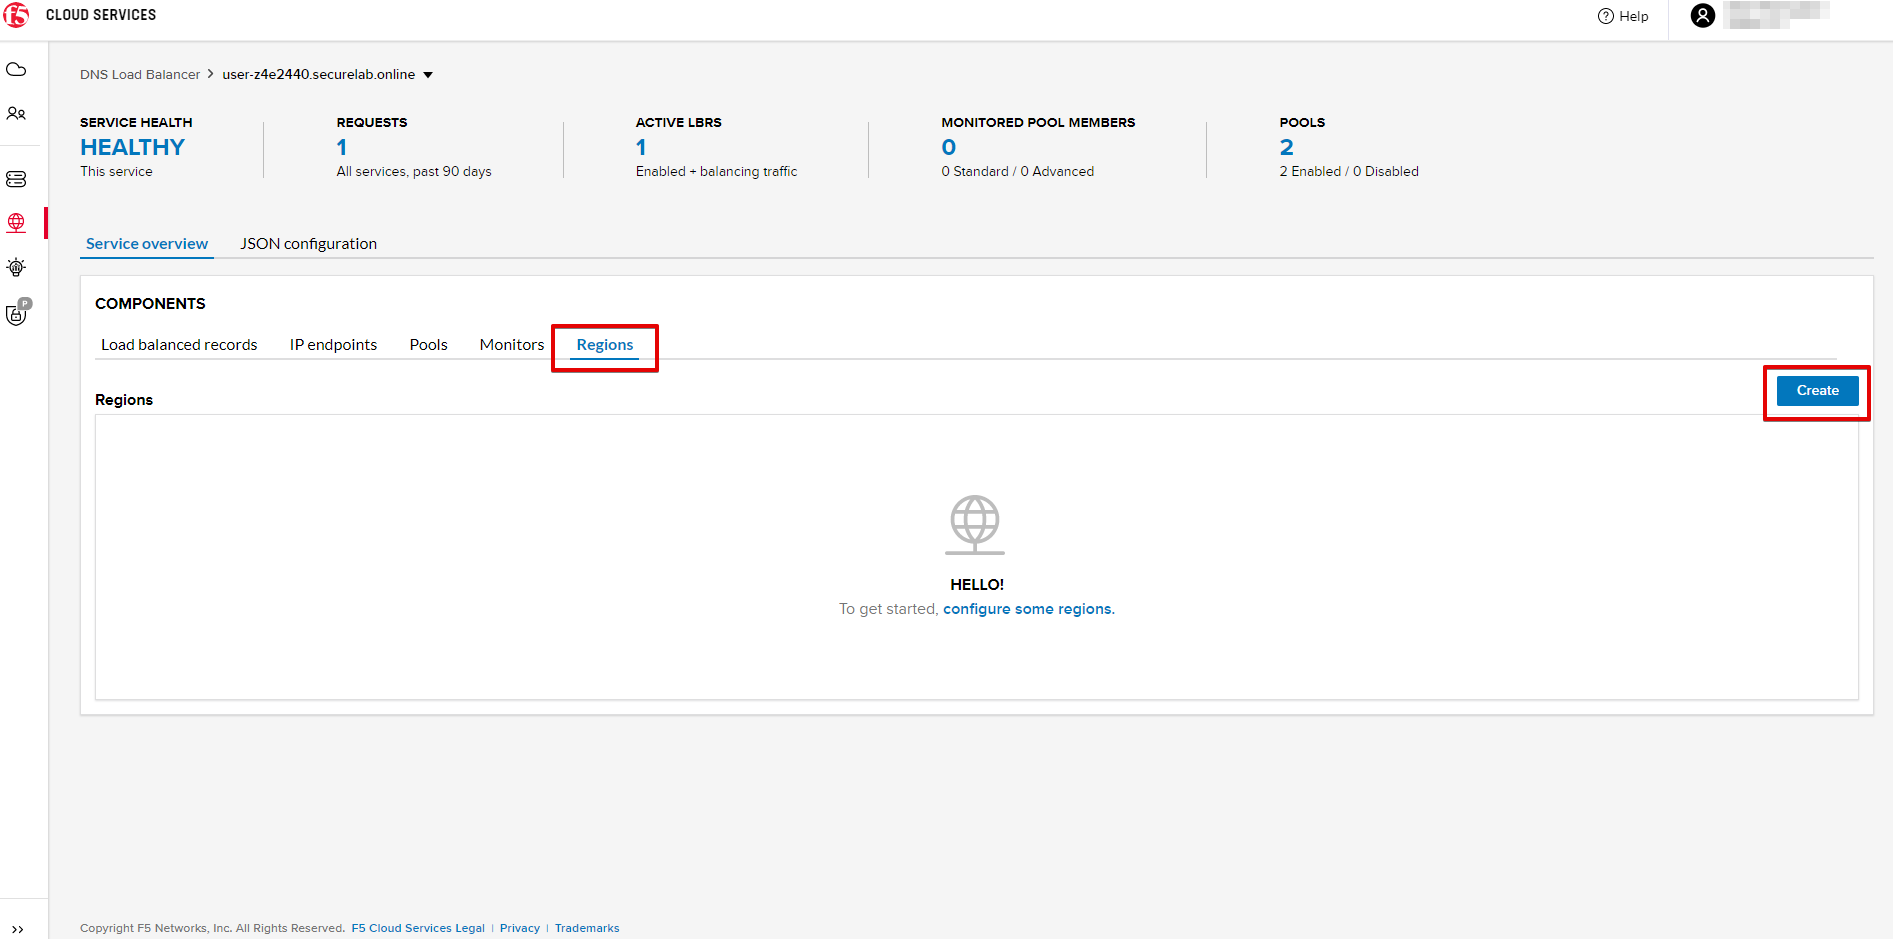
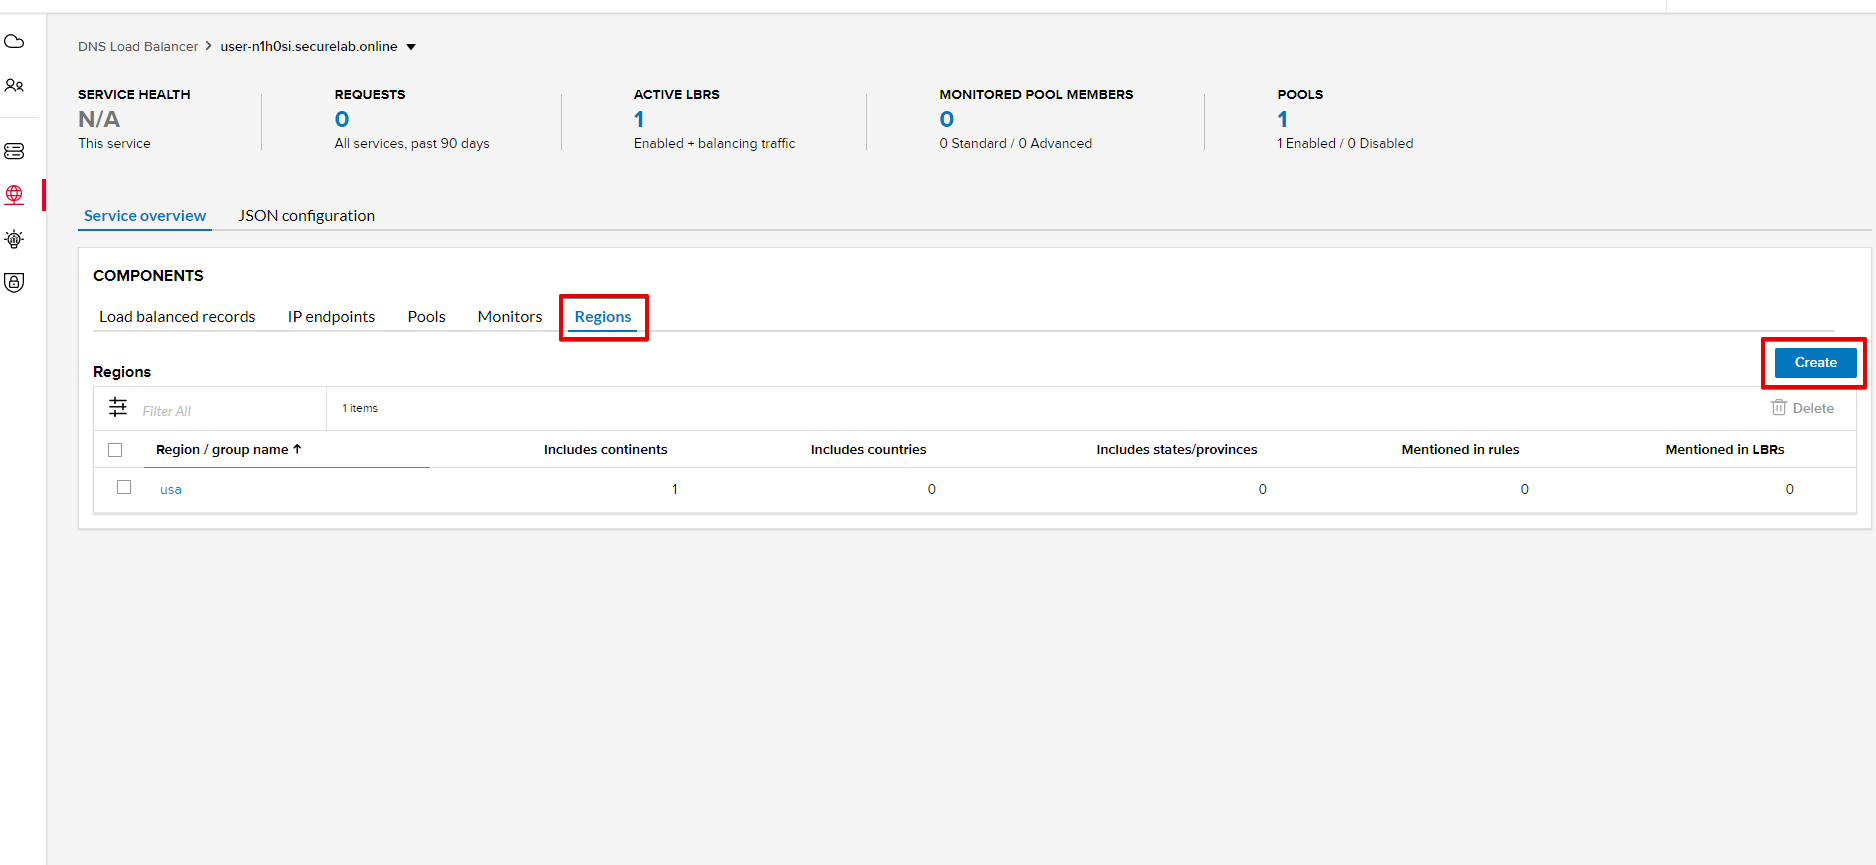
1. Click on DNS Load Balancer instance which we have just created and go to the Regions tab. Click Create.
2. Fill “usa” as “Region name” and select “North America” in “Include these continents”. Save the created region.
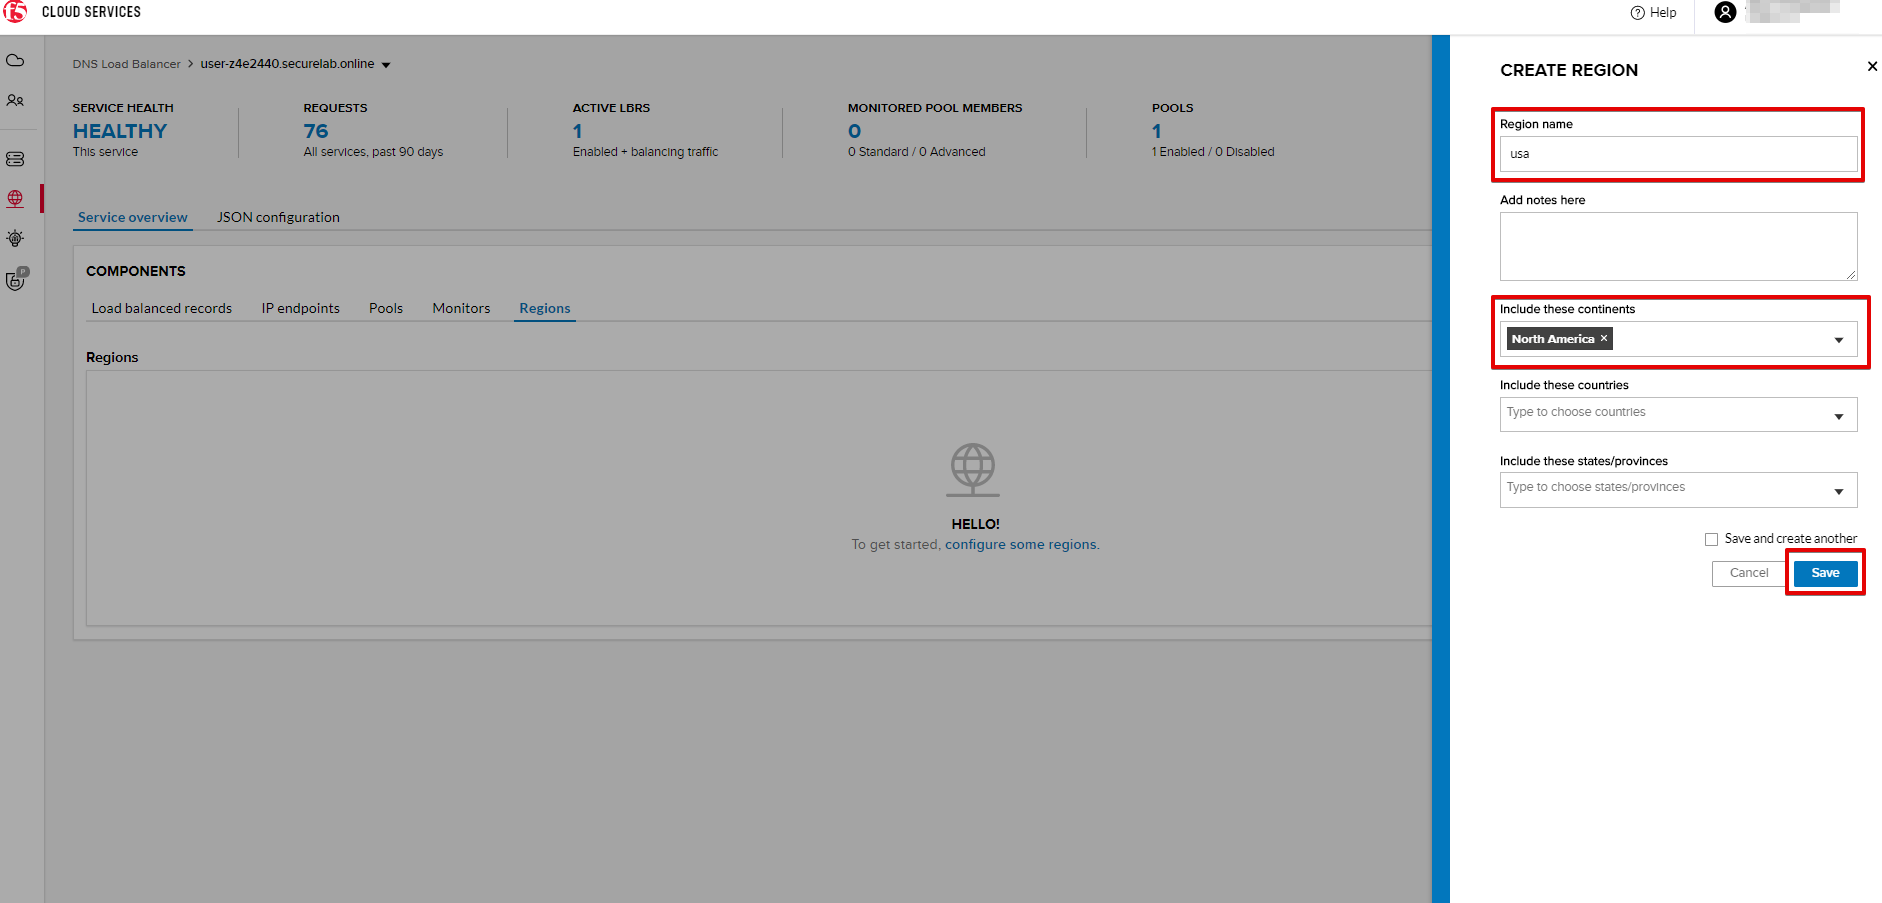
Now all requests from North America will be covered by the “usa” region.
b) Add A Health Monitor
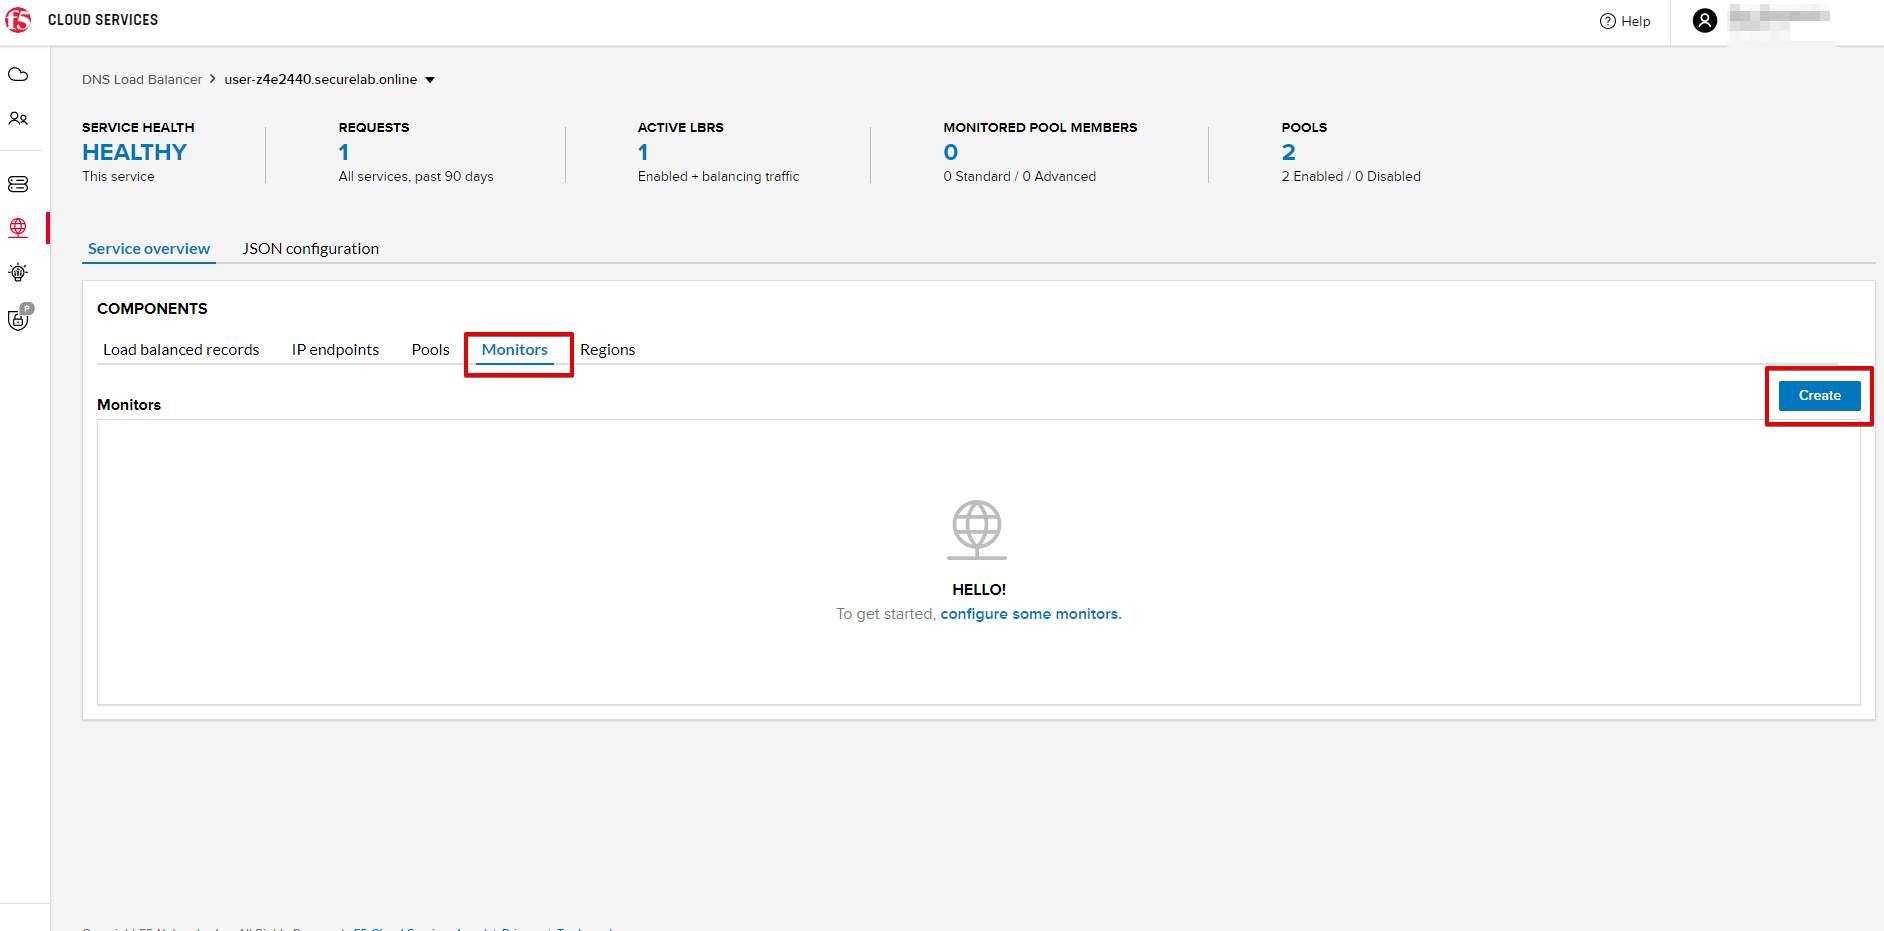
To distribute the load, DNS Load Balancer will need to monitor health of each IP Endpoint. So, let’s create a monitor.
1. Go to the Monitors tab and then click Create.
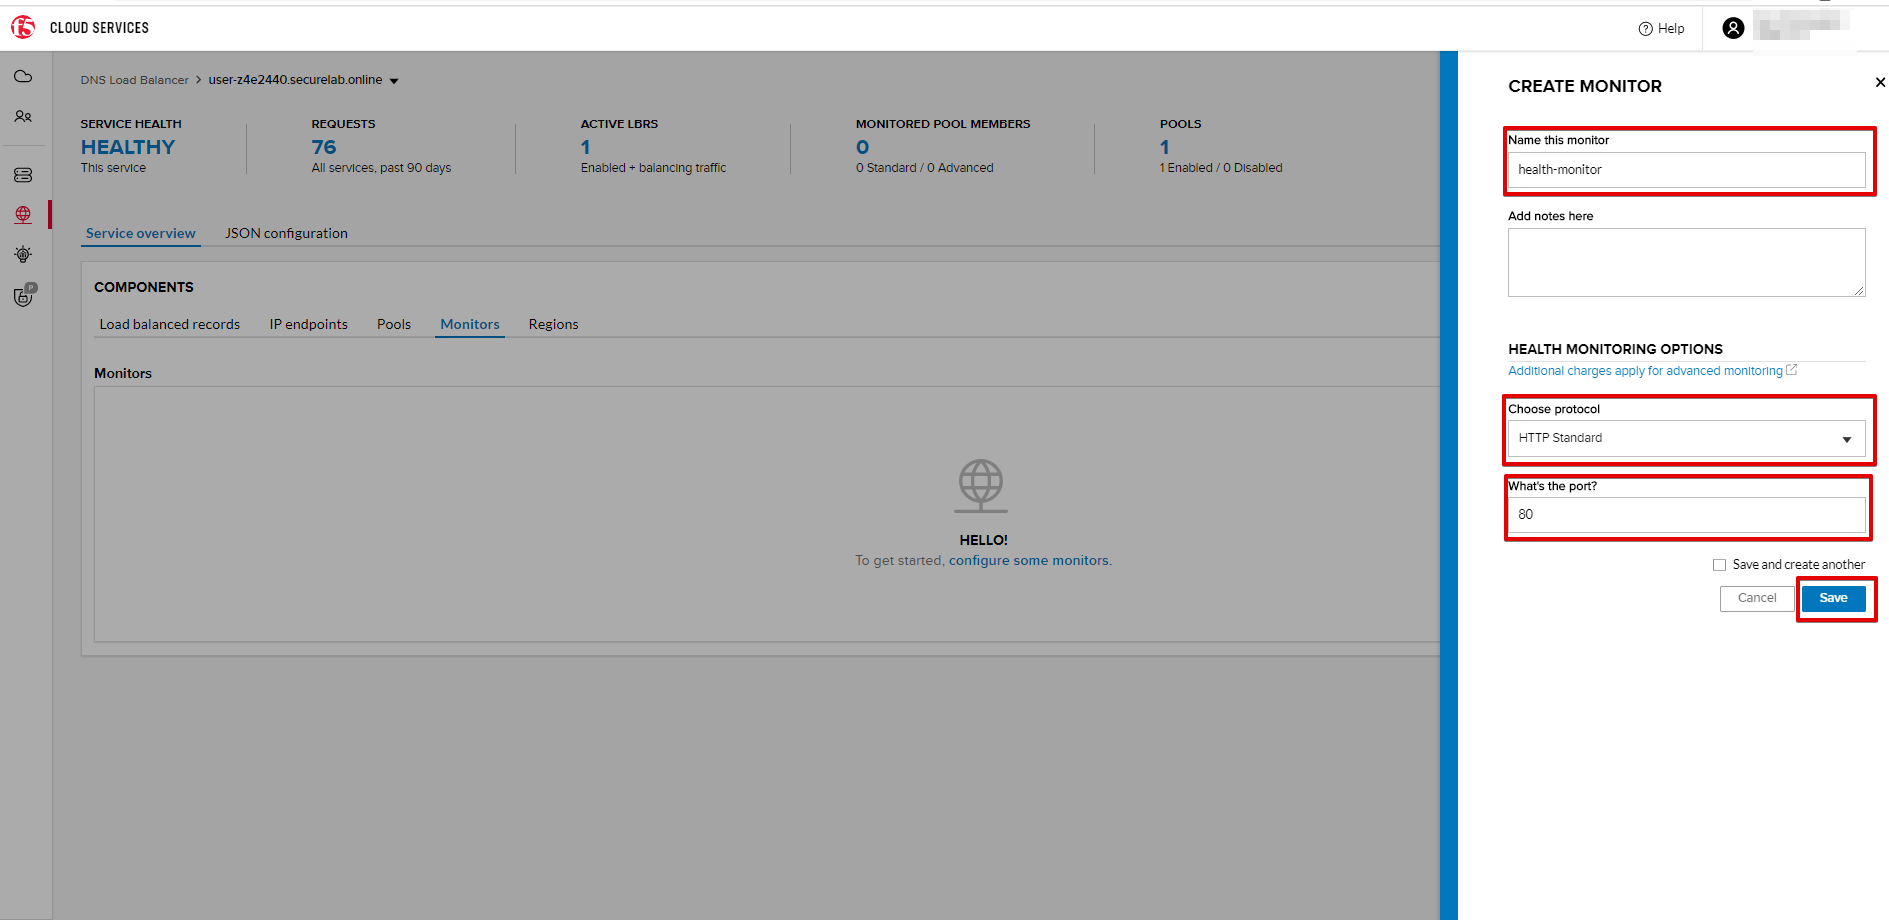
2. Fill in “health-monitor” name, choose “HTTP Standard” protocol, indicate “80” port and click Save.
c) Add an IP Endpoint (NA) with Health Check
Let’s now create an IP endpoint that will currently service all incoming requests. DNS Load Balancer chooses an IP endpoint based on request origin and configuration of IP endpoints, as well as IP Endpoint health.
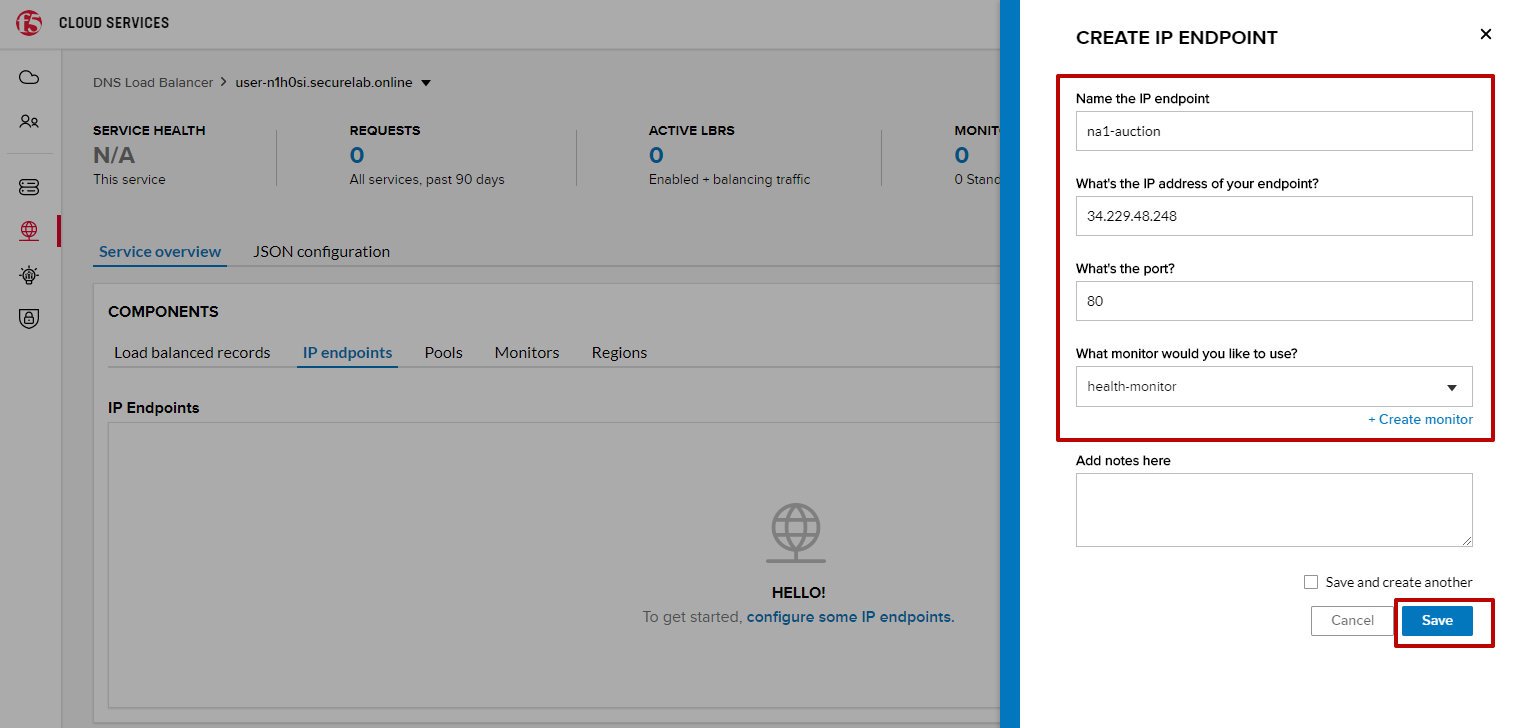
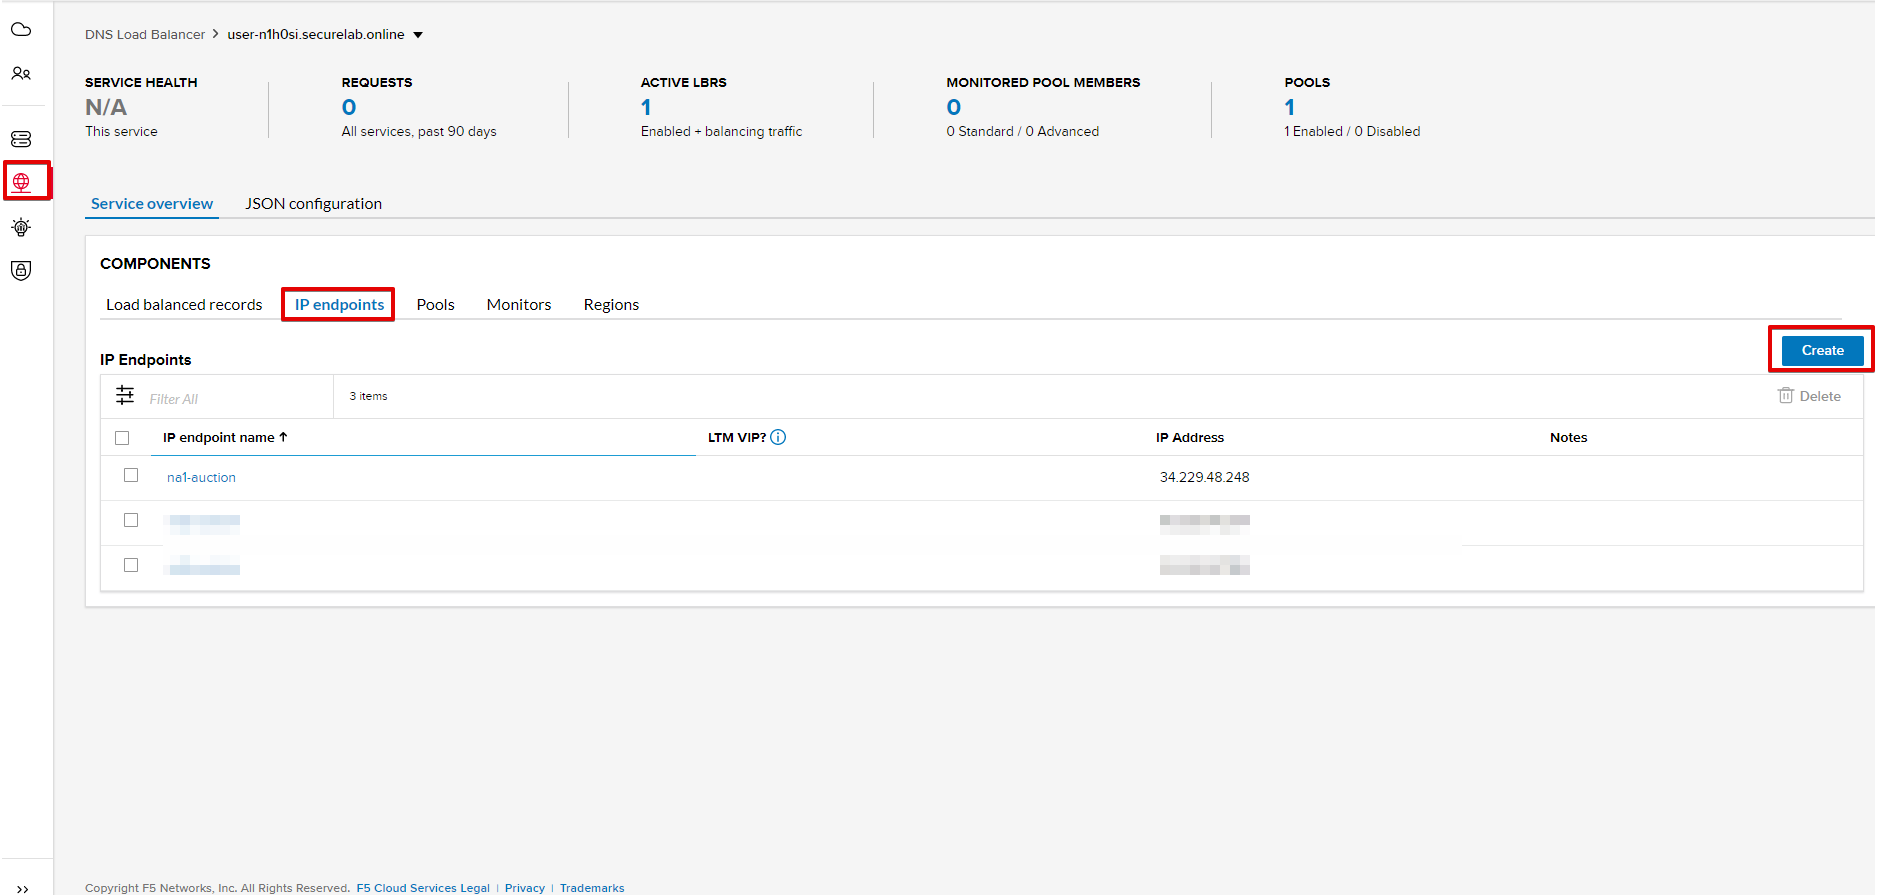
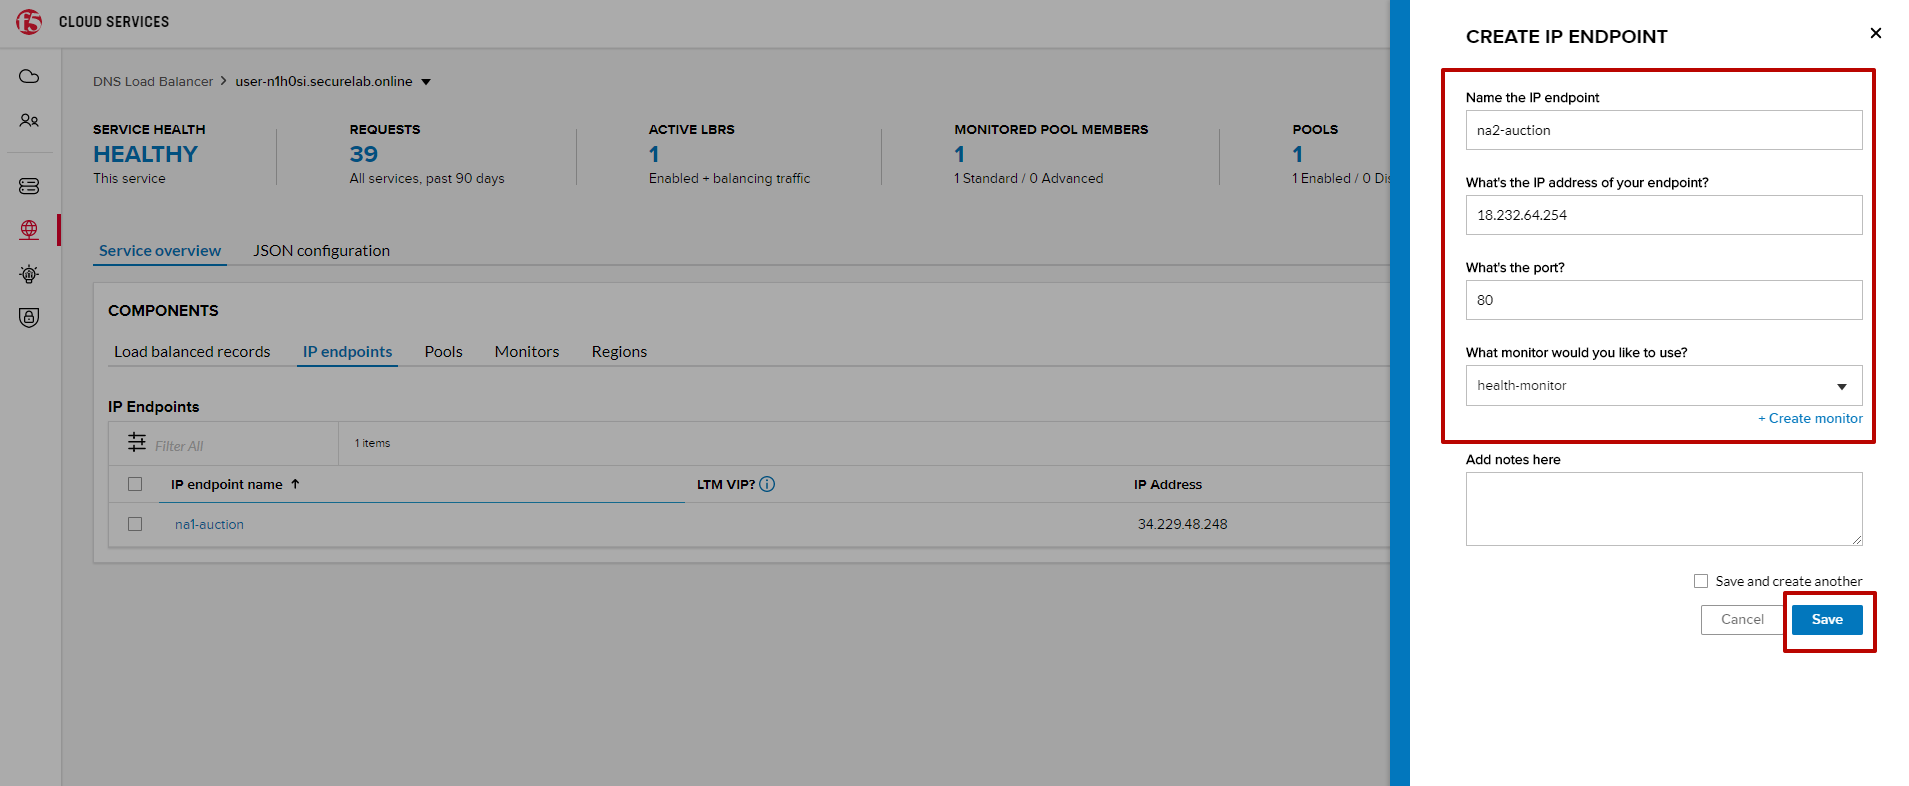
1. Go to the IP endpoints tab and then click Create.
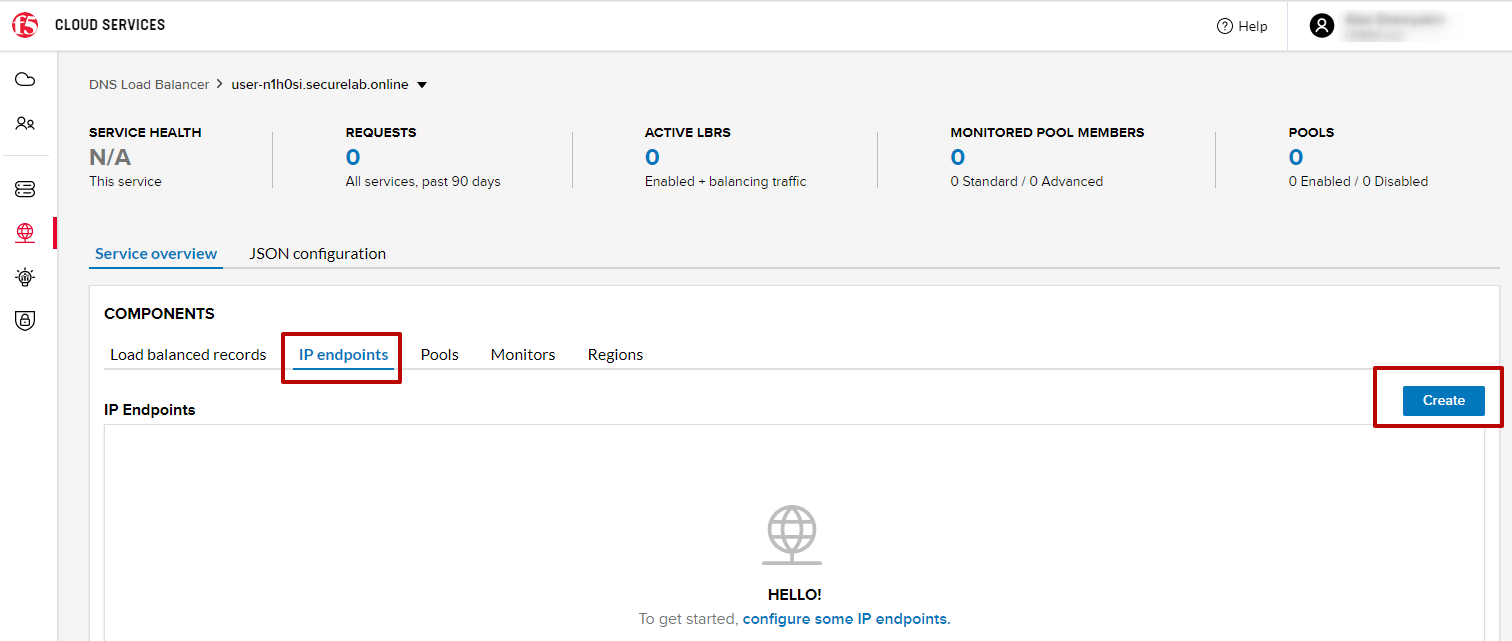
2. Fill in name (“na1-auction”), IP address (“34.229.48.248”), port (“80”) and select the monitor we created above.
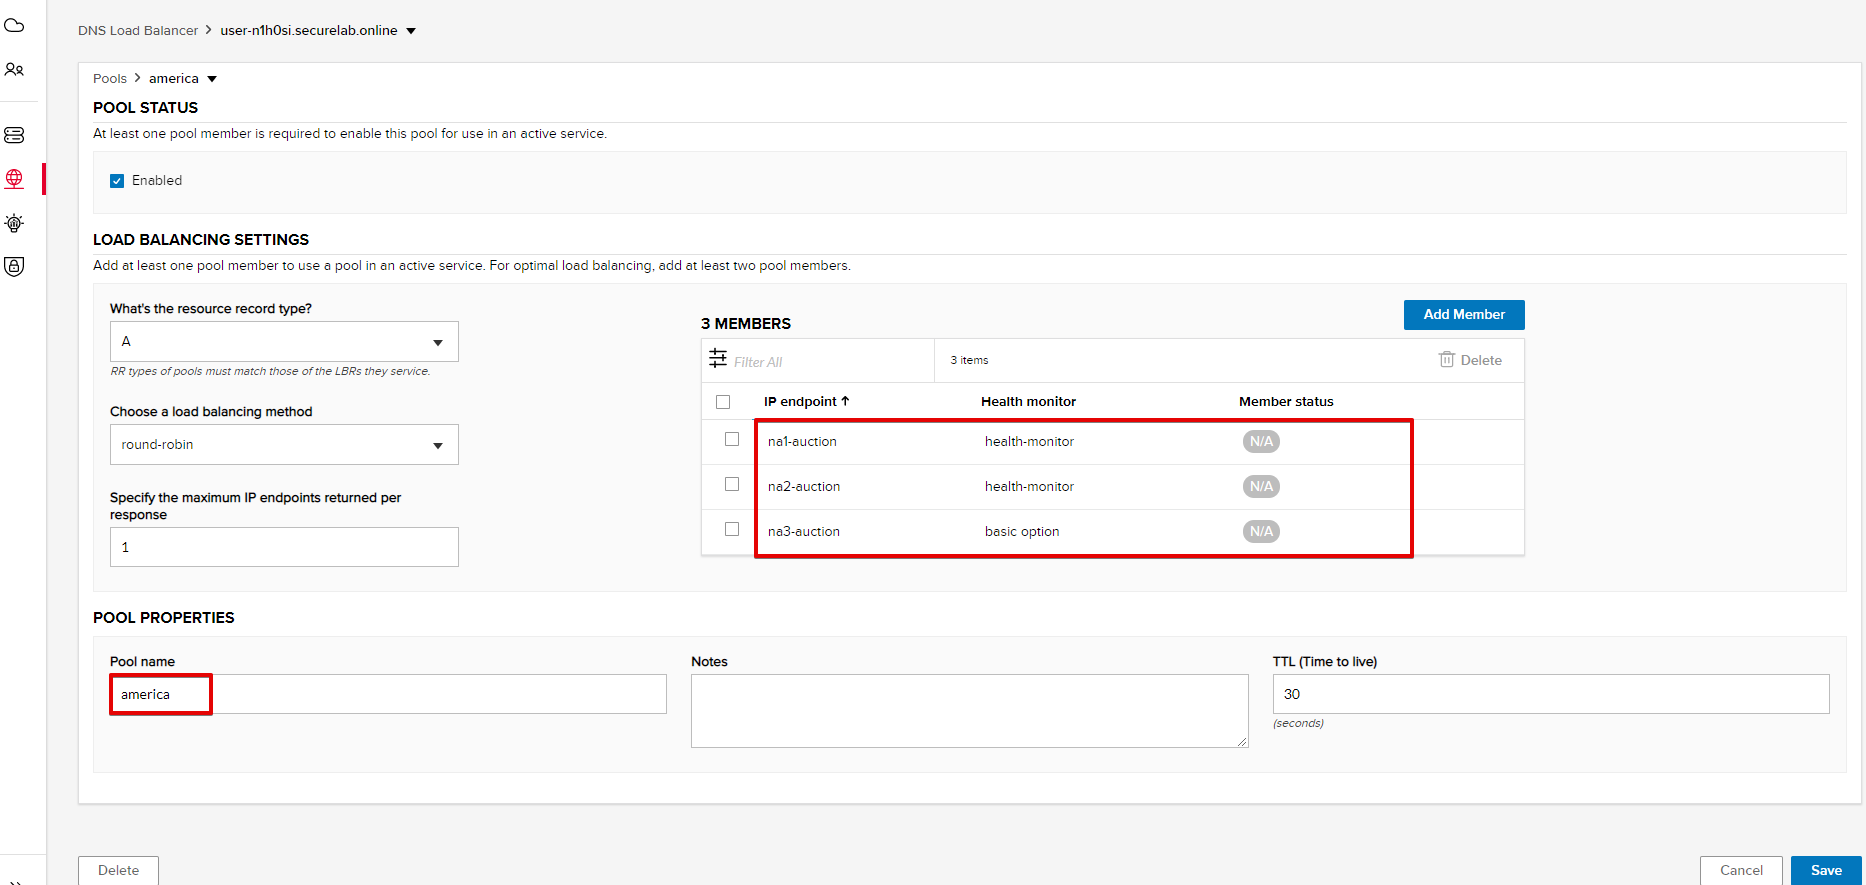
d) Create a Pool
Let’s now create a pool and add a member to it.
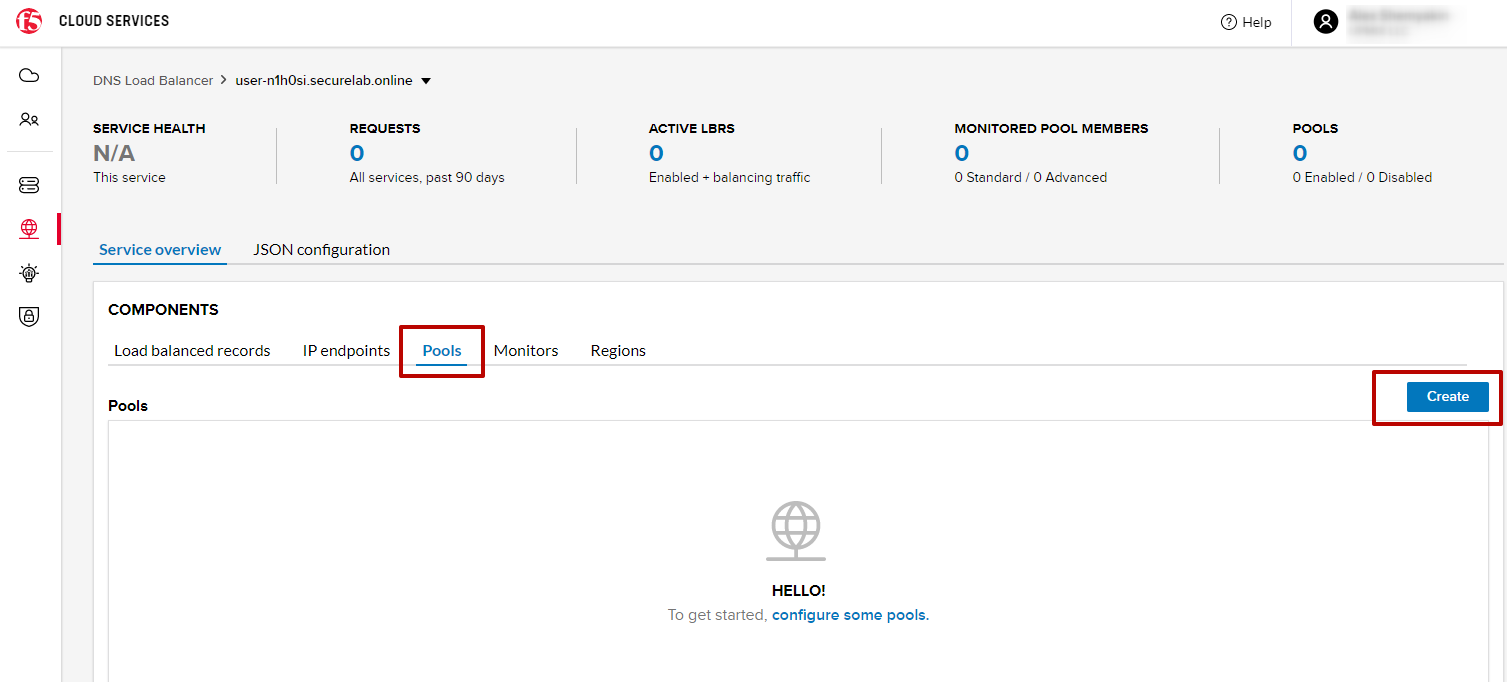
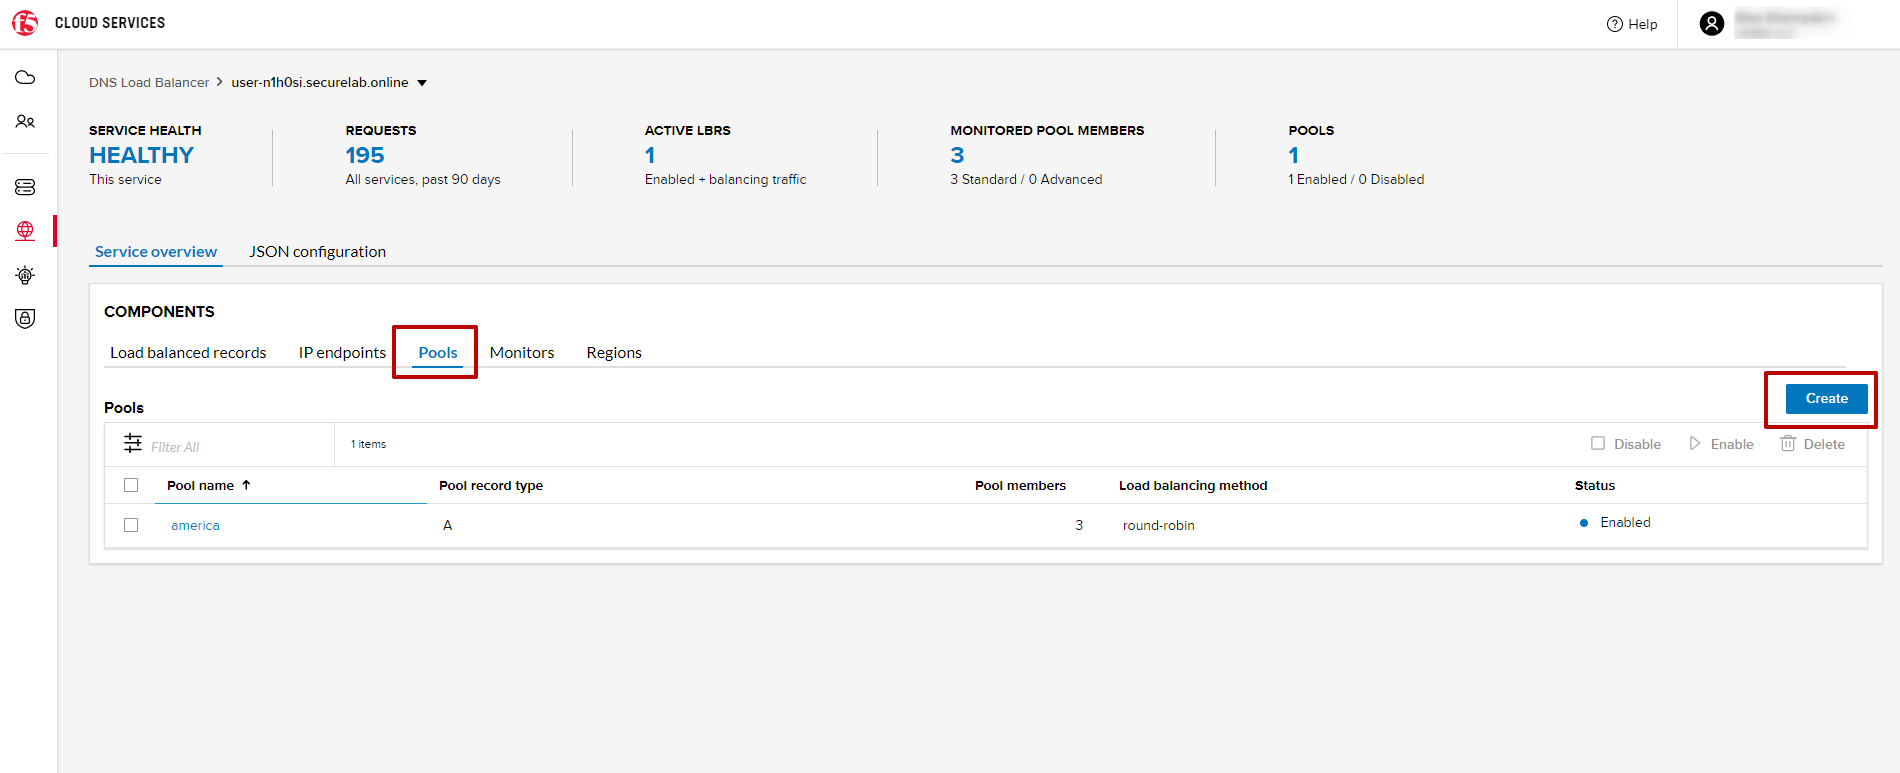
1. Go to the Pools tab and then click Create.
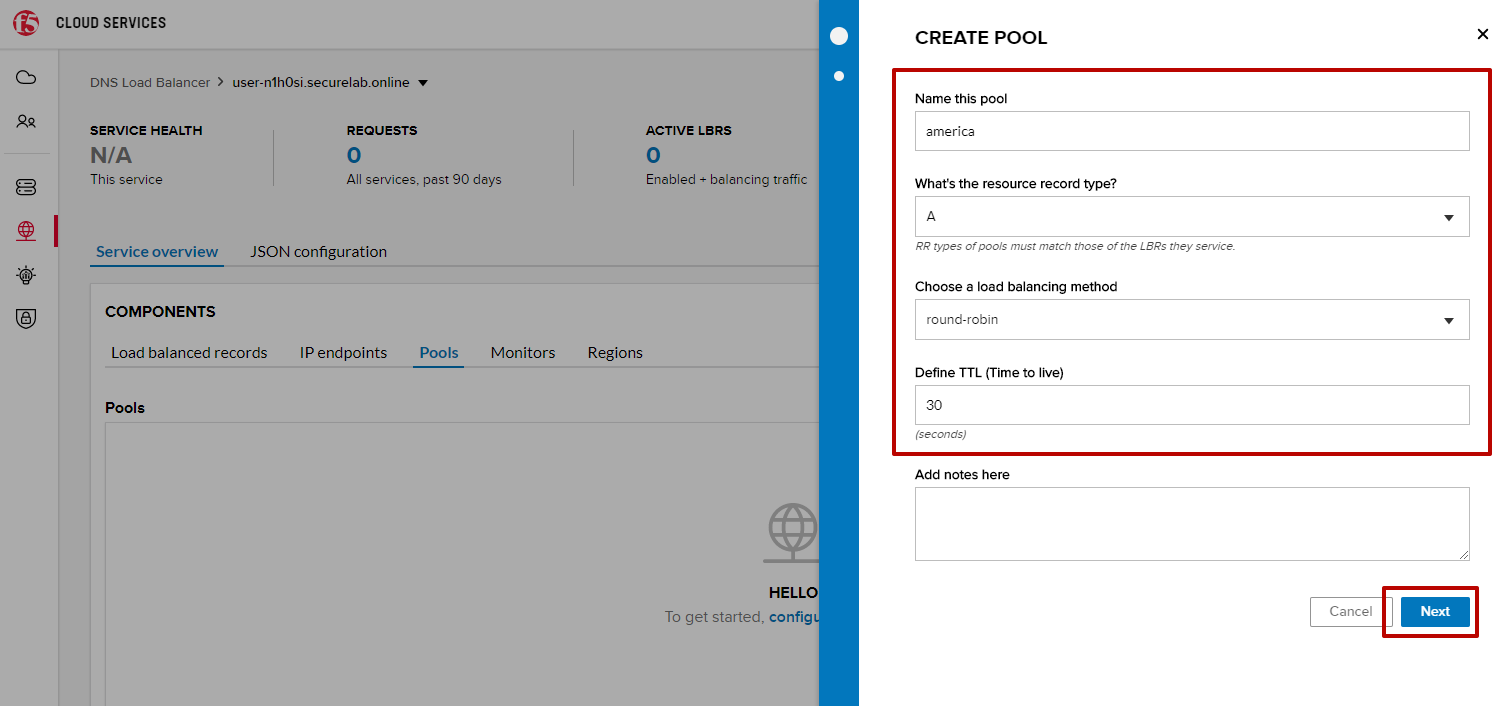
2. Fill in “america” name, choose “round-robin” method and define TTL “30”. Then click Next.
3. Click Add Member to add an IP Endpoint to the pool.
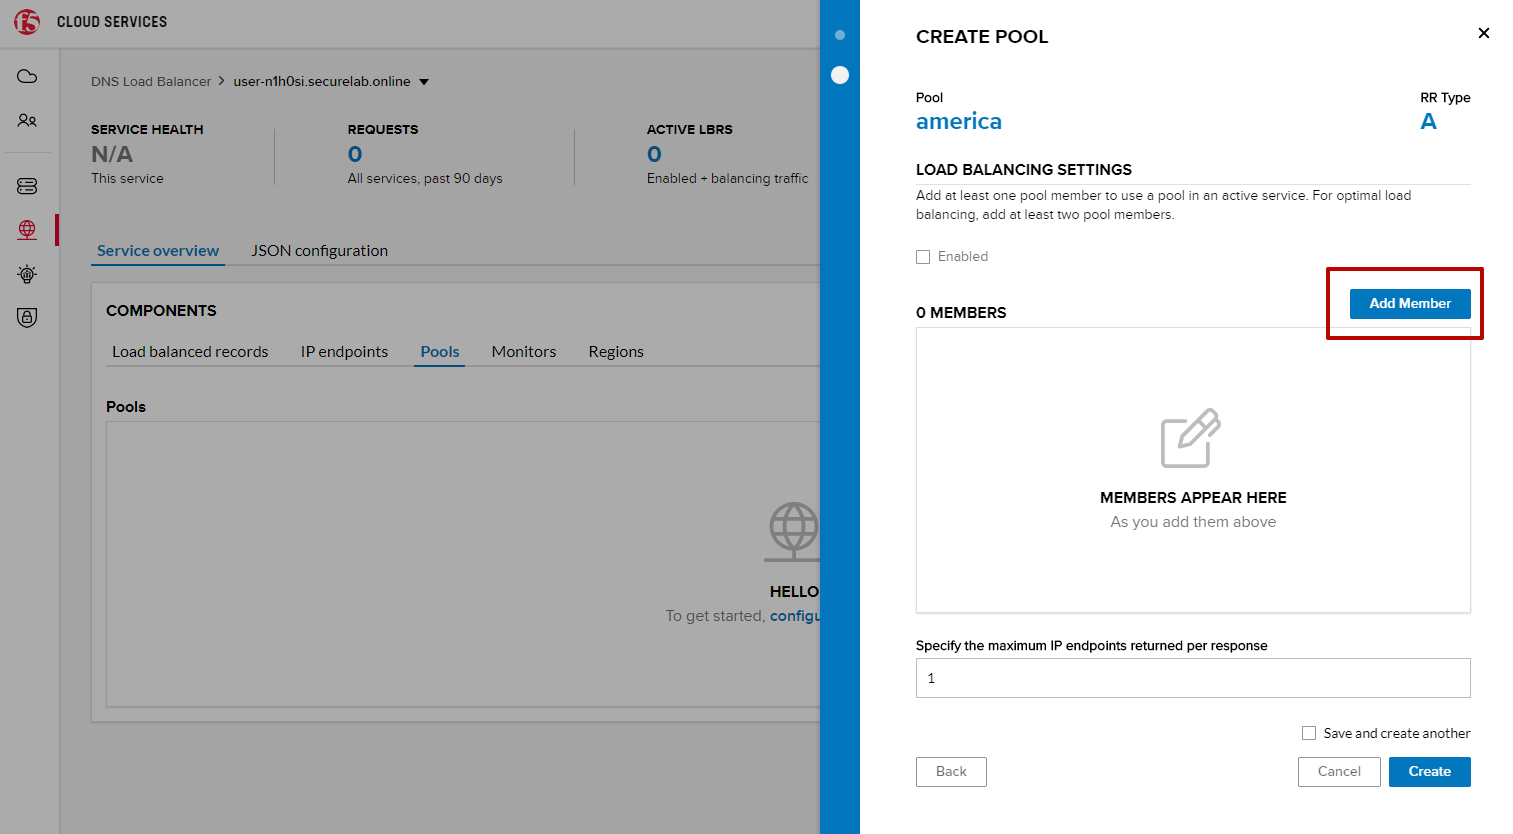
4. Select the endpoint we’ve just created, as well as the monitor. Click Add and Create.

A newly created pool with the one NA endpoint will appear on the list.
e) Add a Load Balanced Record
After creating all the components (IP endpoint, Pool, Region and Monitor), we can create a DNS Load Balancer record and its proximity rule.
1. Go to the Load balanced records tab and then click Create.
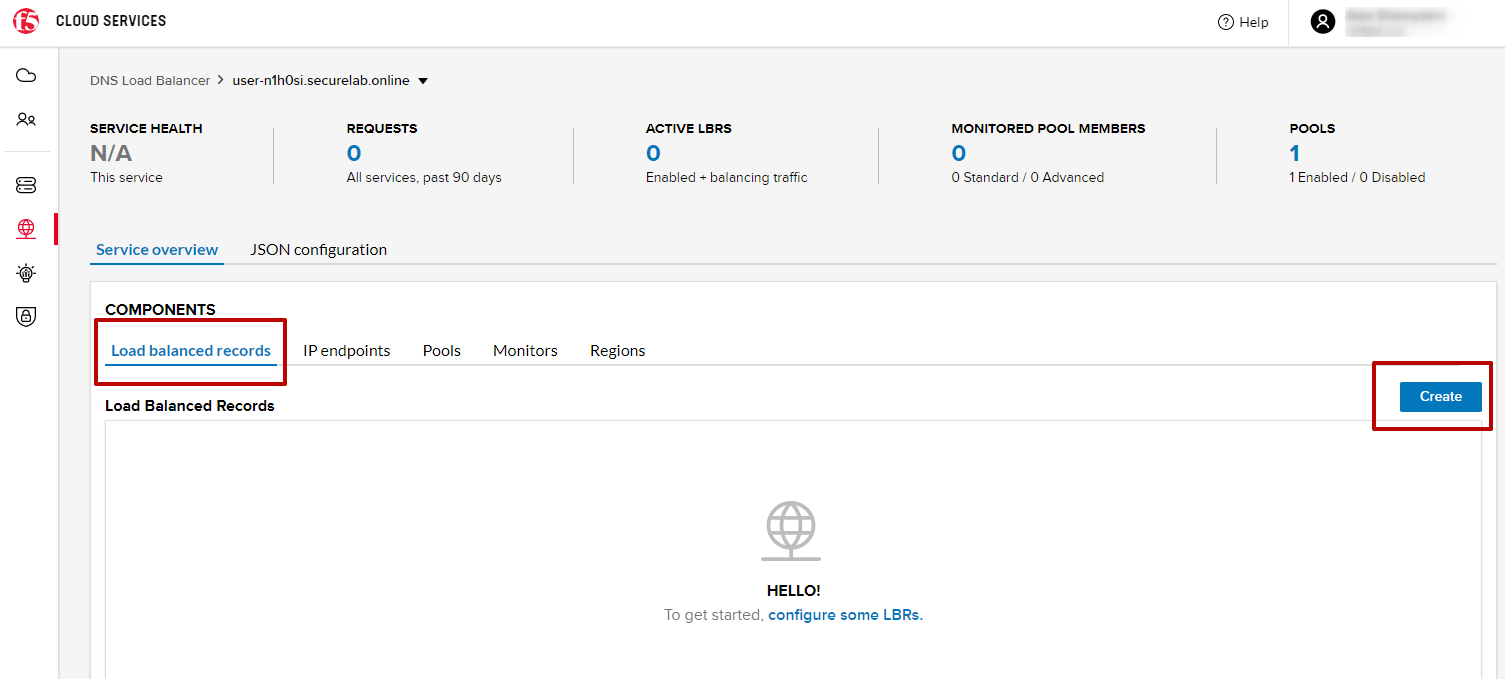
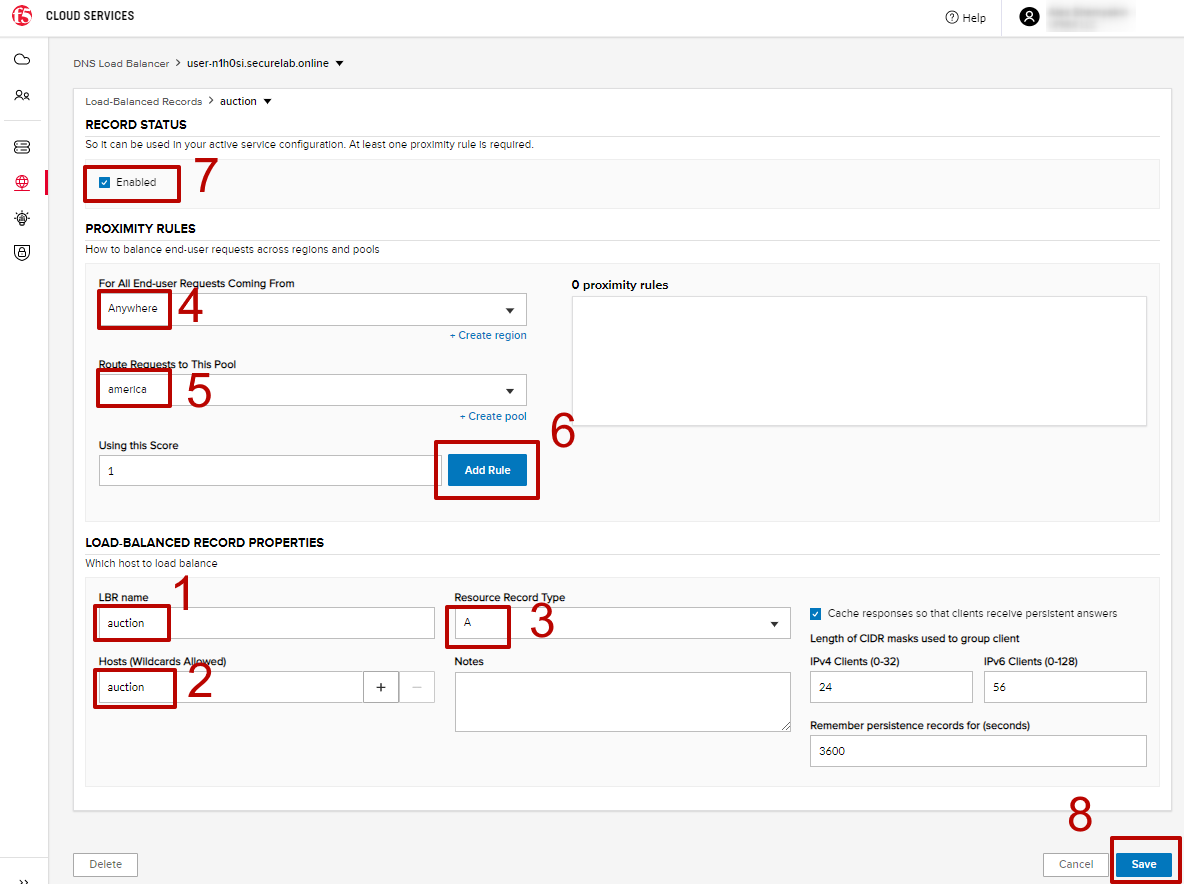
2. Fill in LBR name “auction”, host “auction”, select “A” as “Resource Record Type” and set a proximity rule (“Anywhere” -> “america” pool) to direct requests from anywhere to “america” pool with the created NA1 endpoint. Set score of the proximity rule to be “1”. This will define the priority of the rule after some more are added.
Click Add Rule, then check *Enabled* tick and Save the record.
3. Go back to the DNS Load Balancer tab, click on your service and activate it.
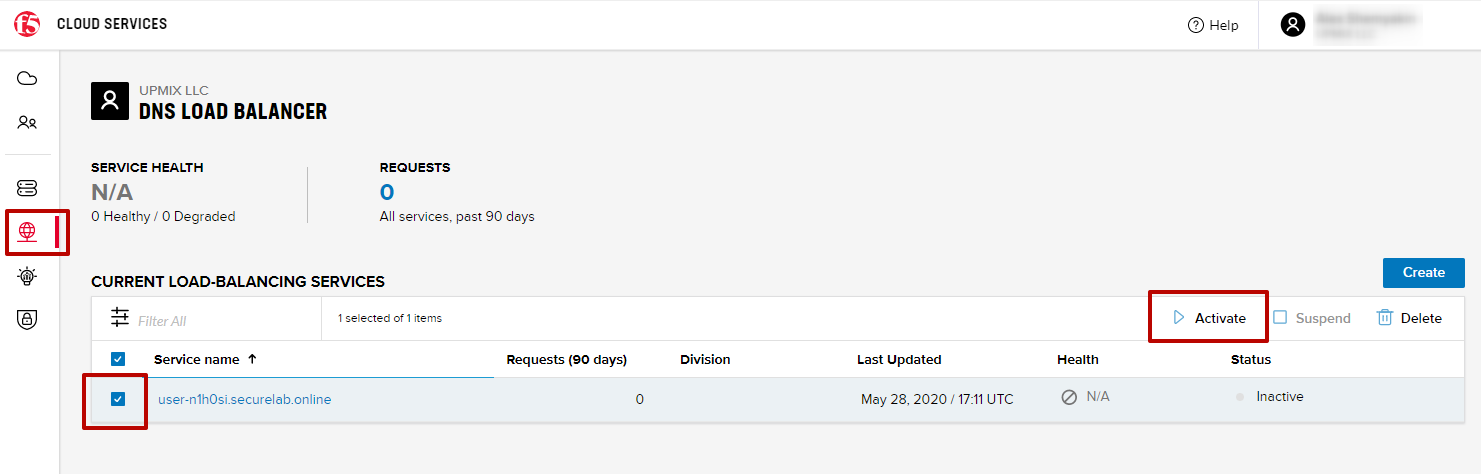
The DNS Load Balancer service is now setup.
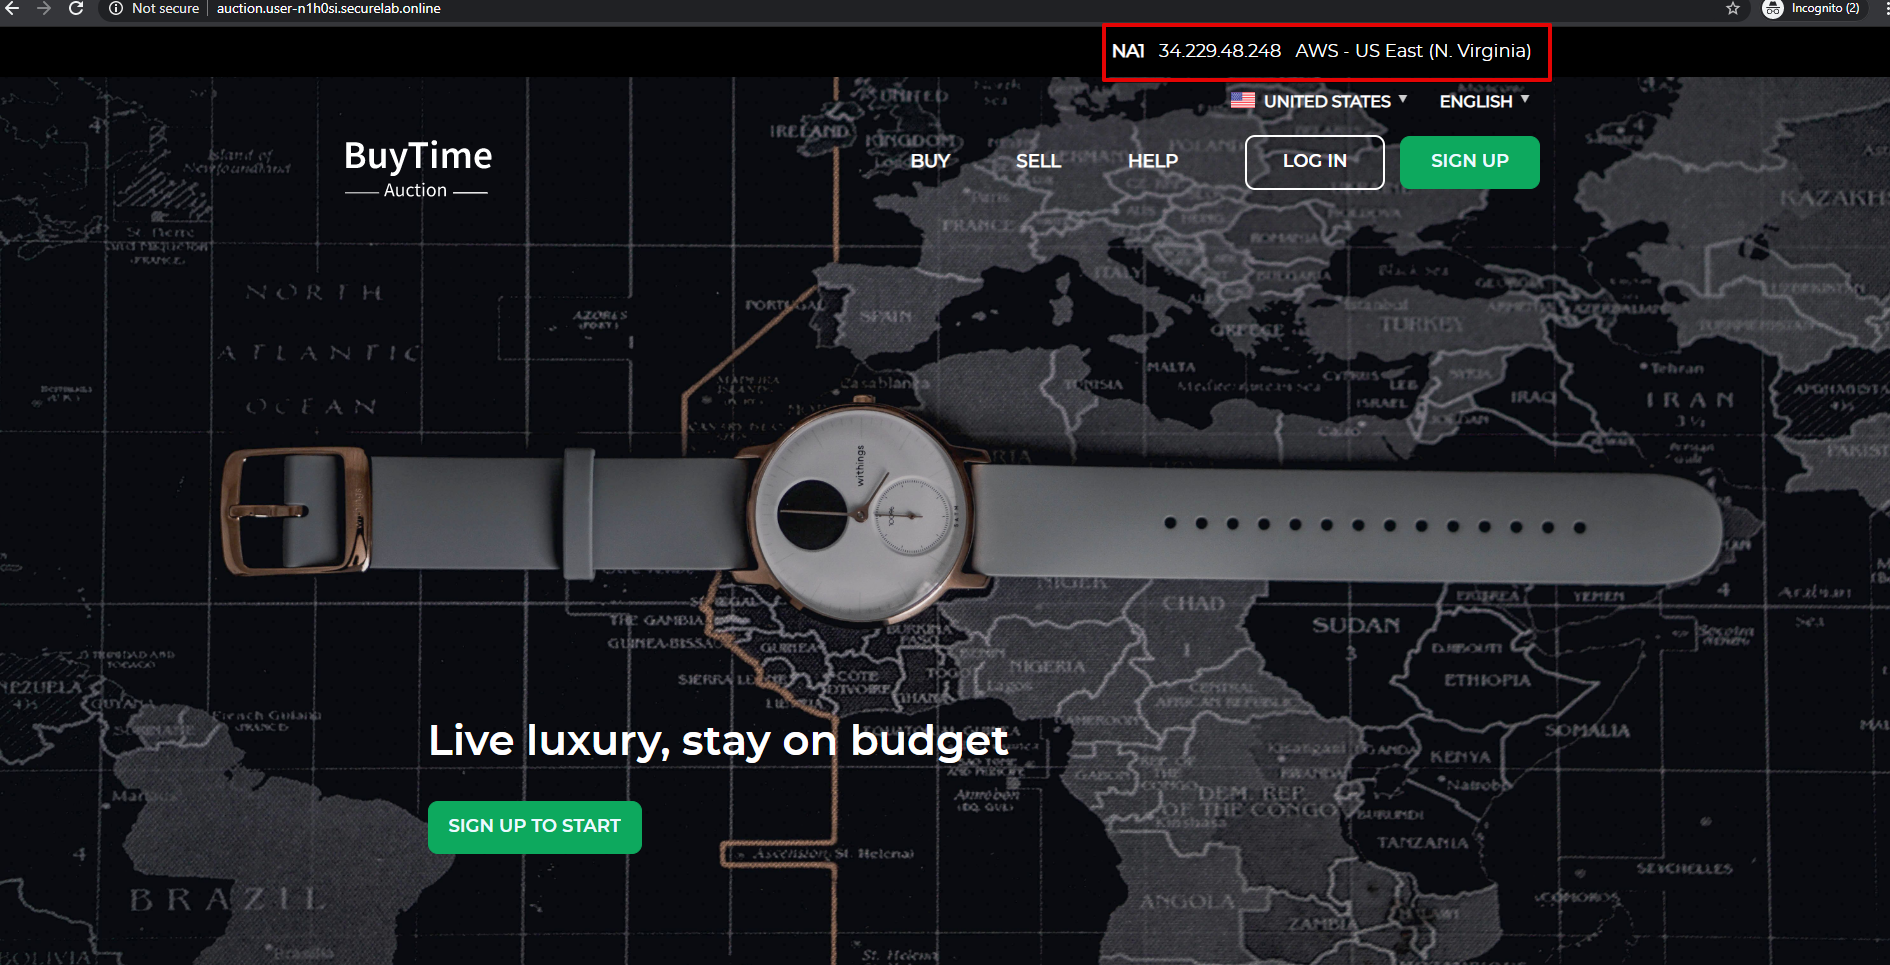
f) Test via Browser
Let’s test the created service with the proximity rule via browser.
1. Open FQDN (“auction.{{zone name}}” where {{zone name}} is the value copied from postman in one of the step above) in your browser.
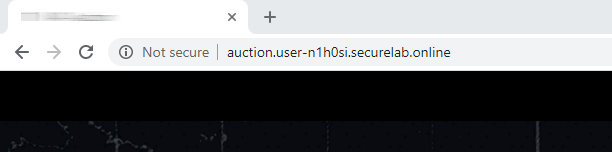
2. You will see that acc to the proximity rule, you joined the endpoint belonging to the “america” pool.
g) Test via Command Prompt
Another way to test the new proximity rule is via Command Prompt.
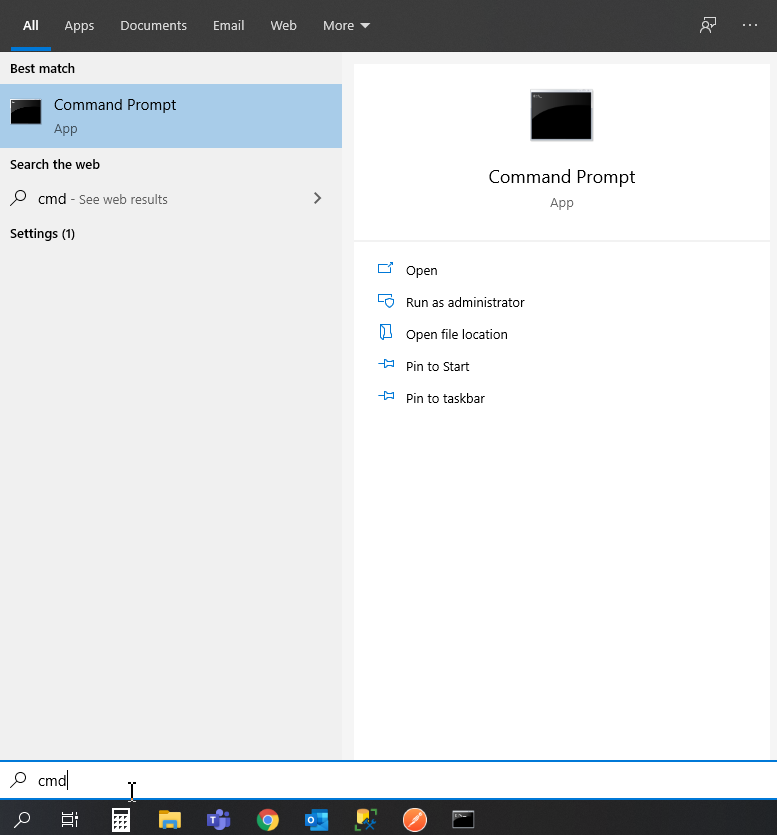
1. Start Command Prompt.
2. Paste the following command to the Command Prompt: nslookup “your FQDN name” and press Enter.
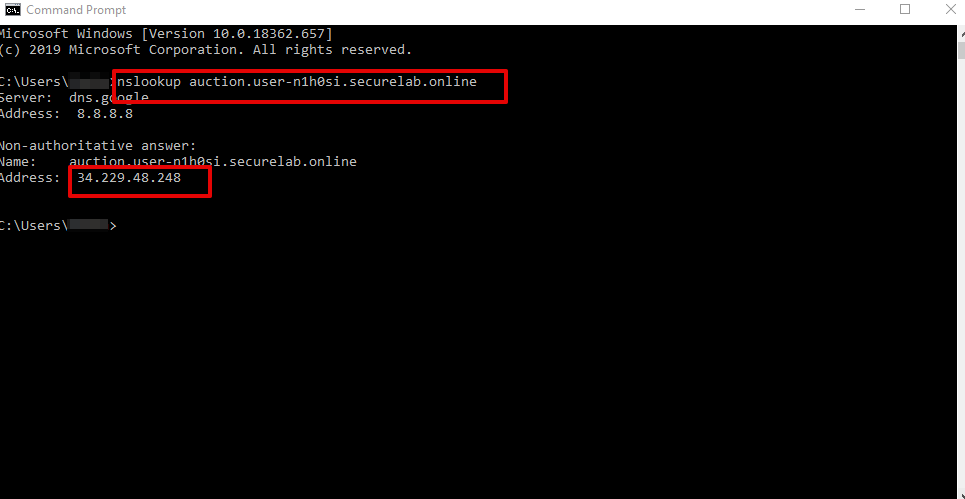
And you will see 34.229.48.248 IP in the response which belongs to na1-auction endpoint from america pool.
3. Add Multiple Ednpoints to Load Balanced Pool & Test
a) Add More Endpoints (NA2,3)
Let’s now add a few more endpoints for load balancing of the application. Note that NA2 endpoint is deployed on Amazon AWS, whereas NA3 is running on Microsoft Azure.
1. Go back to the F5 Cloud Services portal, the DNS Load Balancer service, the IP endpoints tab and select Create.
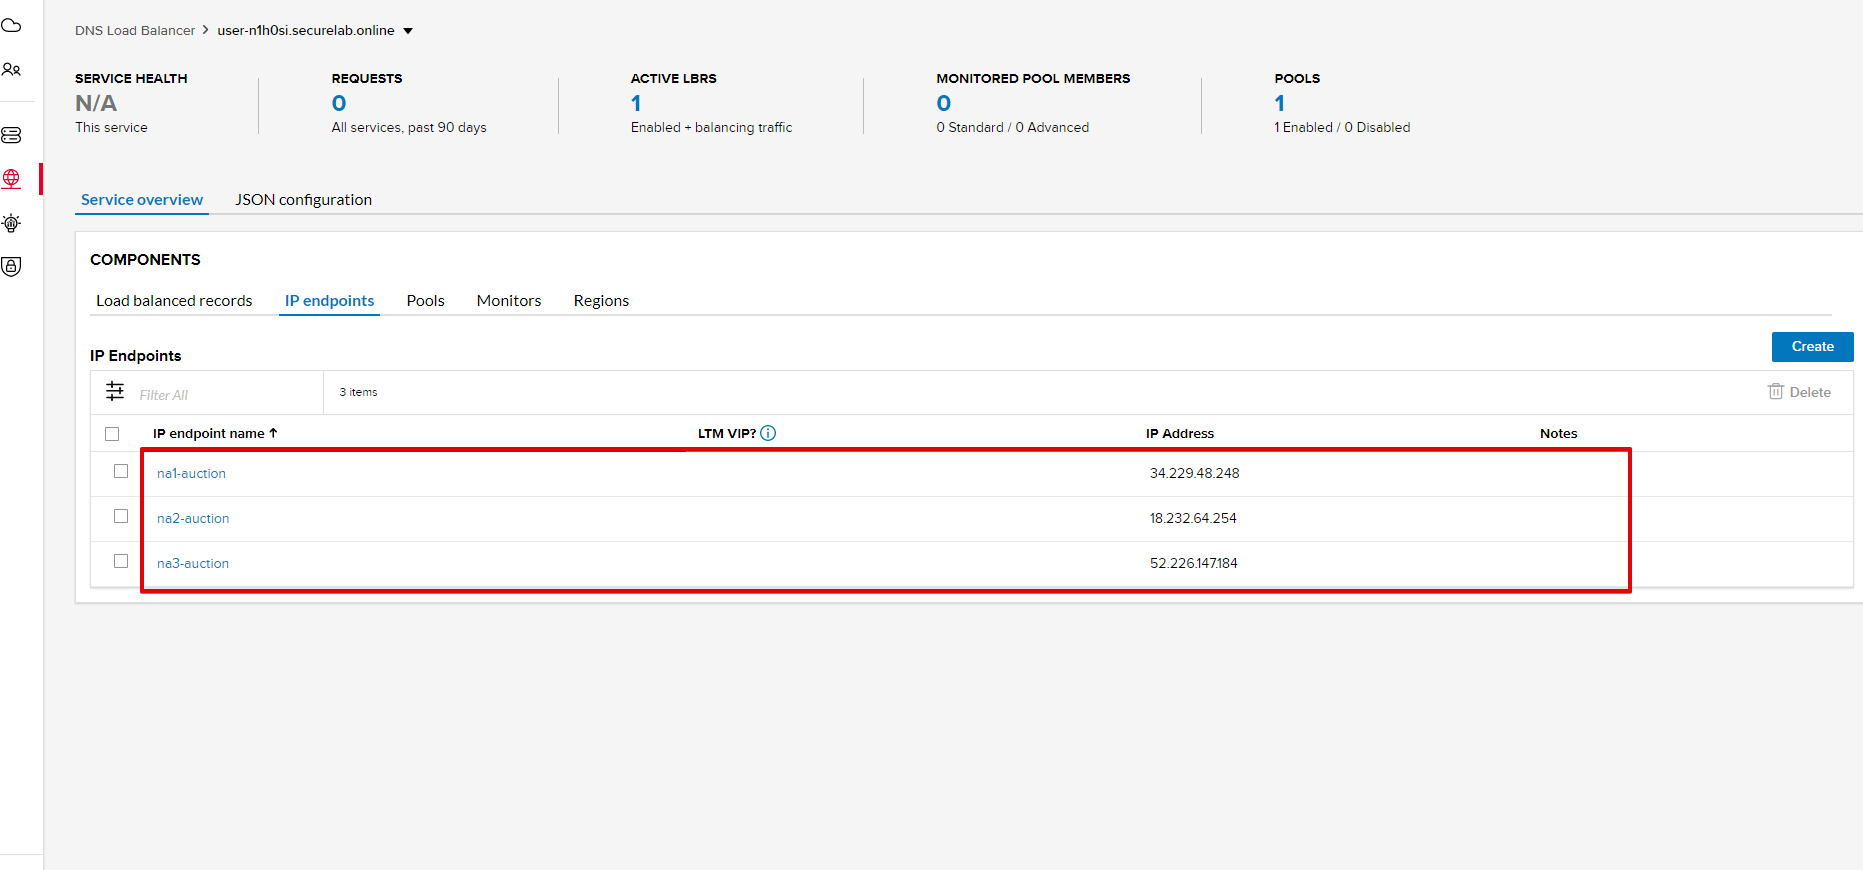
2. Fill in name (“na2-auction”), IP address (“18.232.64.254”), port (“80”) and select the monitor we created above.
Create one more endpoint repeating the step above using the following properties: “na3-auction” for name, “13.82.106.211” for IP address, “80” for port. You will have three endpoints as a result.
b) Add the Endpoints to the Pool
Let’s now add the newly created endpoints to the existing pool.
1. Go to the Pools tab and click on the america pool.
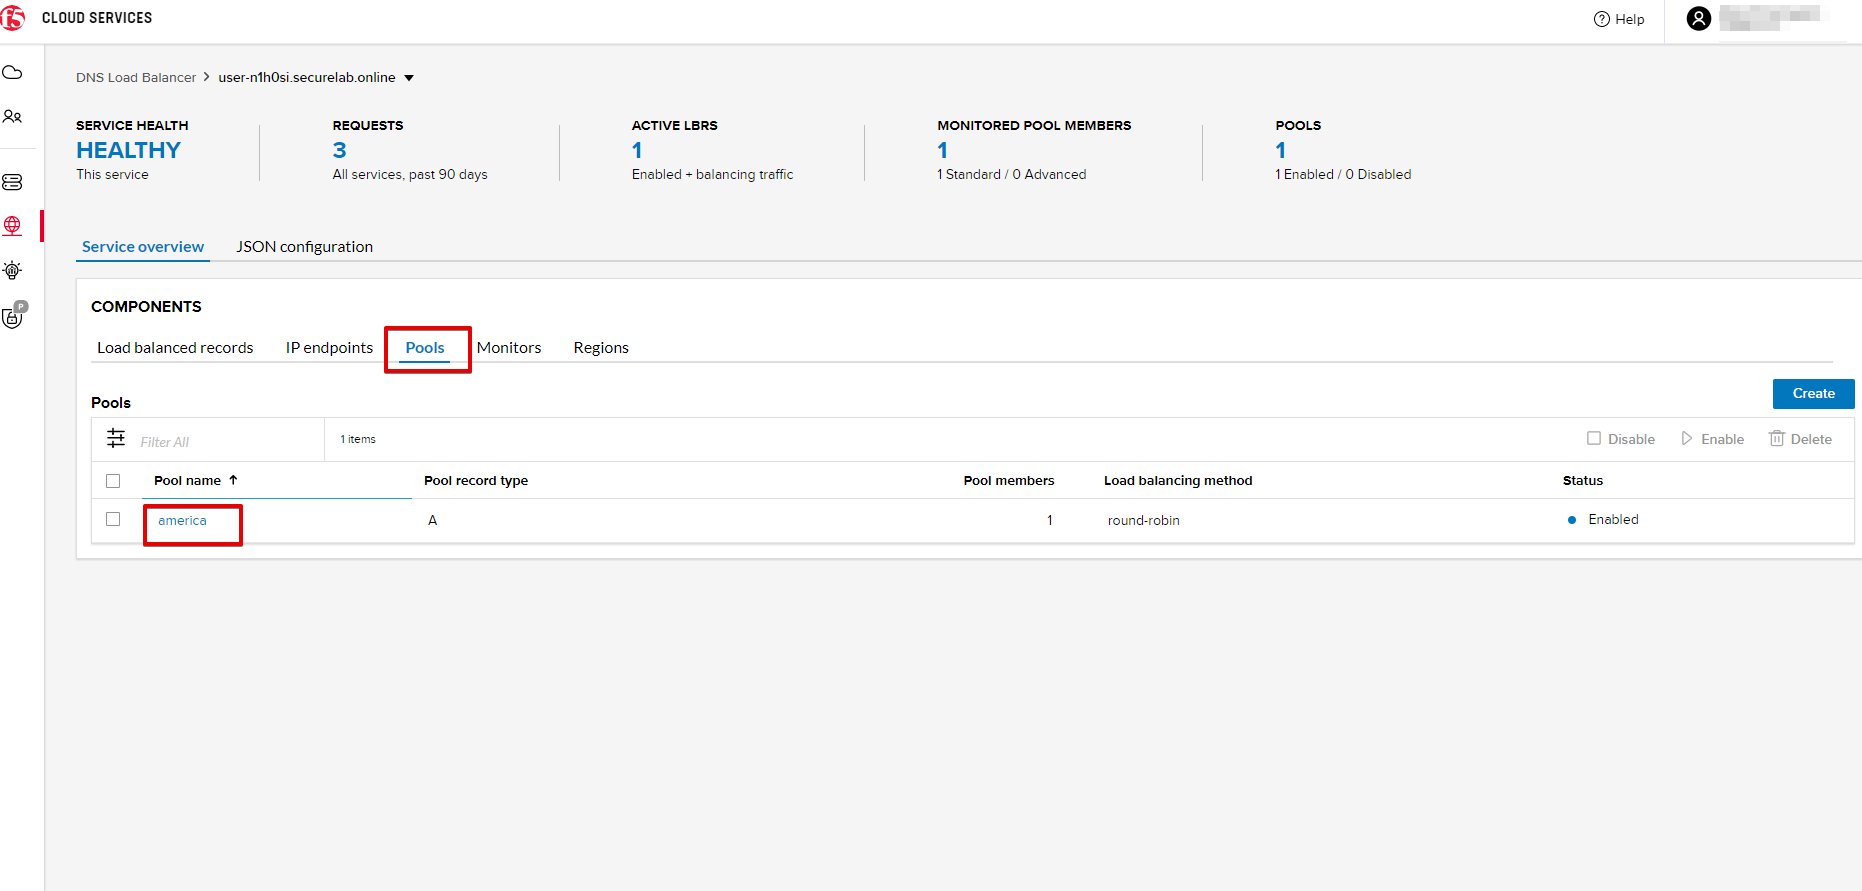
2. Click Add Member and select the endpoint to be added.
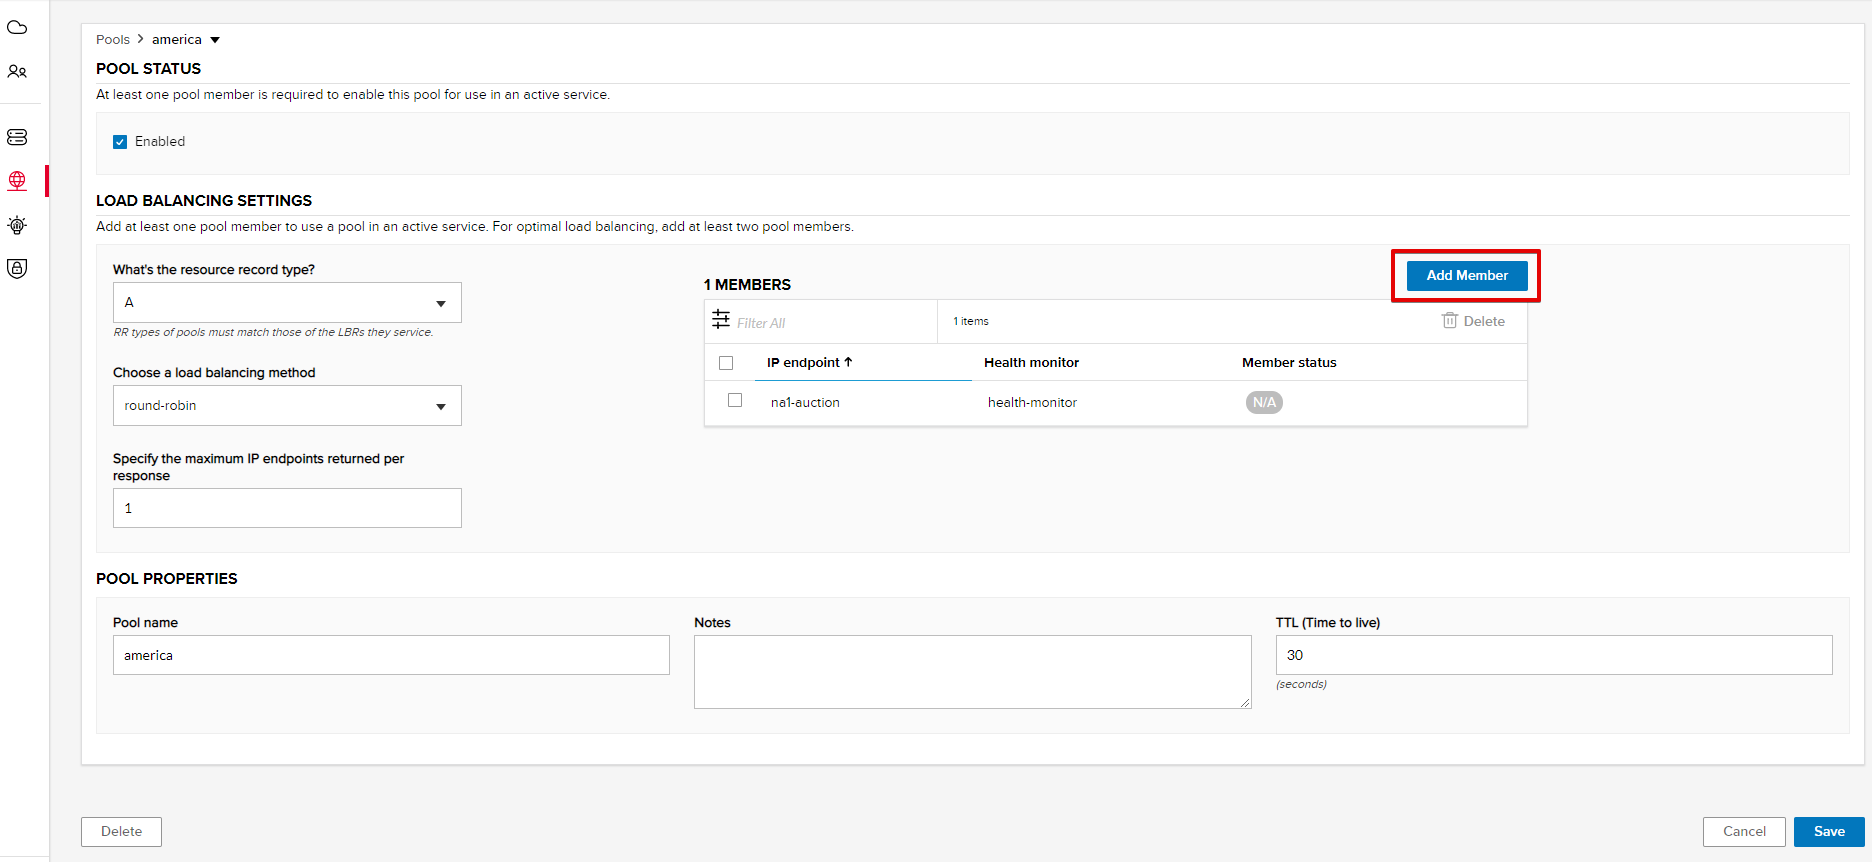
Add one more endpoint and click Save. Now all three endpoints belong to one pool:
c) Test via Default Browser
Let’s test the updated pool with the new endpoints via browser.
1. Open FQDN (“auction.{{zone name}}” where {{zone name}} is the value copied from postman in one of the step above) in your browser.
2. You will see that acc to the proximity rule and pool members, you will get to endpoints belonging to the america pool in a round-robin manner.
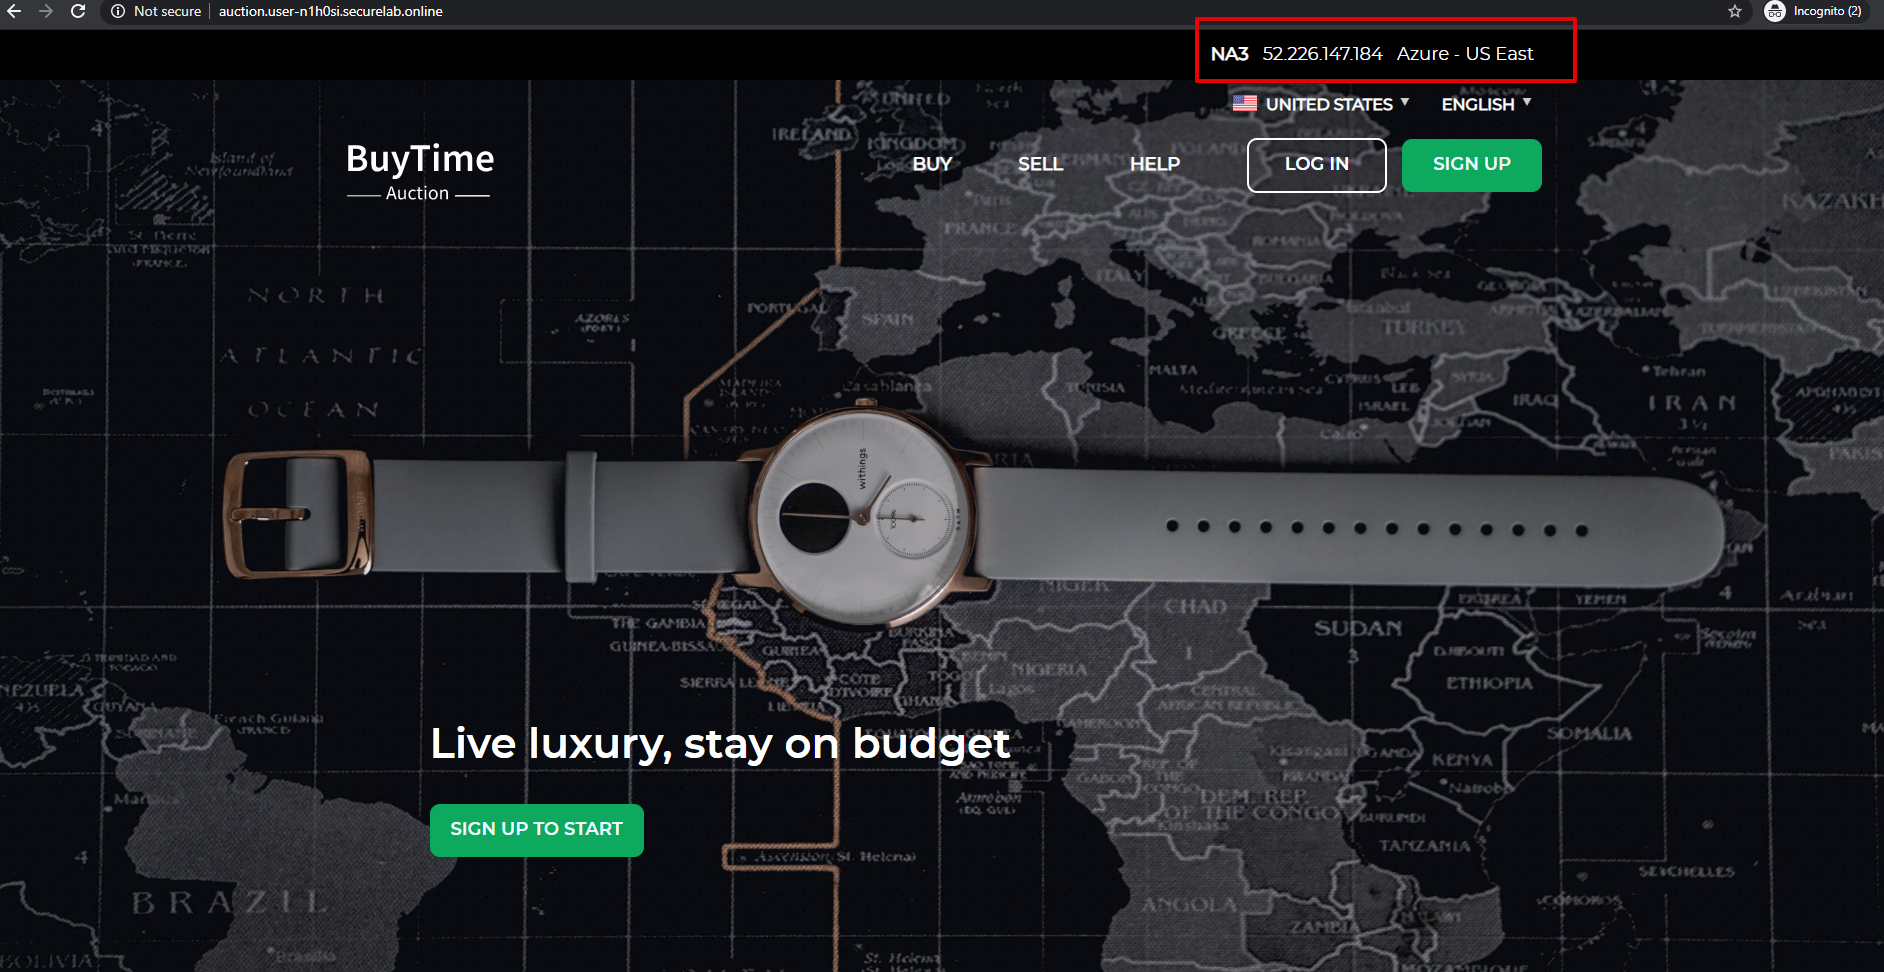
And let’s now update the page:
4. Add Europe Region & EU Endpoint with Corresponding Geoproximity Record
a) Add EU Endpoint
Let’s now add a EU endpoint which is deployed on Amazon AWS.
1. Go back to the F5 Cloud Services portal, the DNS Load Balancer service, the IP endpoints tab and select Create.
2. Fill in name (“eu-auction”), IP address (“3.122.191.227”), port (“80”) and select the monitor we’ve created above.
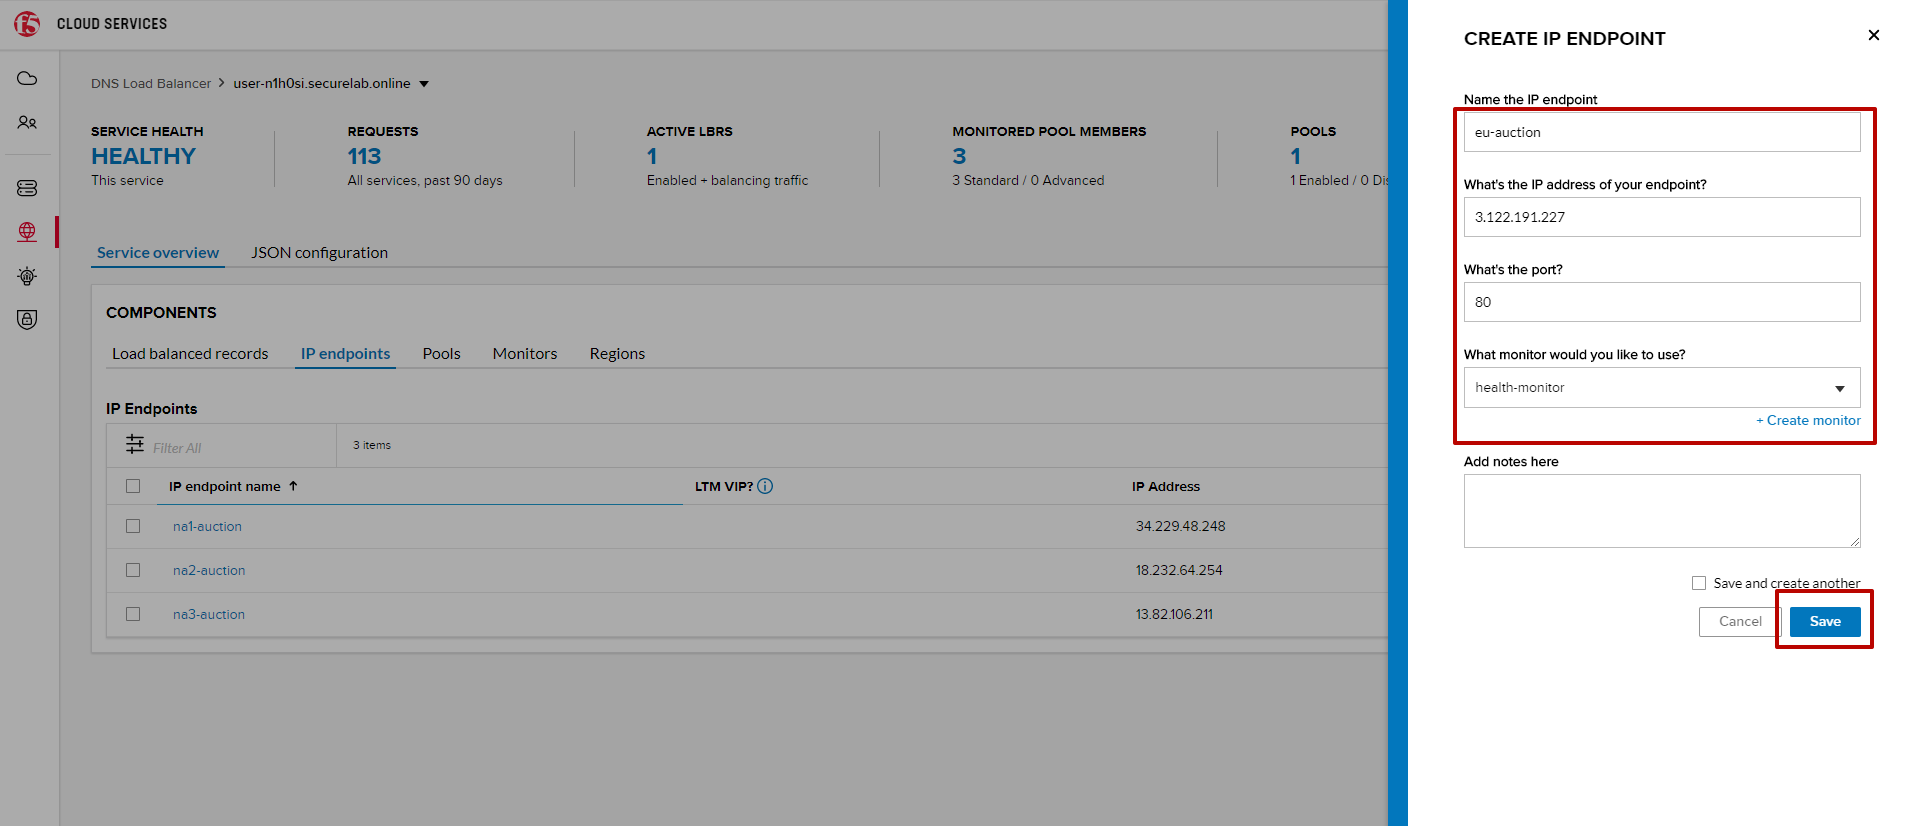
The new endpoint will appear on the list.
b) Add EU Region
Creating EU region will allow grouping requests coming from the European region and directing them to a specific pool.
1. Go to the Regions tab and click Create.
2. Fill “europe” as “Region name” and select “Europe” in “Include these continents”. Save the created region.
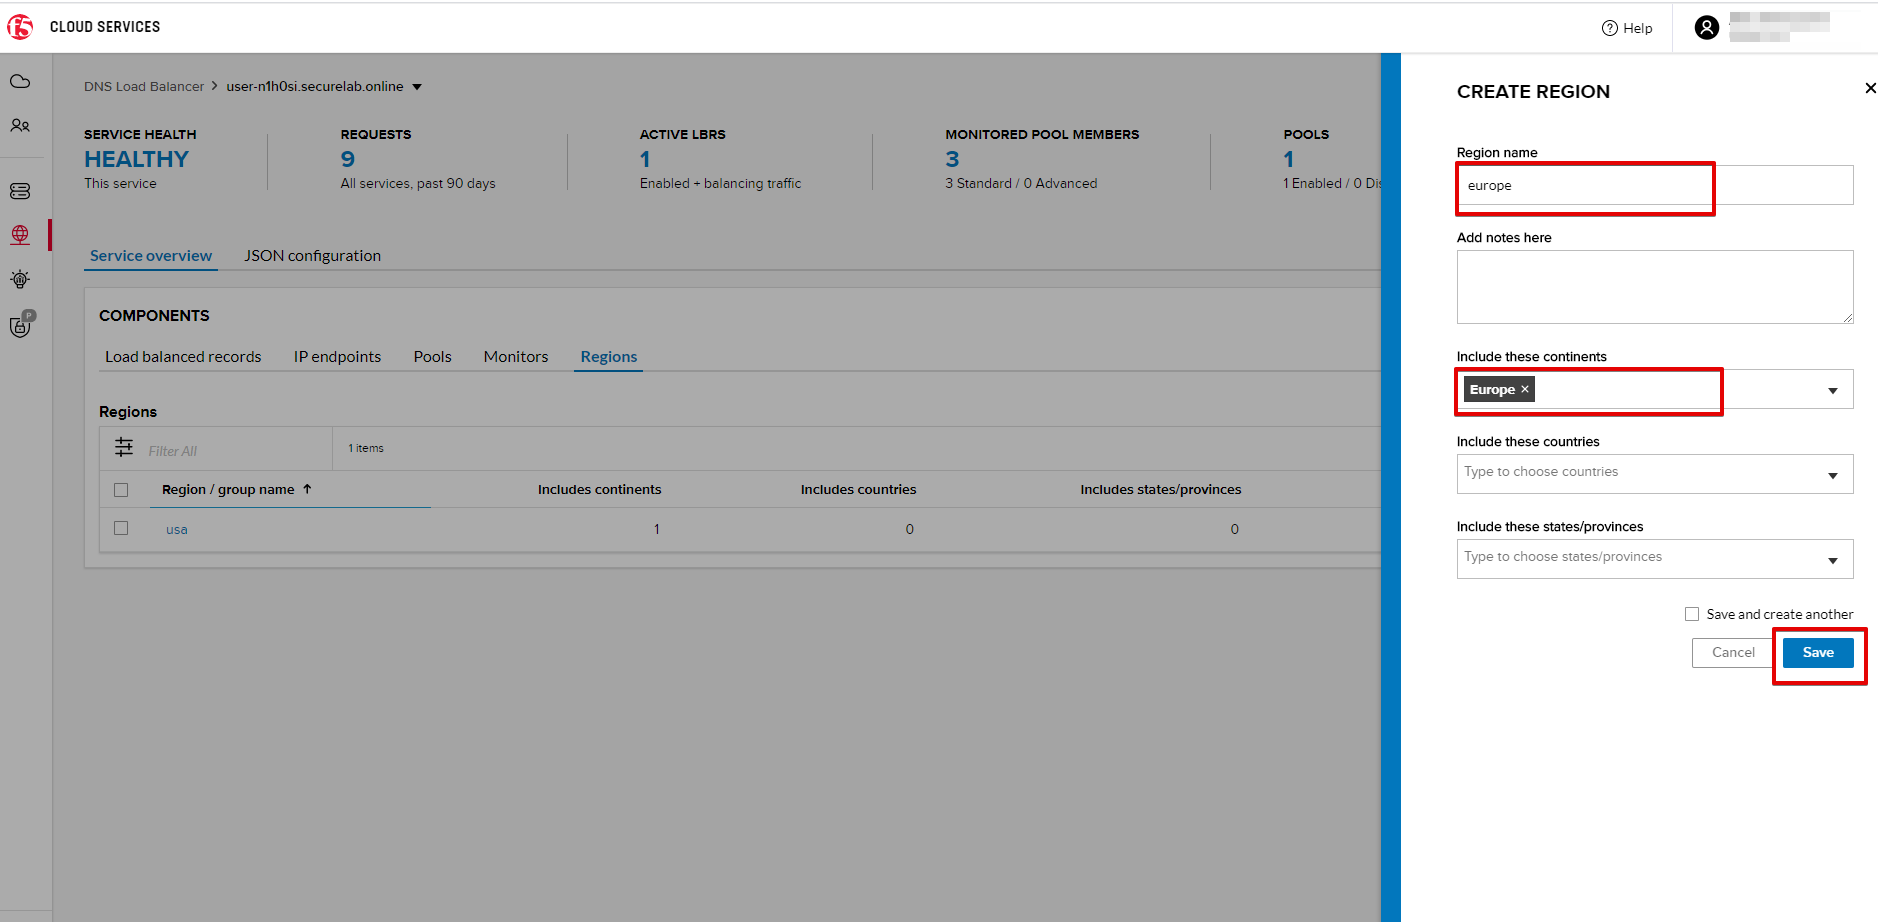
Now you have two regions created.
c) Add EU Pool
Let’s now create a pool and add a member to it.
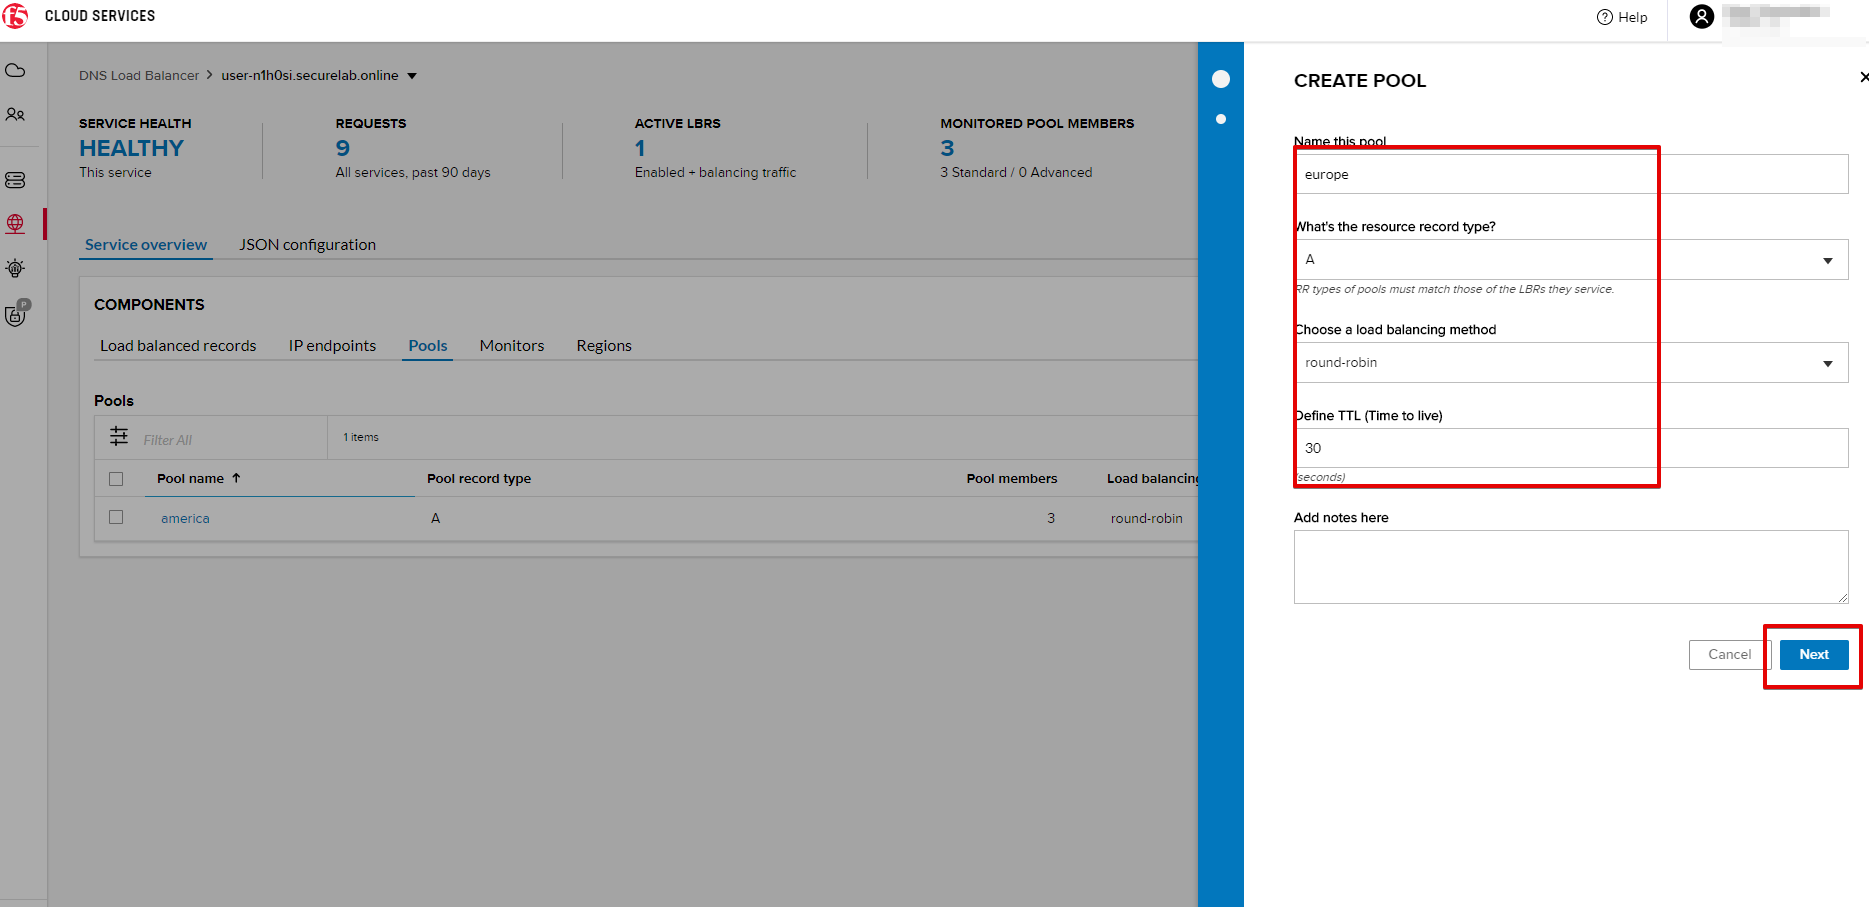
1. Go to the Pools tab and then click Create.
2. Fill in “europe” name, choose “round-robin” method and define TTL “30”. Then click Next.
3. Click Add Member to add an IP Endpoint to the pool.
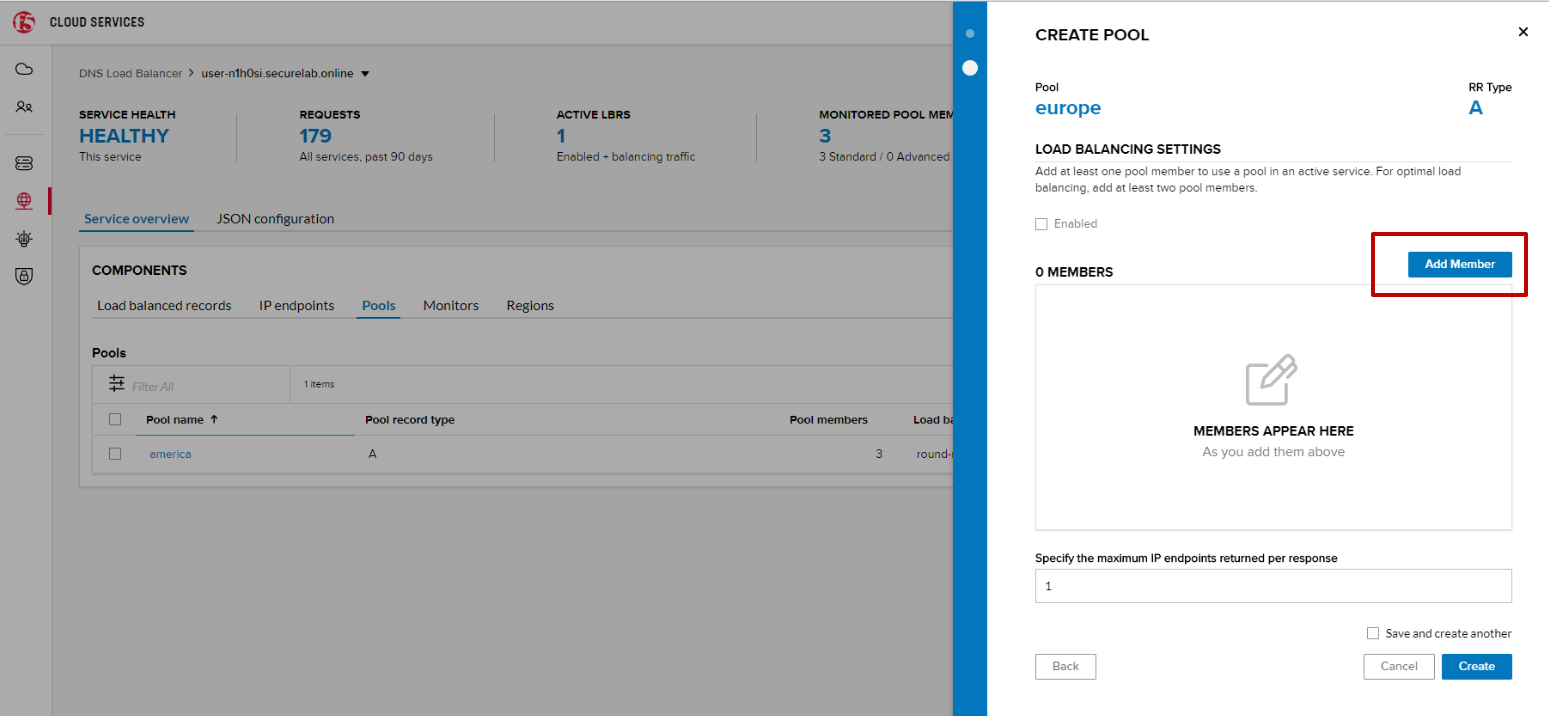
4. Select the endpoint we’ve just created, as well as the monitor. Click Add and Create.

A newly created pool with one EU endpoint will appear on the list.
d) Update LB Record Europe -> “europe”
Now that we have created EU pool, region and endpoint, we can update load balanced record and add a new proximity rule: to send the traffic originating in Europe to the “europe” pool, utilizing a higher relative score than the previous rule of routing traffic from “Anywhere” to the “america” pool. This type of geo-proximity based routing is useful for GDPR compliance.
Go to the Load balanced records tab and click on your record. Set a new proximity rule (“europe” -> “europe” pool). Set the score of the proximity rule to be “50”.
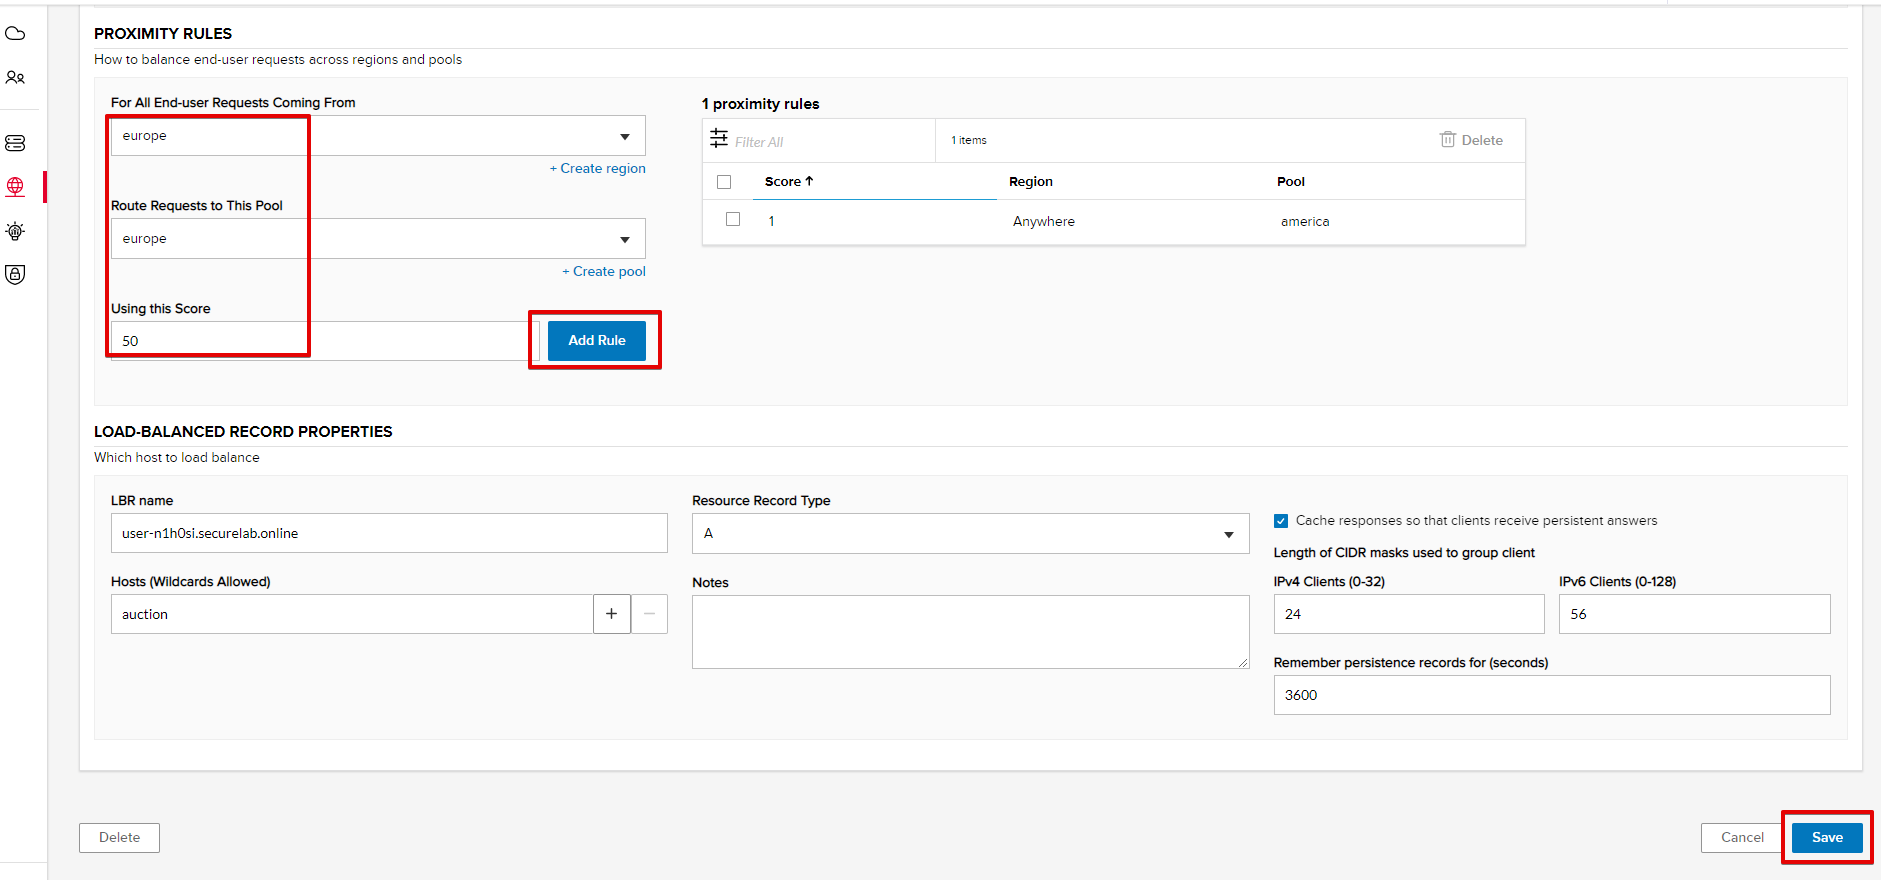
Click Add Rule and Save the record. The new proximity rule will direct requests from Europe region to europe pool.
e) Test using the Opera Browser
Now let’s test the new proximity rule. This can be done either via the Opera browser or via your computer’s Command Prompt (see the next section).
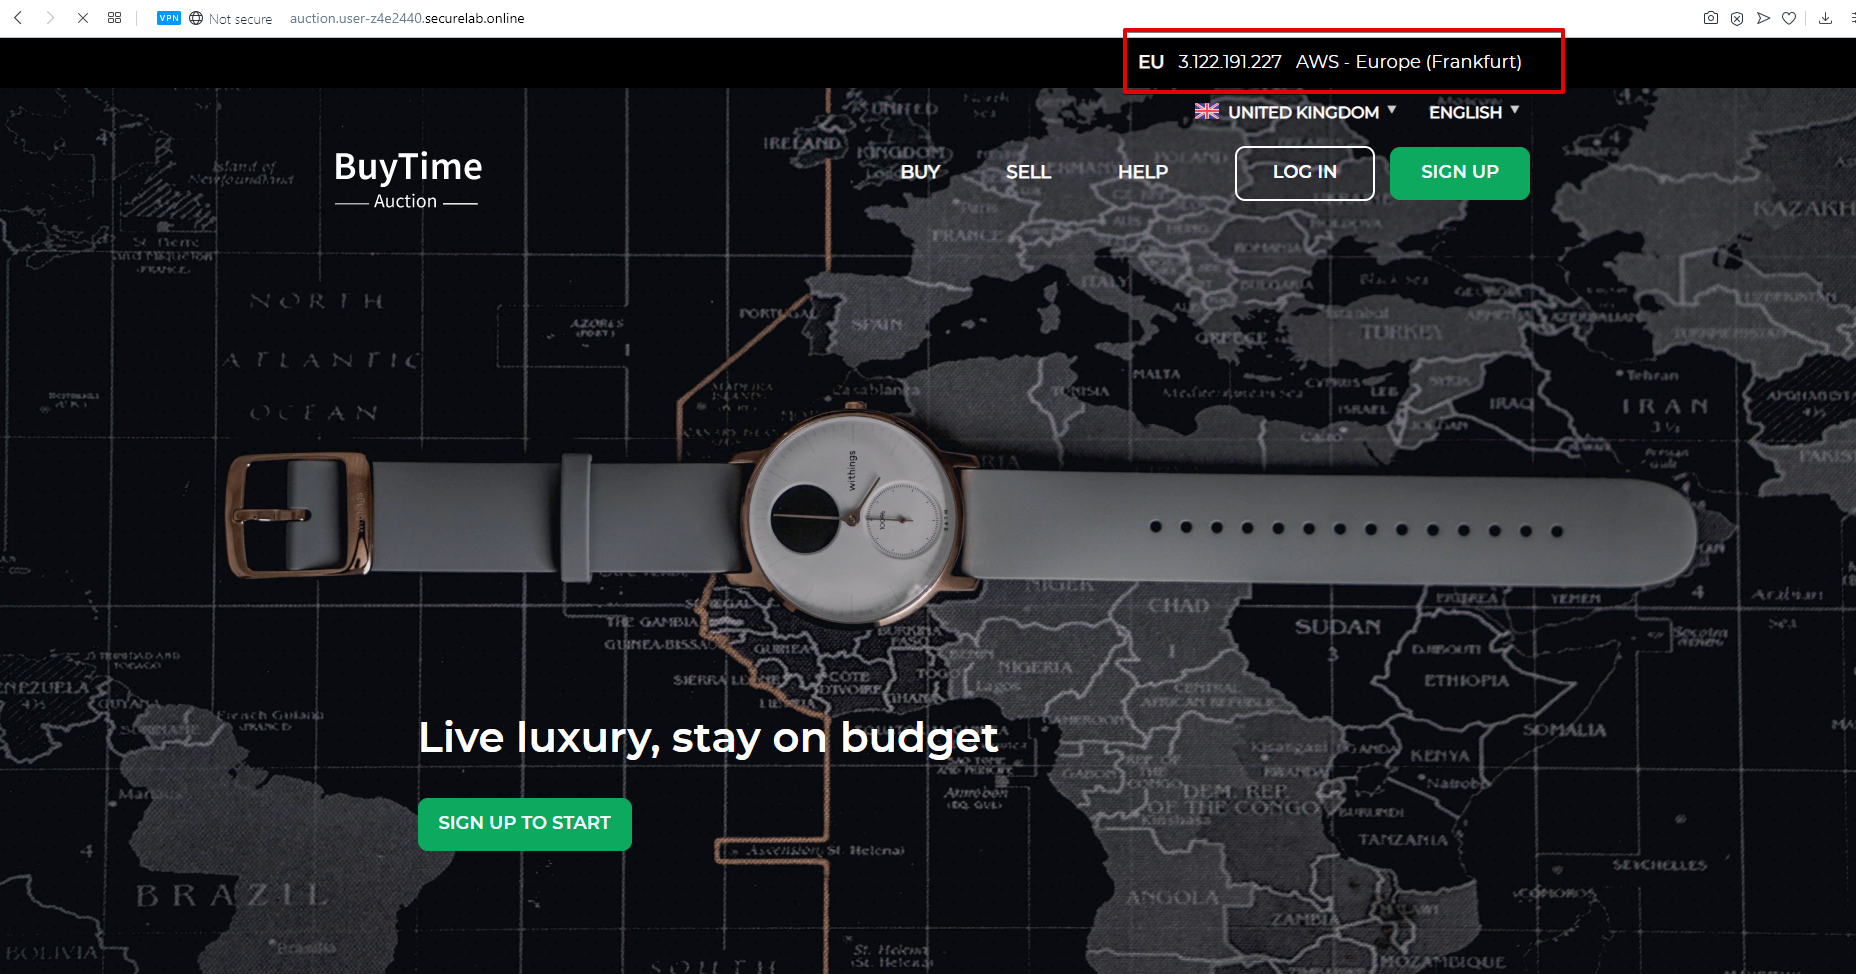
1. Open the Opera browser, copy FQDN name (“auction.”your zone name””) in Load balanced record properties and paste into your browser. You will get to one of three available IP endpoints of the “america” pool.
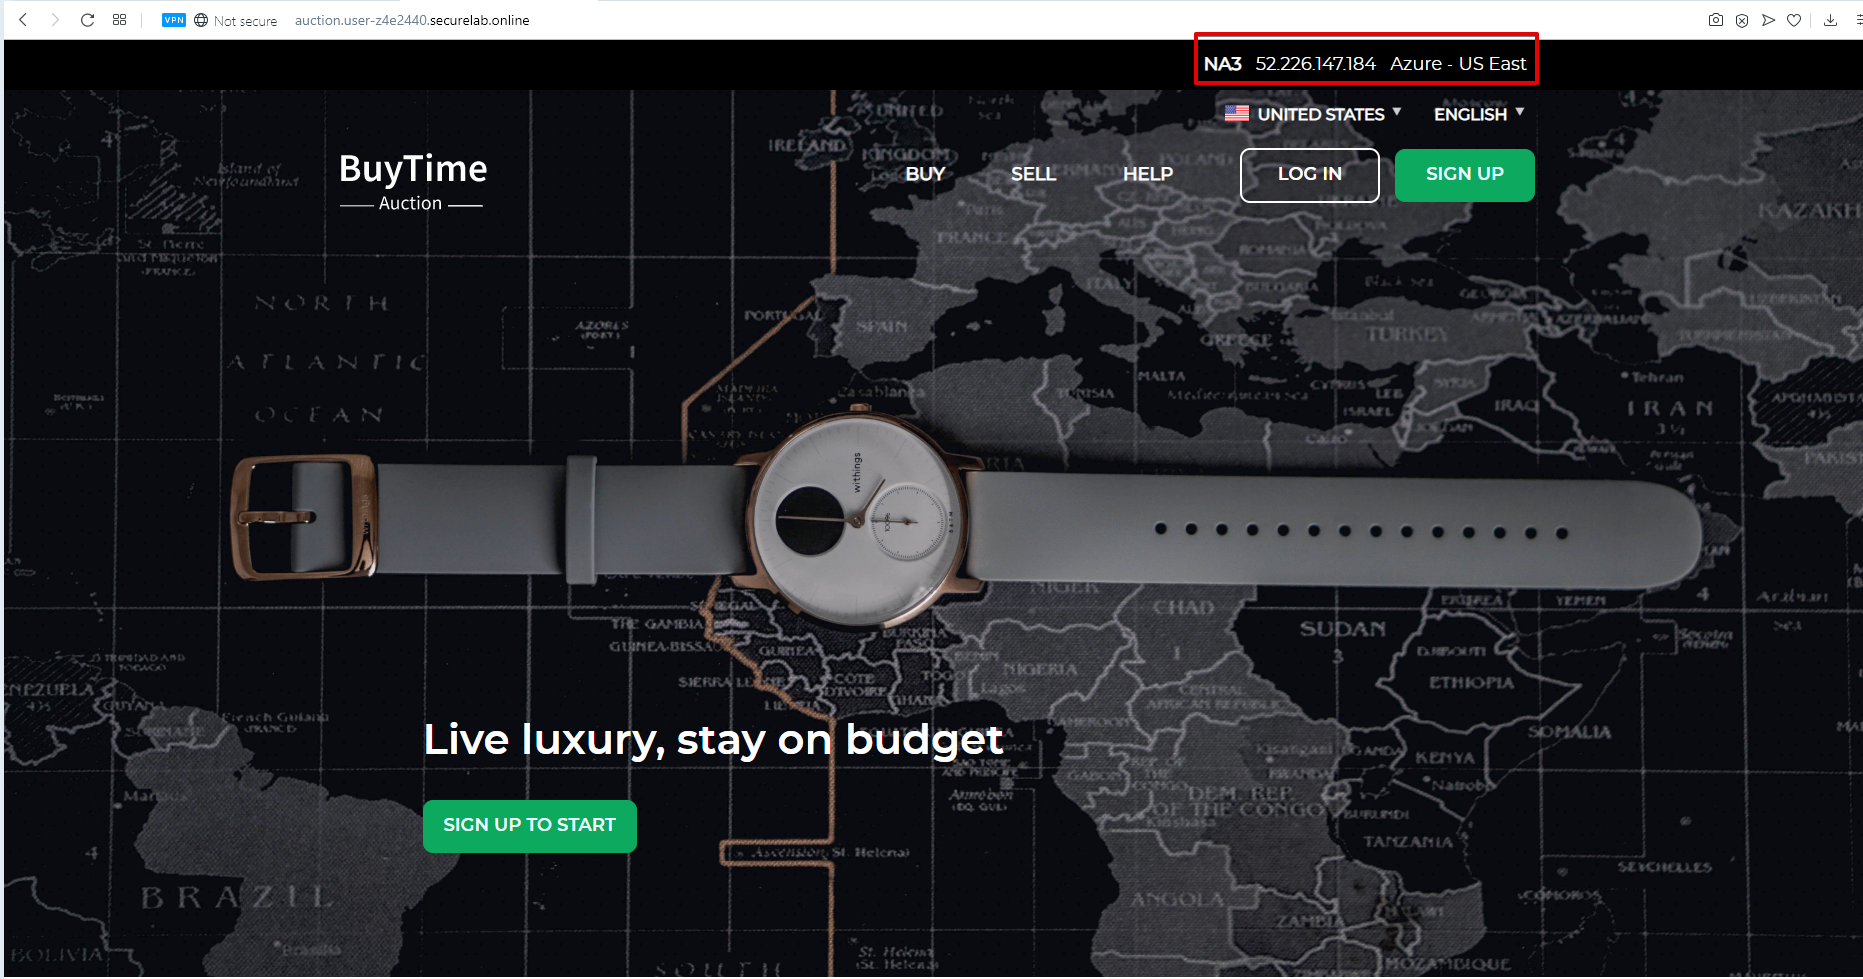
2. Let’s now test the EU proximity rule. Click VPN and select Europe. This will simulate your entering BuyTime Website from Europe.
3. Update your “auction.”zone name”” page to see that acc to the proximity rule, you switched to the European pool.
f) Test via Command Prompt
Another way to test the new proximity rule is via Command Prompt.
1. Start Command Prompt.
2. Paste the following command to the Command Prompt: “nslookup auction.cloudservicesdemo.net 198.6.100.25”.
And you will see 34.229.48.248 IP in the response which belongs to na1-auction endpoint from america pool.
3. Now let’s check the europe pool. Paste the following command to the Command Prompt: nslookup auction.cloudservicesdemo.net 158.43.240.3.
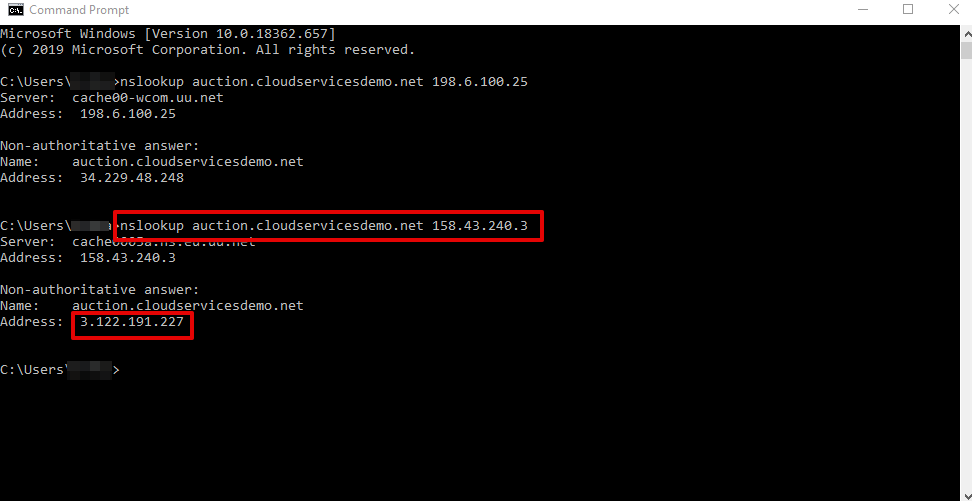
And you will see 3.122.191.227 IP in the response which belongs to eu-auction endpoint from europe pool.
5. Duplicate Load Balanced Record using JSON through the UI
Let’s now duplicate a load balanced record and its configuration in the existing Load-balancing service via the F5 Cloud Services portal. To do that, follow the step below:
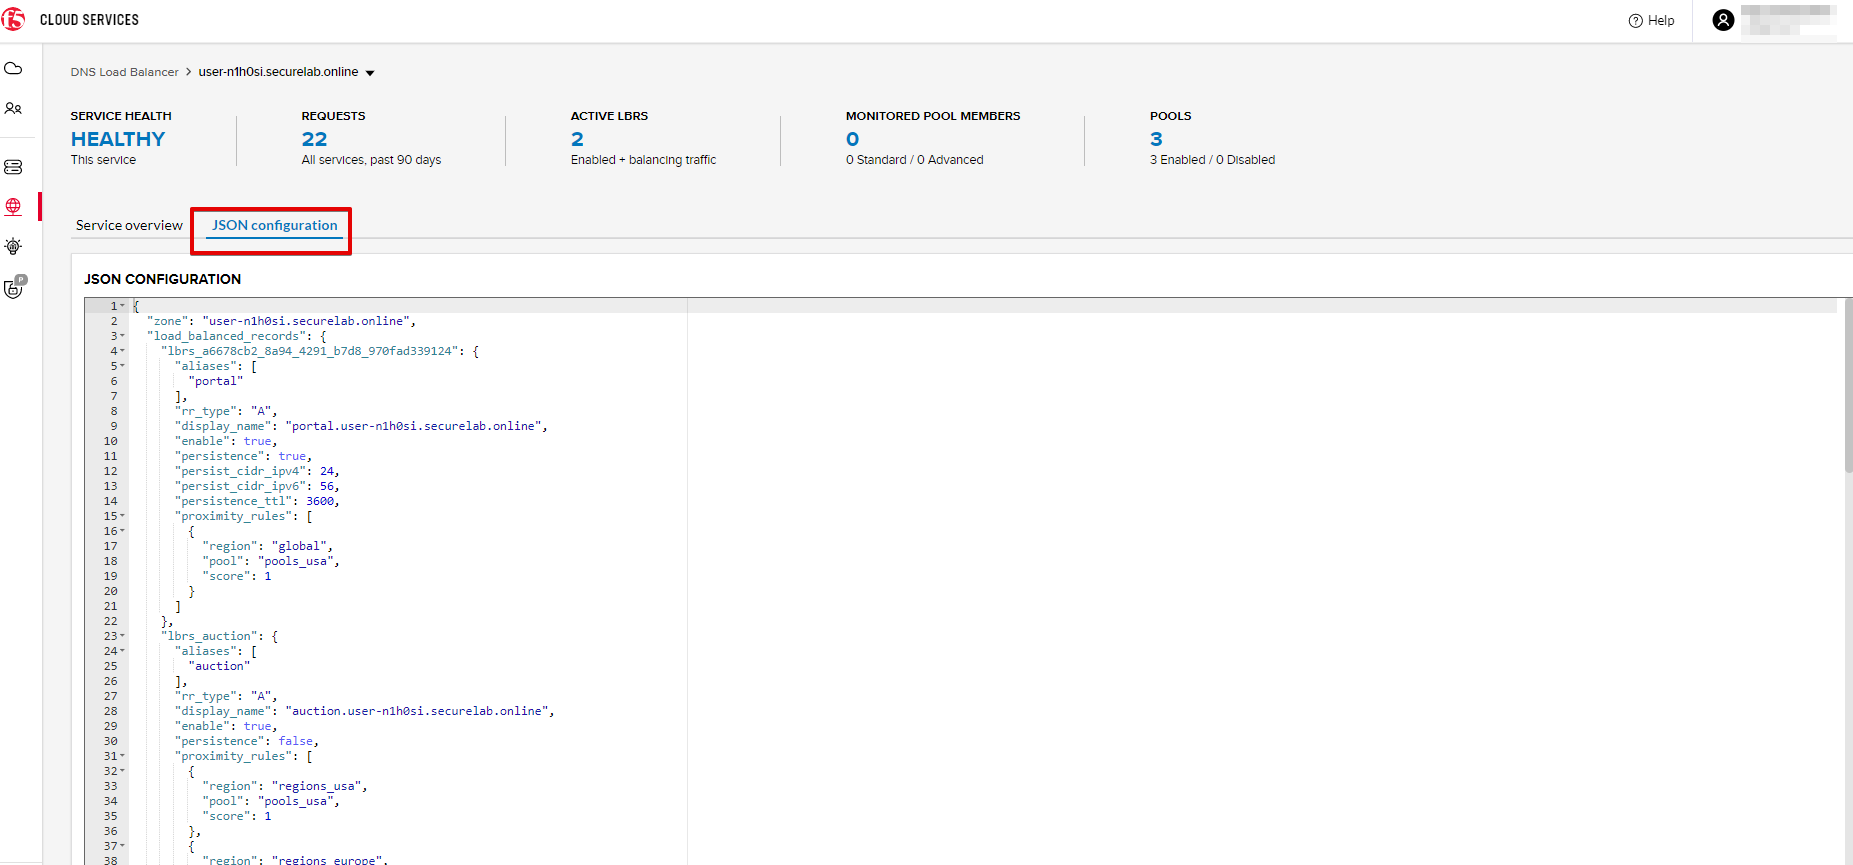
a) Get JSON
Go to the DNS Load Balancer tab in the portal and click on your existing Load-balancing service. Open the JSON configuration tab and copy it.
b) Create New Load Balanced Service
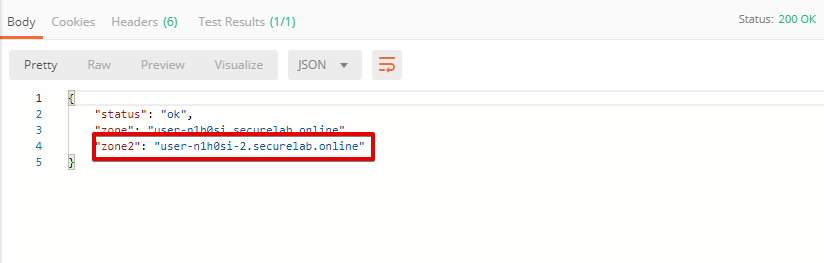
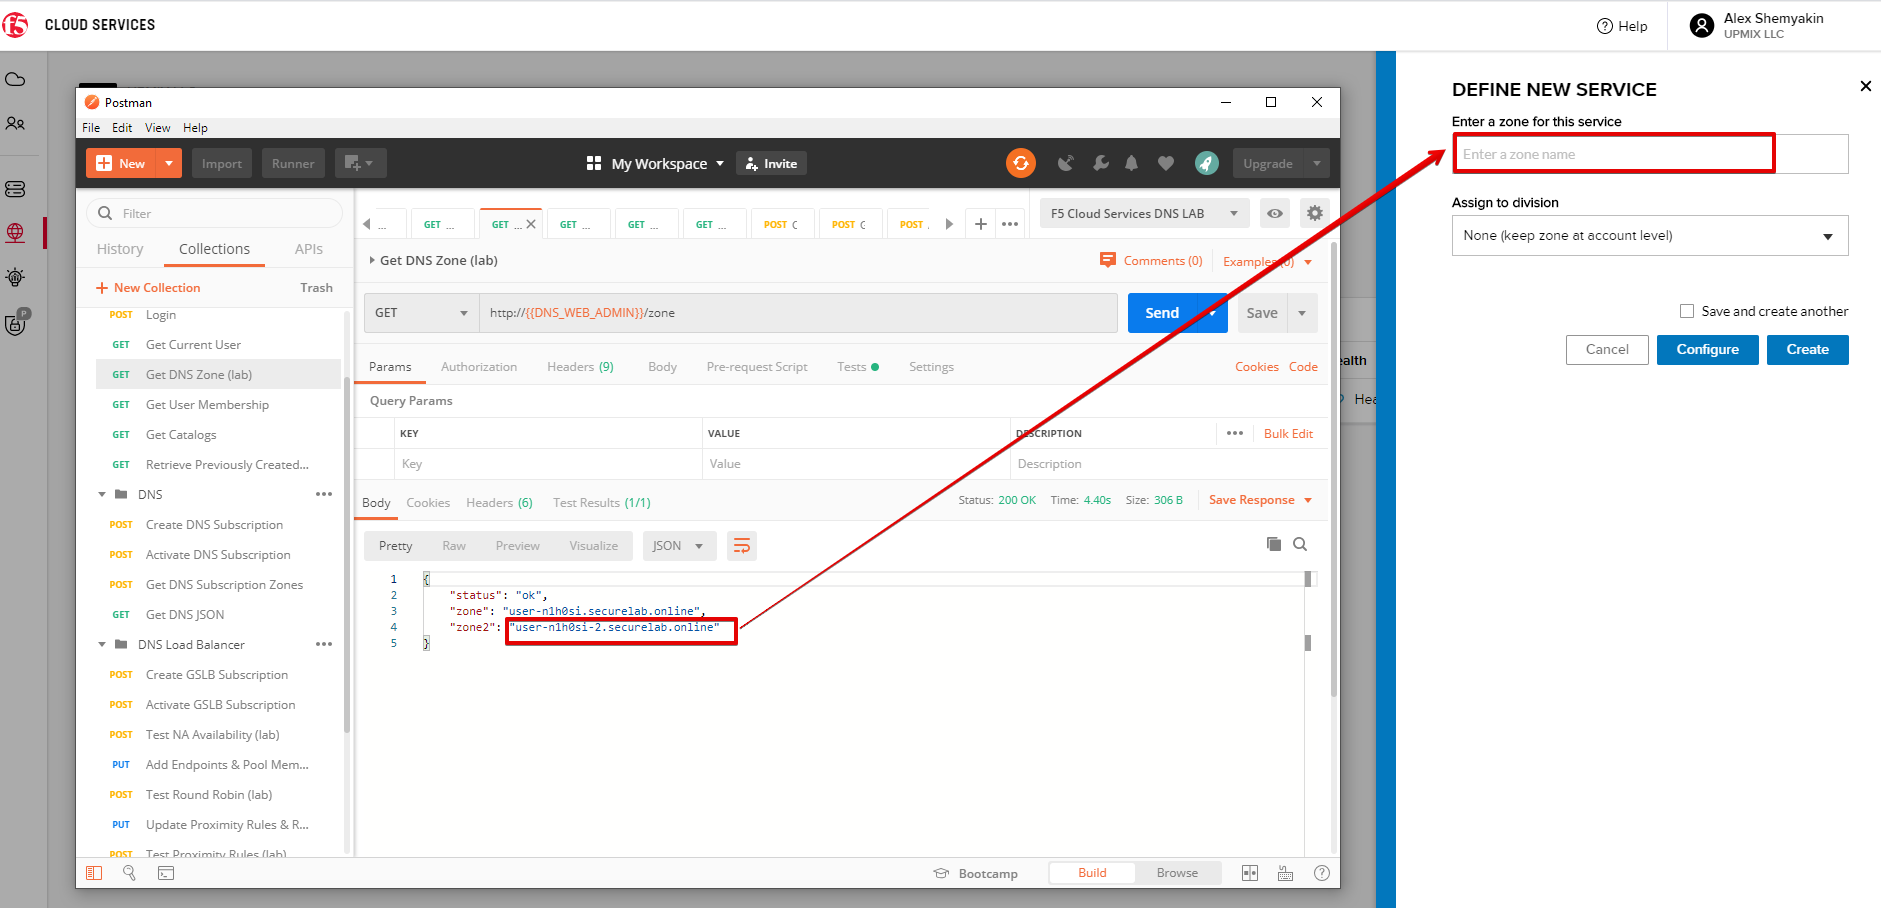
Let’s now create a new Load-balancing service via UI to copy the record to. To do that, you will first need to get “zone2”.
1. Go back to Postman and open Get DNS Zone(lab) request. Copy “zone2” which is returned in its response.
2. Open any text editor (say, Notepad) and paste the JSON configuration. Replace the existing zone name with the “zone2” copied from the Postman in the step above:
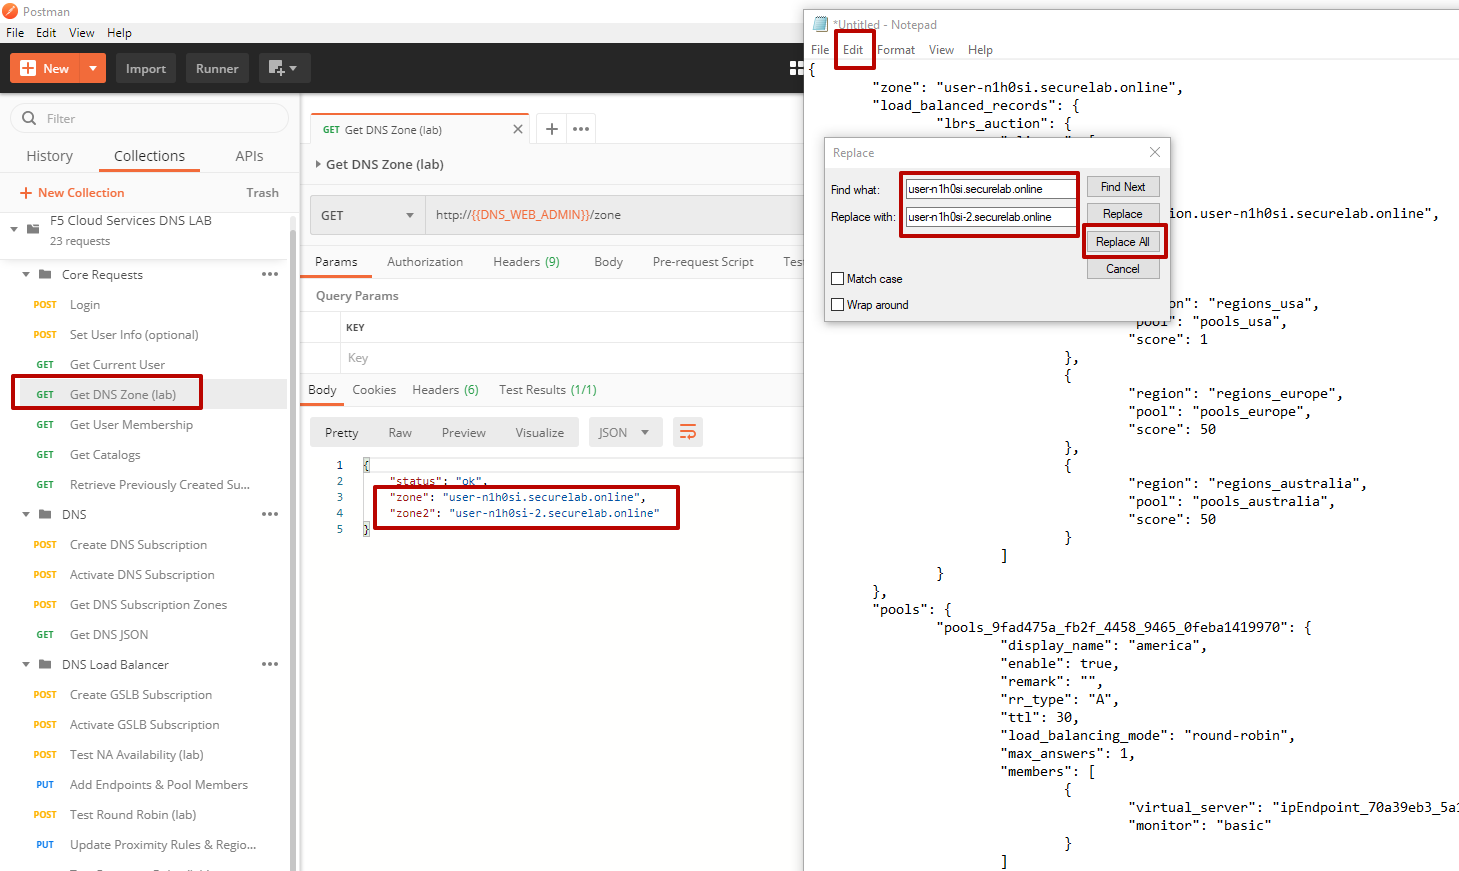
A new JSON configuration with the properties copied from the existing zone is ready.
3. Return to the F5 Cloud Services portal and open the DNS Load Balancer tab. Click Create.
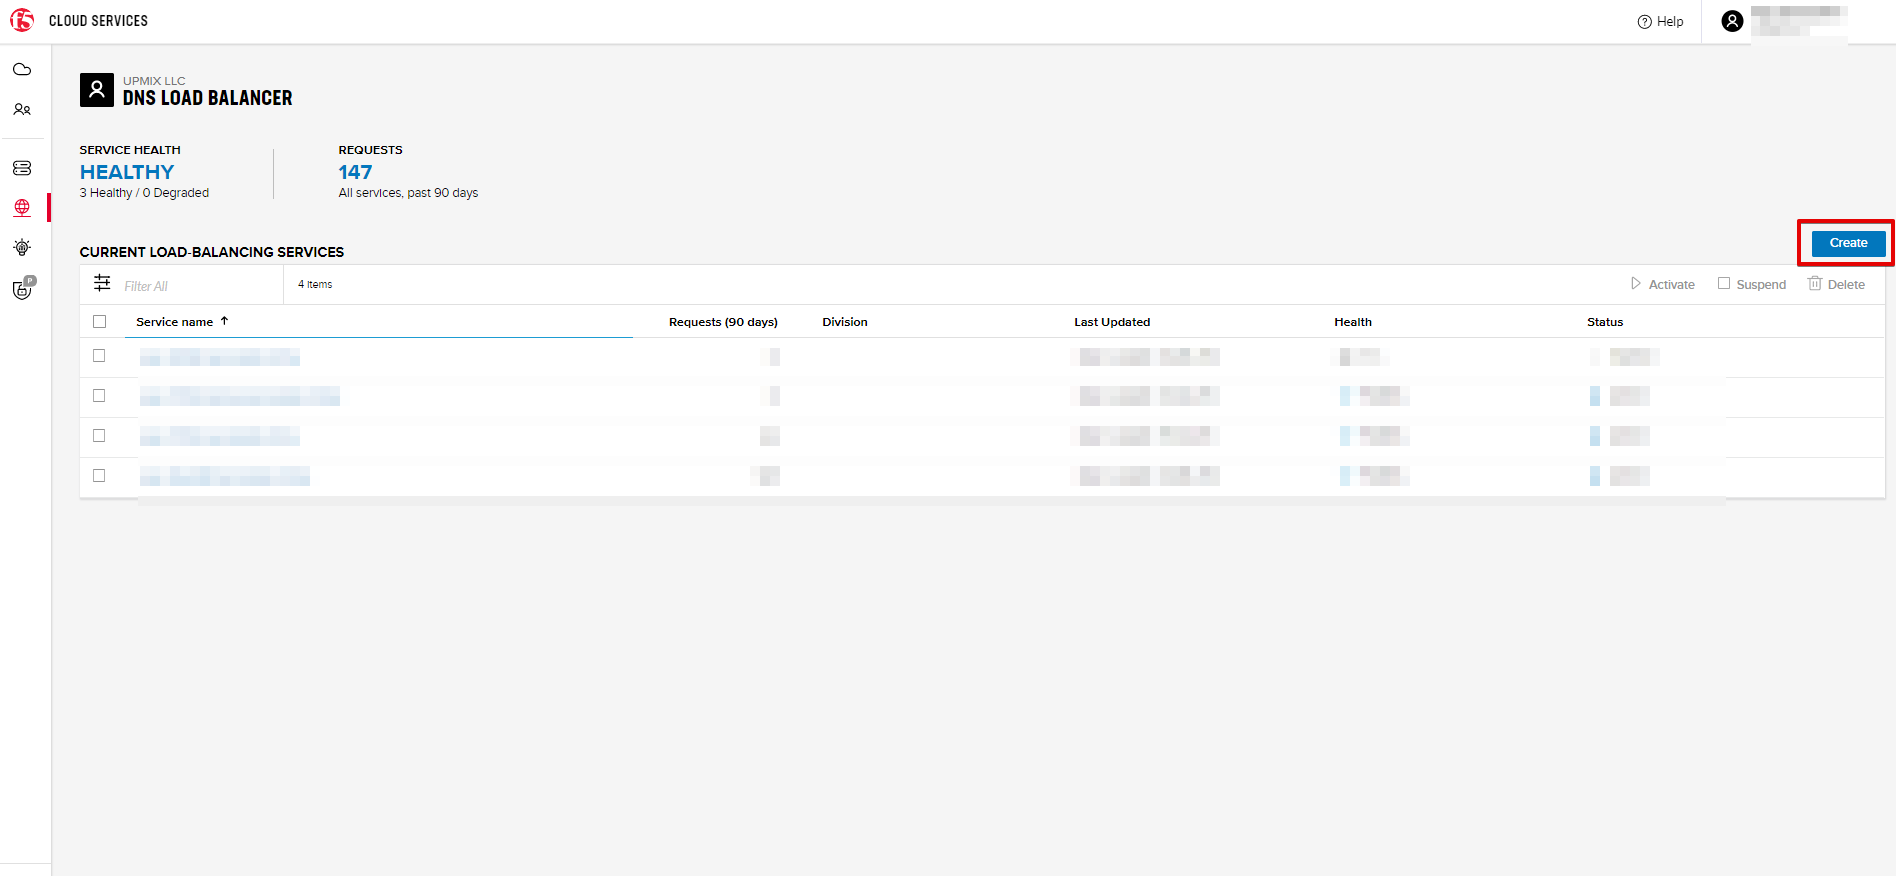
Paste “zone2” name which you copied in step 1 above and click Create.
c) Update JSON
Уou have just created a new Load-balancing service. Let’s configure it by duplicating the Load balanced record from the existing service.
Click on your newly created service and open the JSON configuration tab. Paste the JSON which you created in step b) 2. above and click Save.
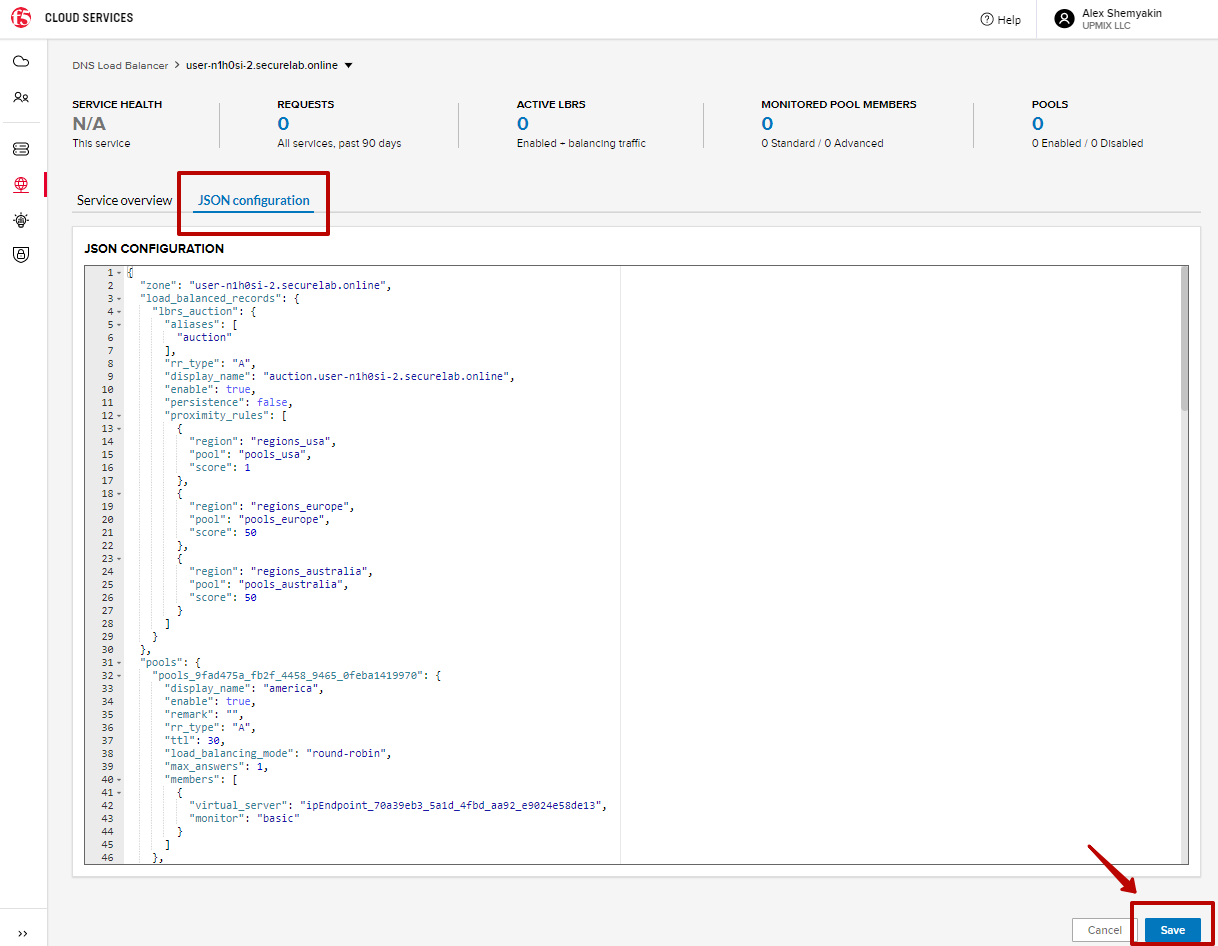
Go back to the newly created Load-balancing service to see the newly created record which is the copy of the original one.
d) Go back to the DNS Load Balancer tab and activate the new DNS Load Balancer service by selecting Activate button:
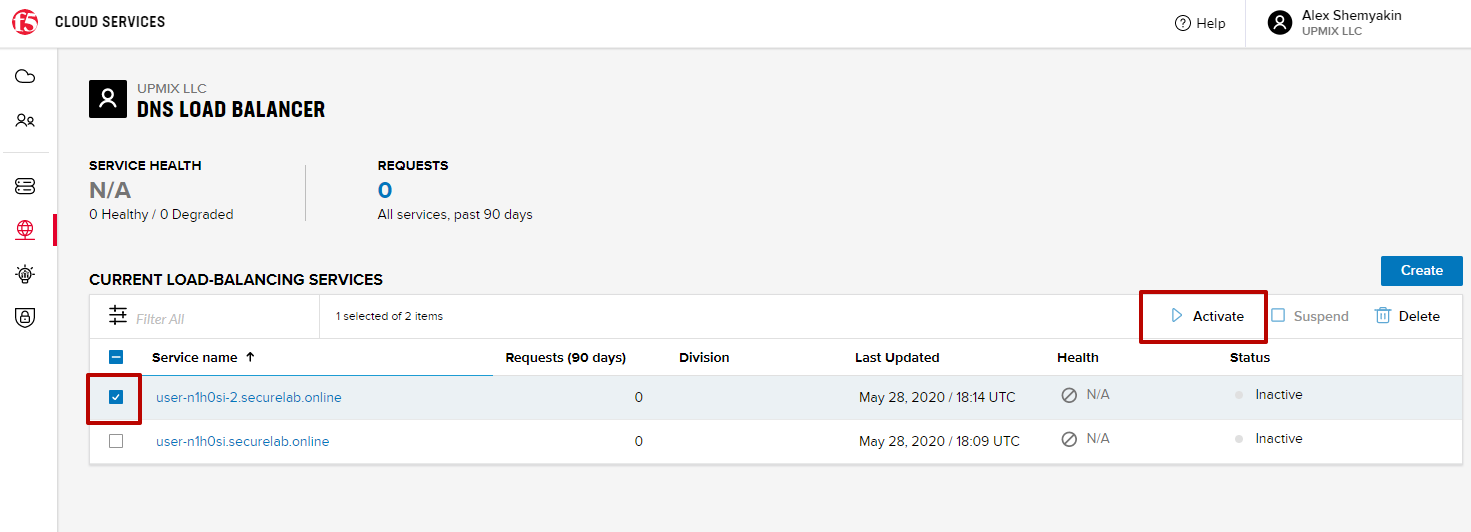
Status will be updated a few seconds later.
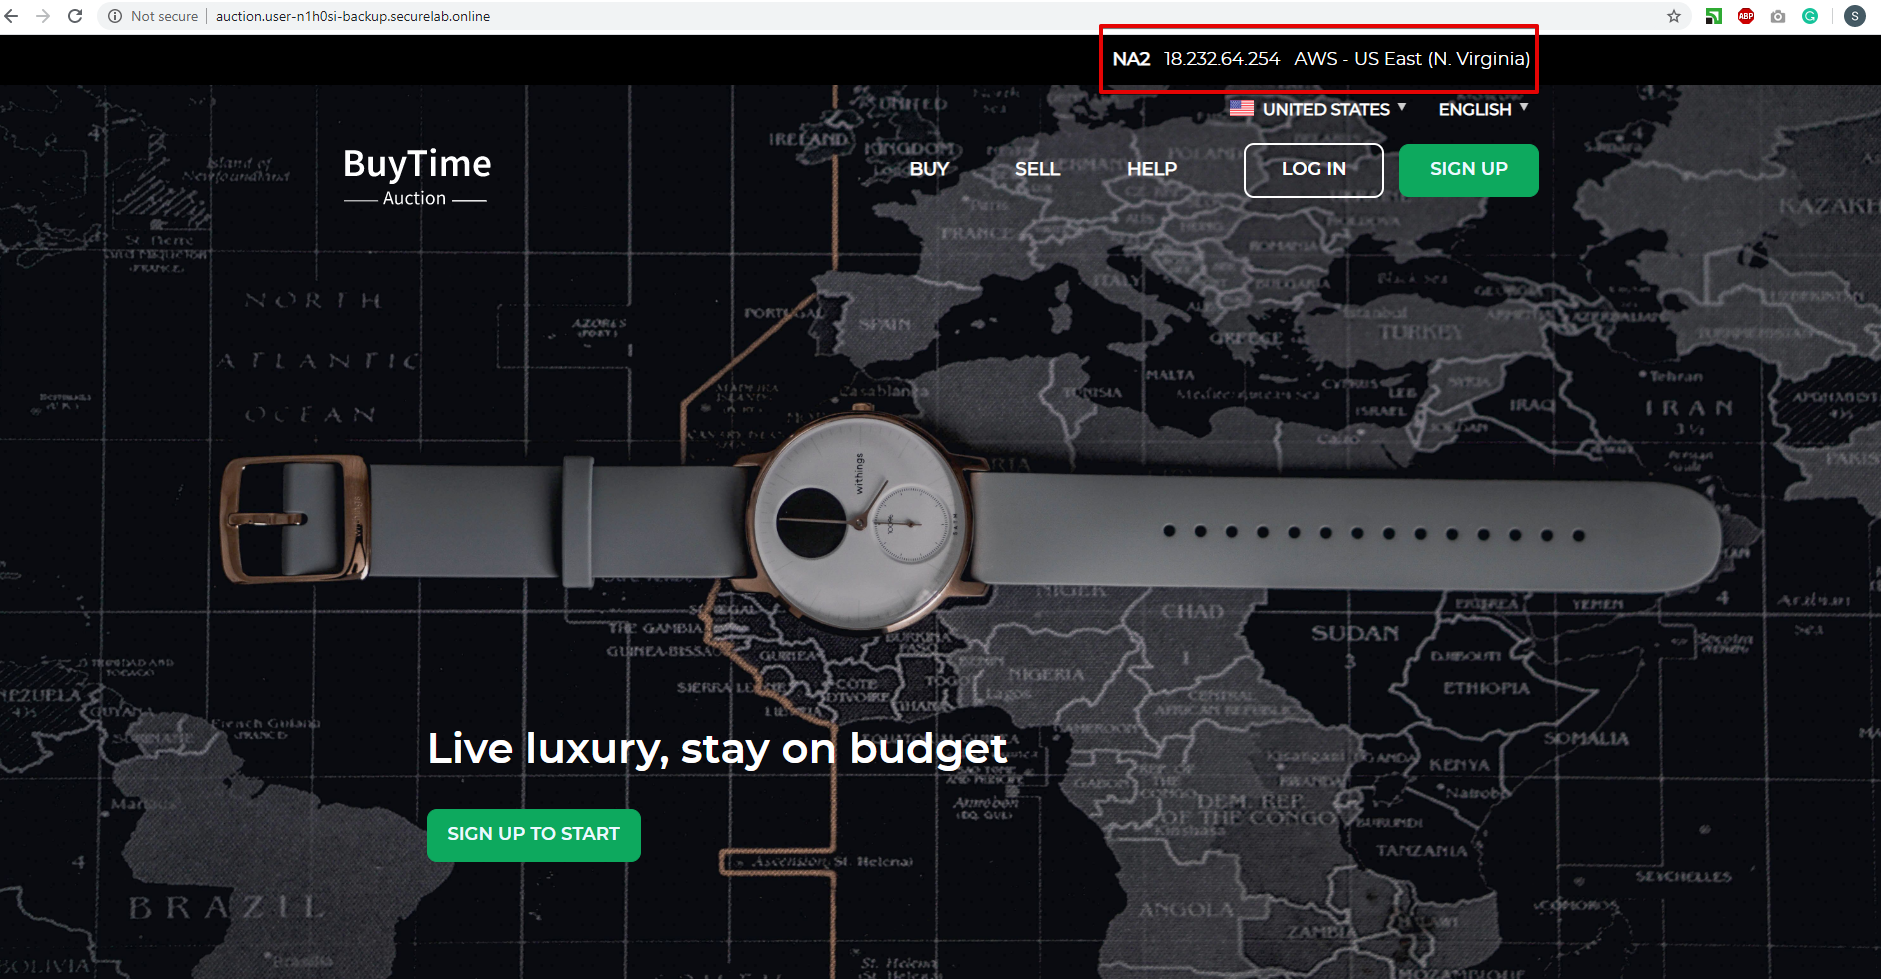
e) Test via Browser
1. Open FQDN (“auction.{{zone-2 name}}” where {{zone-2 name}} is the value copied from postman in one of the step above) in your browser.
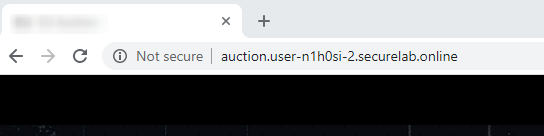
2. You will see that acc to the proximity rule and pool members, you will get to endpoints belonging to the closest pool in a round-robin manner.
6. Delete DNS Load Balancer Service
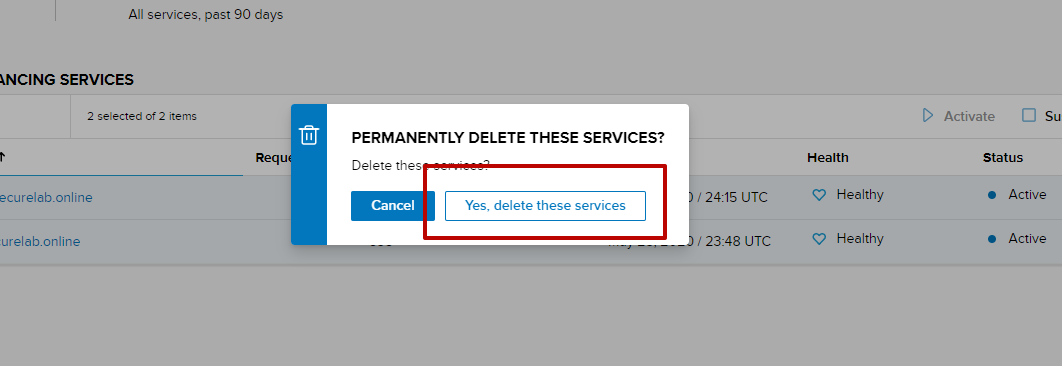
1. Go back to the F5 Cloud Services portal, the DNS Load Balancer tab, and click on your load-balancing service.
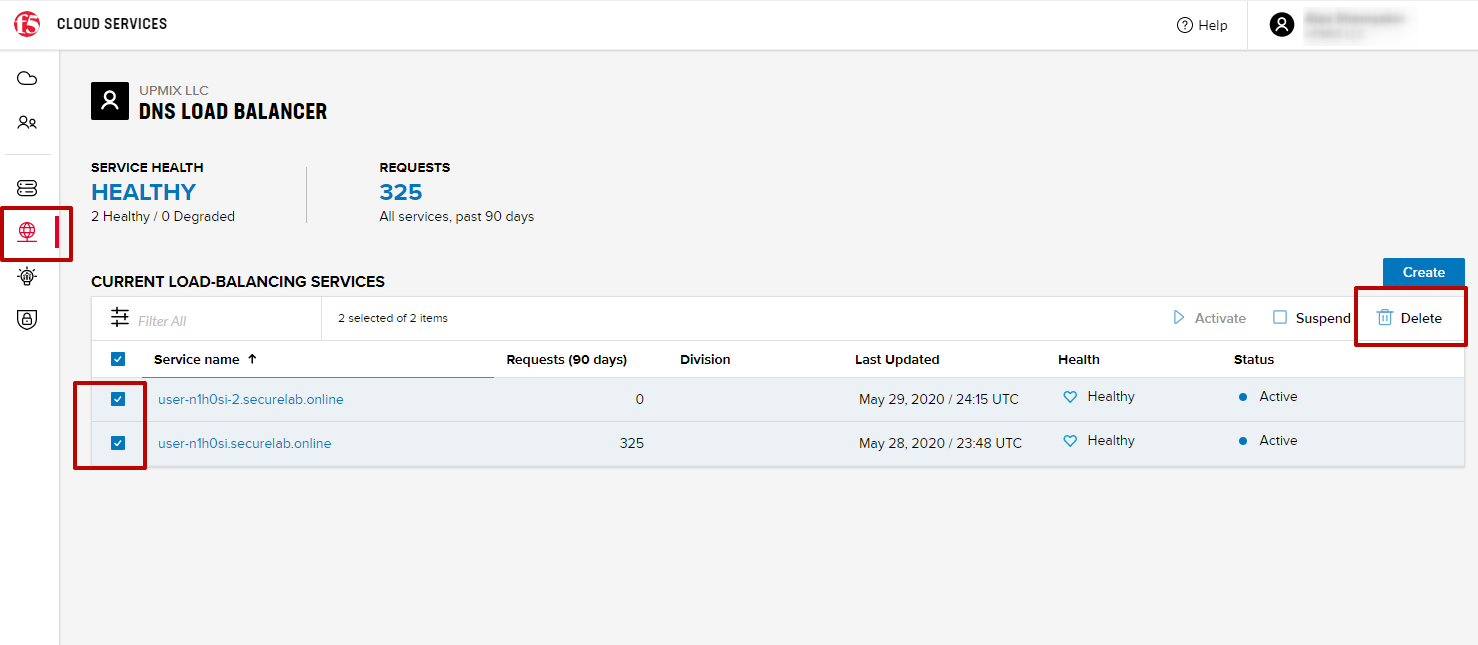
2. Tick the records and click Delete, then confirm your choice.
F5 DNS Load Balancer Cloud Service - API
1. Create DNS Load Balancer Subscription
Select the Create GSLB Subscription request and click Send to create a new service instance of DNS Load Balancer using “account_id” and “catalog_id” retrieved a few steps above.
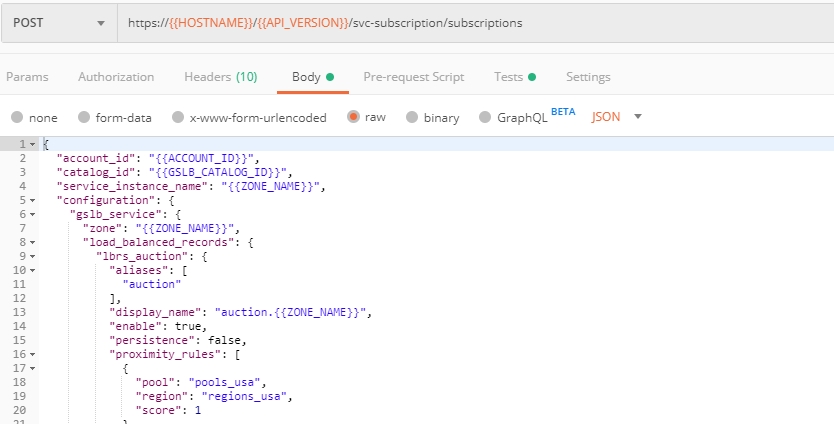
You will see “subscription_id” and created ”service_instance_id” in the body. You may also note that this request will create only NA1 endpoint for now. Some more will be created in the subsequent requests.
You may also notice that the current proximity rule is set to send traffic from: Everyone -> Americas pool. This means that only one endpoint (NA1) will be serving all requests now. We will subsequently configure proper load balancing and geoproximity rules.
The retrieved “subscription_id” is then stored for subsequent calls.
You can change its status from “DISABLED” to “ACTIVE” sending the Activate GSLB Subscription request below.
More detailed information on this API request can be found here.
2. Activate DNS Load Balancer Subscription
Select the Activate GSLB Subscription request and click Send. This will deploy DNS Load Balancer using “subscription_id” captured in one of the steps above.
You will see “active” subscription status.
More detailed information on this API request can be found here.
3. Test NA Pool
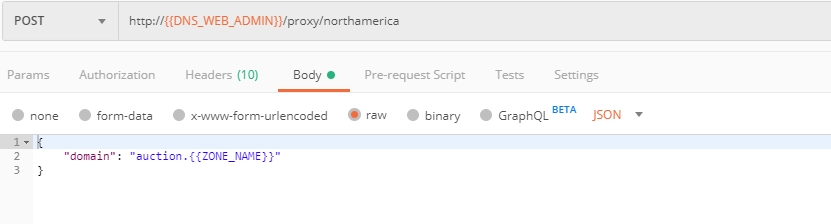
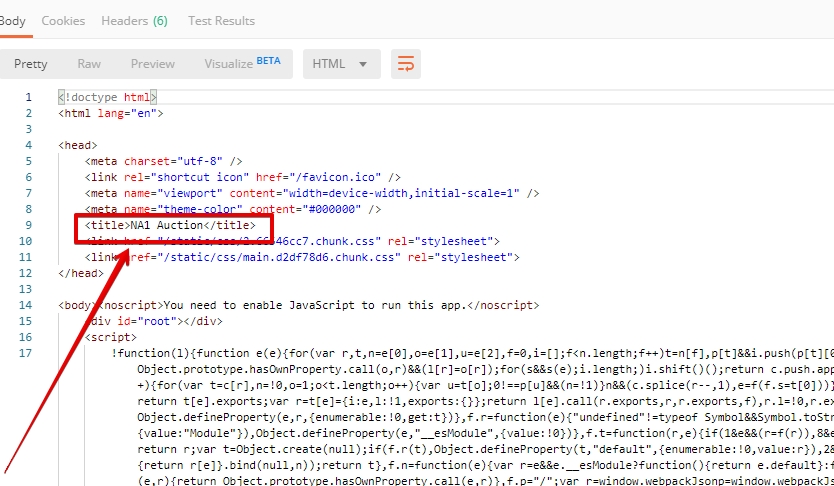
Send the Test NA Availability (lab) request to execute a call against the Lab service API, which in turn uses an external VM (located in the USA) to run a “wget” to retrieve the response from http://auction.cloudservicesdemo.net. This should show the only available instance NA1 in the HTML that is returned.
The response shows that your first instance is available:
4. Add Endpoints & Pool Members
Send the Add Endpoint & Pool Members request to add a few more endpoints for load balancing of the application. Note that three of the new endpoints (EU and NA2) are deployed on Amazon AWS, and one (NA3) is running on Microsoft Azure. NA1, NA2, and NA3 endpoints are aggregated into a pool “usa”, which demonstrates multi-cloud load balancing.
You will see all the information on the added endpoints:
5. Test Round Robin (lab)
Run the Test Round Robin (lab) request to check the response from the Lab service API to test what instance is now being returned. This should show a result different from the previous due to the newly-configured round-robin load balancing.
NOTE: it’s possible that you will still get the same endpoint in the response due to either DNS caching or 1/3 chance of the same endpoint to be pulled from the load-balance pool. Let’s try:
And check the response:
You can send the same request to check other instances.
6. Update Proximity Rule
Run the Update Proximity Rules & Regions. This adds a new region “europe”, and assigns a EU endpoint to it. It also updates the DNS Load Balancer with new proximity rules: to send the traffic originating in Europe to the “europe” pool, utilizing a higher relative score than the previous rule of routing traffic from “Anywhere” to the “usa” pool. This type of geo-proximity based routing is useful for GDPR compliance.
And you will see all the information on available pools and regions:
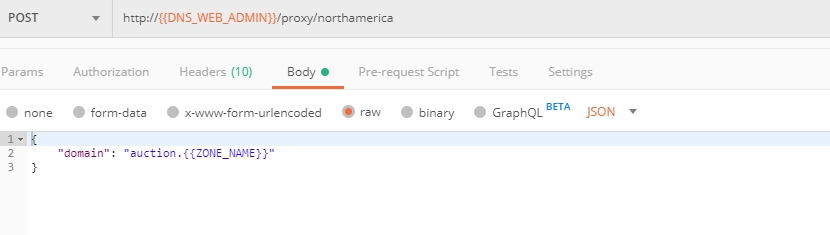
7. Test Proximity Rules (lab)
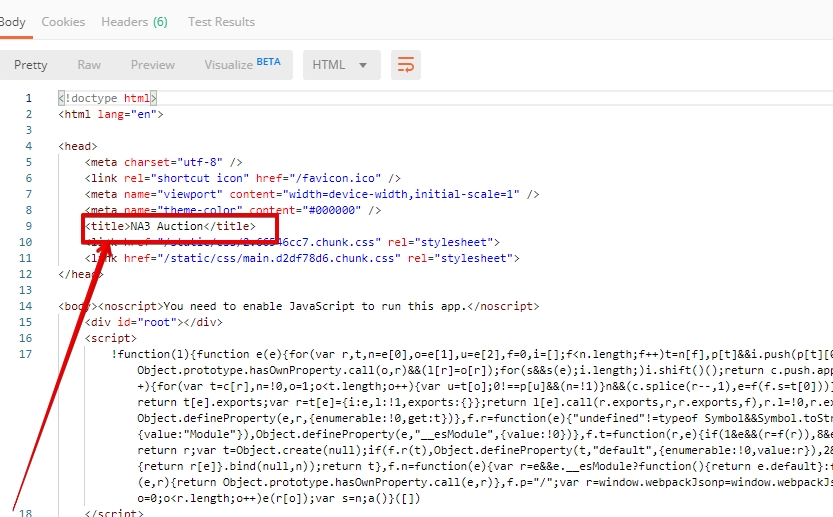
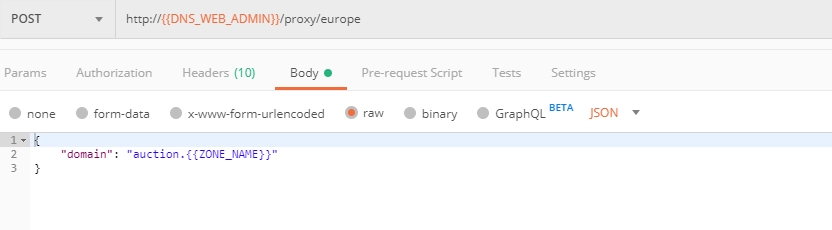
Send the Test Proximity Rules (lab) request, which uses an external VM (located in Europe) to run a “wget” to retrieve the response from http://auction.cloudservicesdemo.net. This simulates what an EU-based customer would see when opening this URL in their browser. NOTE: you can also test this in your Opera browser (using EU proxy), the way you’ve done it previously with the UI.
Here’s what you should see in the response:

8. Review the JSON
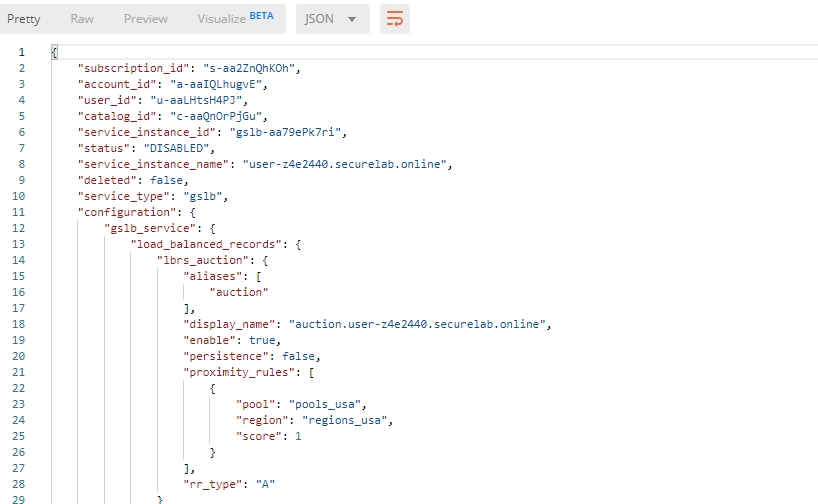
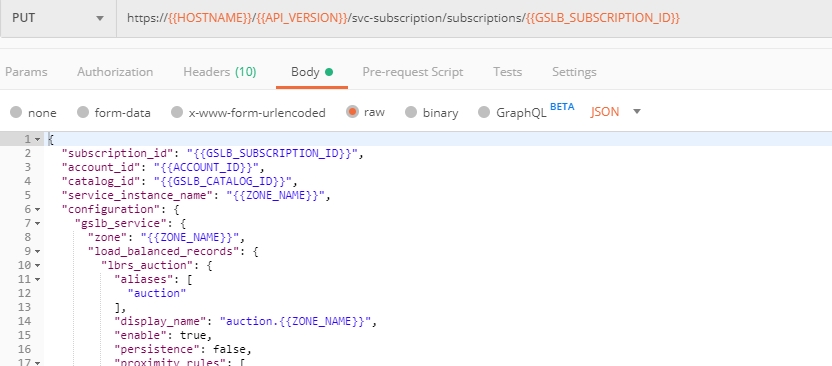
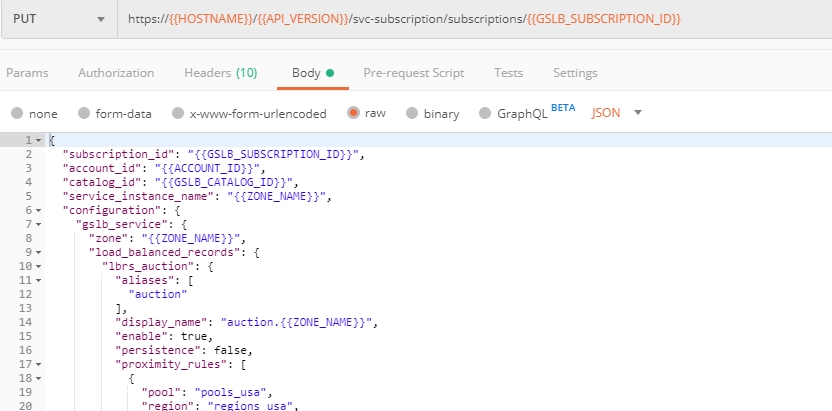
Let’s now see the structure of the JSON. In order to get the JSON, send the Get GSLB JSON request which uses your ACCESS_TOKEN to retrieve the JSON:
The response will retrieve the JSON containing all the DNS Load Balancer instance information:
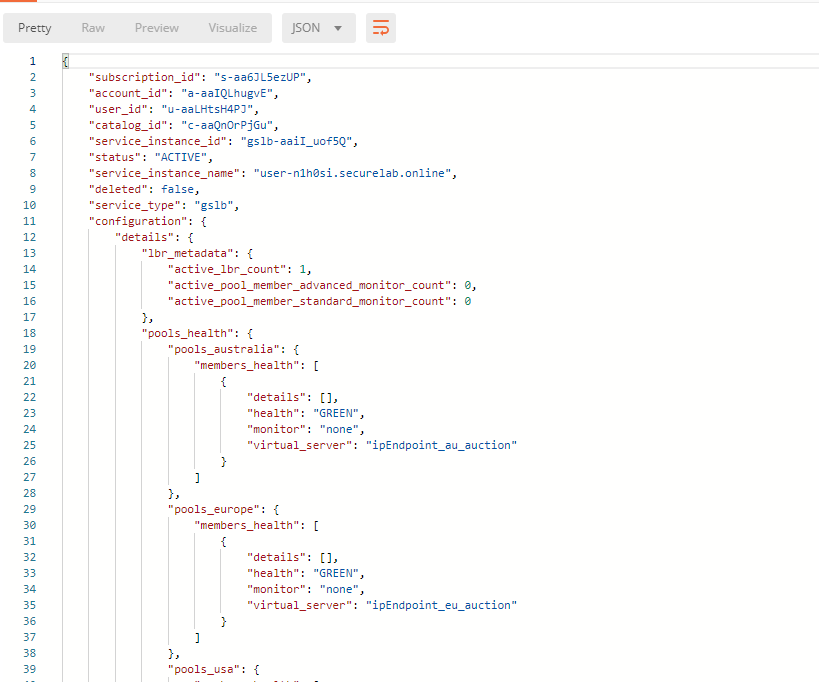
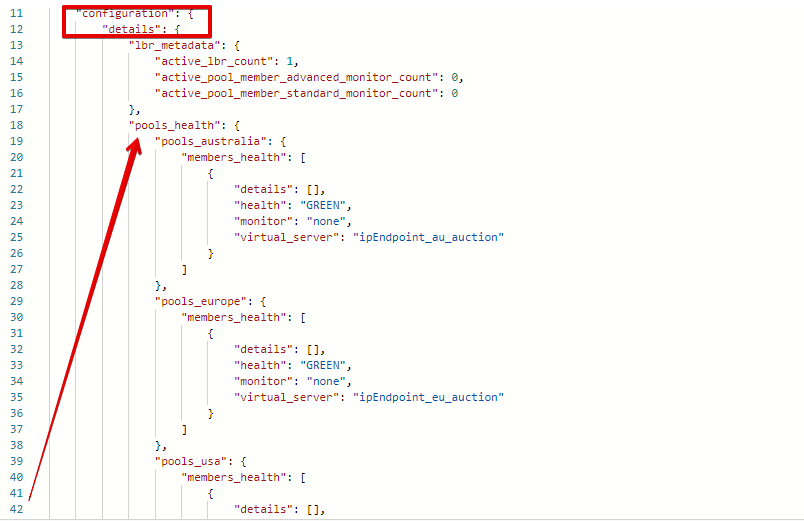
As you can see, the JSON provides some general information on subcription_id, user_id, and instance name, as well as all configuration details. The configuration section “details” includes information on “pools_health”:
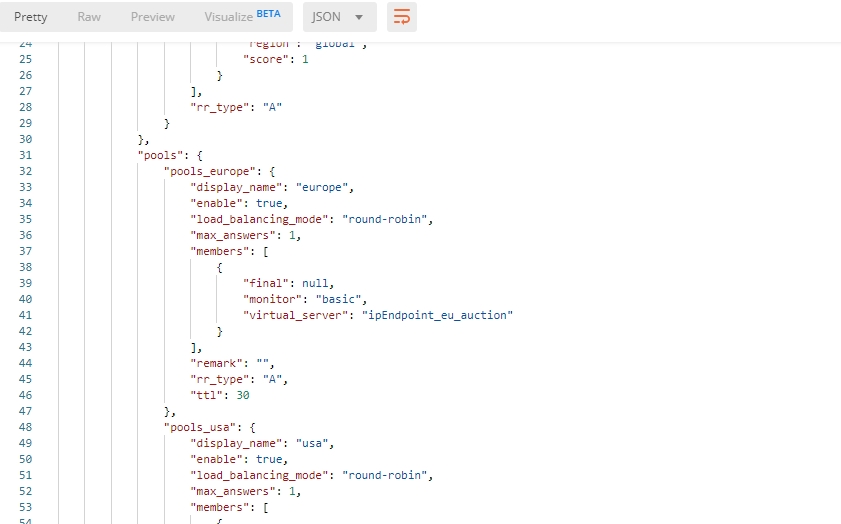
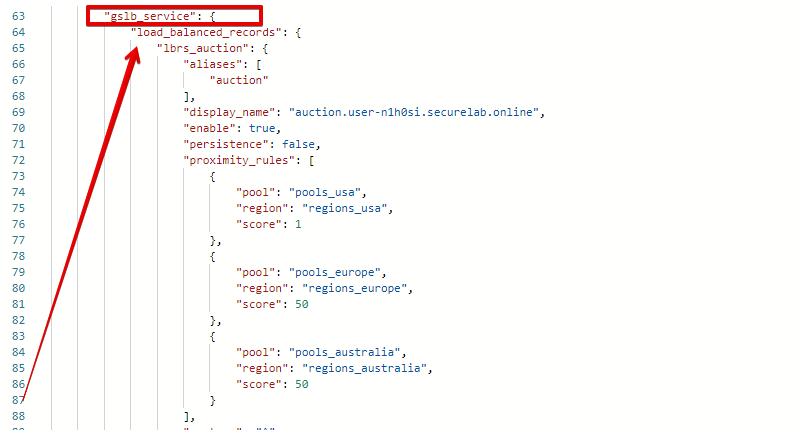
The next configuration section is “gslb_service” which contains “load_balanced_records” with their “name” and “proximity_rules”:
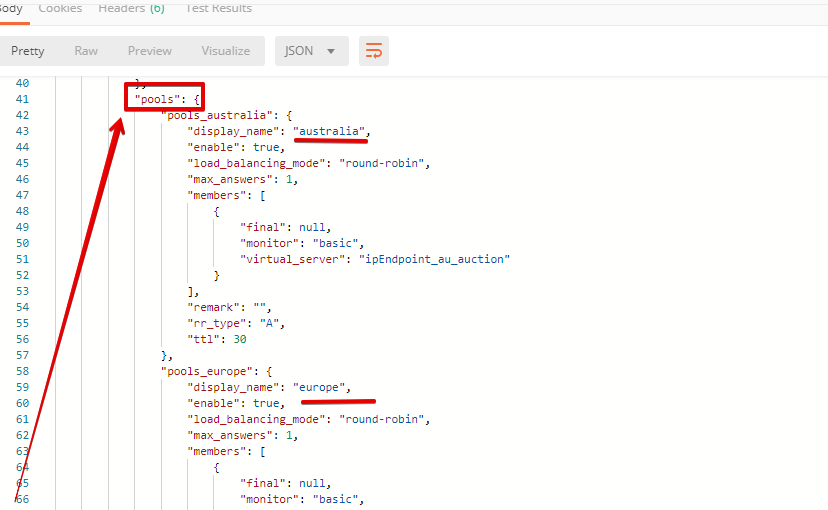
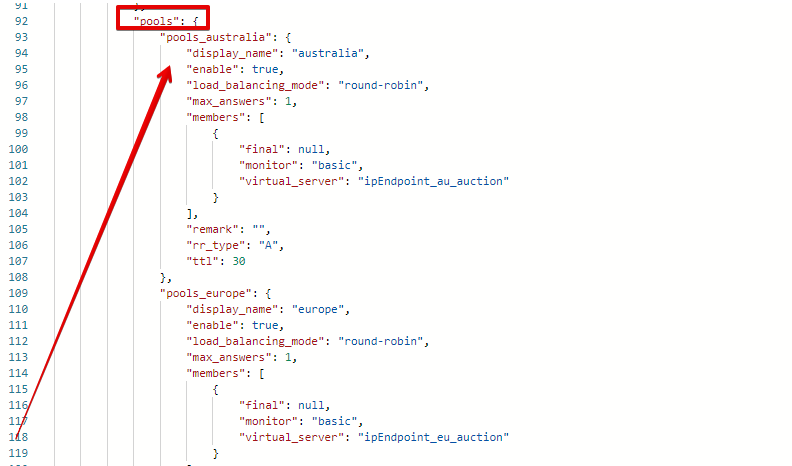
It also includes “pools” section with their “name”, “load_balancing_mode” and “members”:
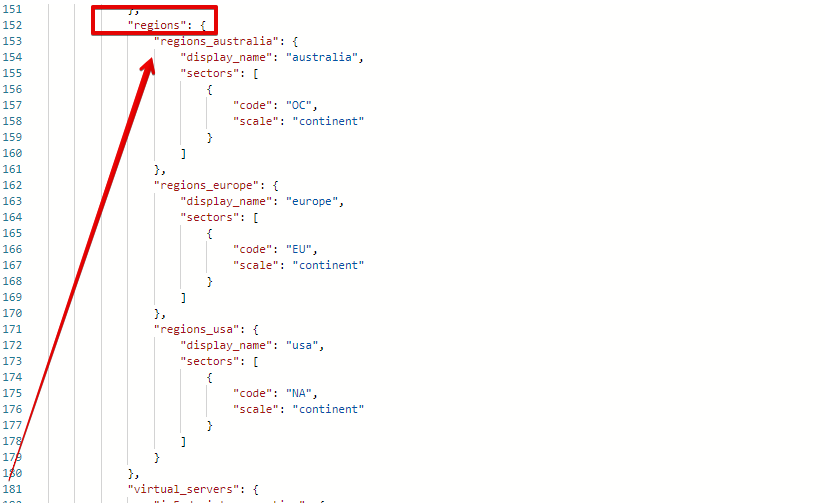
One more section is “regions” which includes information on region “names” and “sectors”:
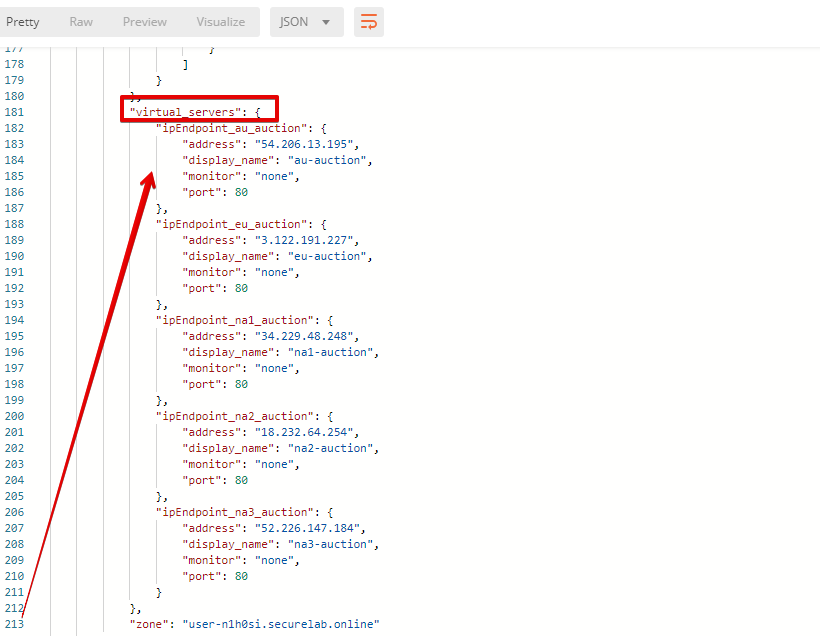
And another section provides information on “virtual_servers”: their IP endpoints, addresses, names, monitors and ports:
9. Delete DNS Load Balancer Service
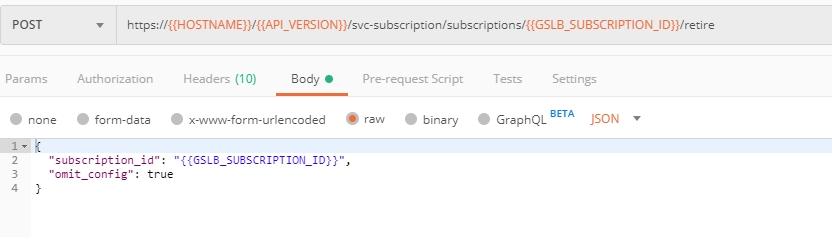
Send the Retire GSLB Subscription request which uses the relevant “subscription_id”.
You will see “retired” status in the response body which means that it’s not available on the F5 Cloud Services portal anymore.
Clean Up
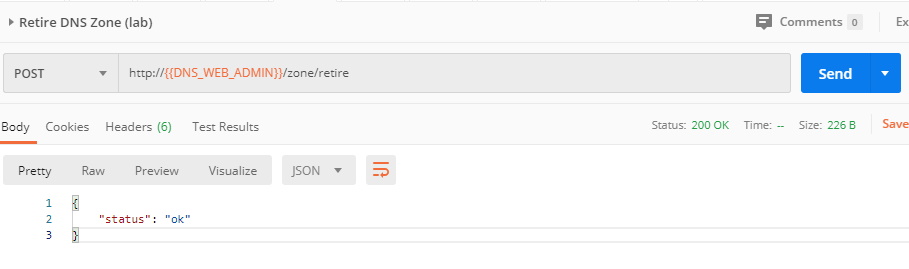
Send the Retire DNS Zone to remove or reset zone file. You will get response with status code “200 OK”.
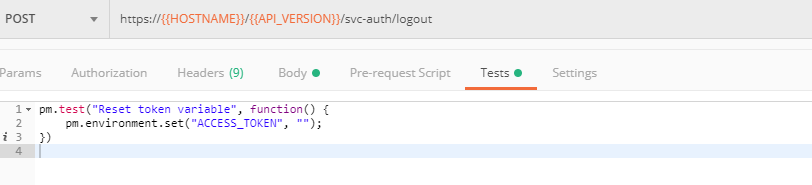
We recommend that you clear your tokens from the Lab Service API for security purposes. In order to do that, send the Logout request, which uses your ACCESS_TOKEN:
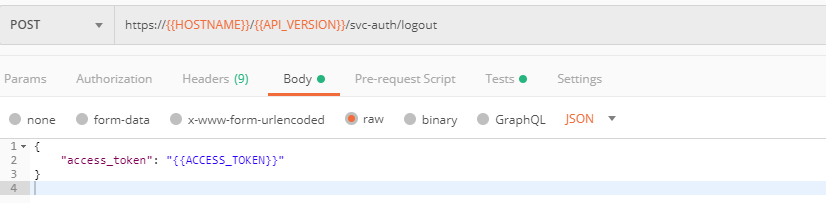
You will get the following response with the status showing “200 OK”:

Your ACCESS_TOKEN will be considered invalid: